This article builds upon our first article Introduction to Network Security - Part 1. This article is split into 5 pages and covers a variety of topics including:
- Tools and Attacker Uses
- General Network Tools
- Exploits
- Port Scanners
- Network Sniffers
- Vulnerability Scanners
- Password Crackers
- What is Penetration Testing
- More Tools
- Common Exploits
- A Brief Walk-through of an Attack
- and more.
Tools An Attacker Uses
Now that we've concluded a brief introduction to the types of threats faced by both home users and the enterprise, it is time to have a look at some of the tools that attackers use.
Keep in mind that a lot of these tools have legitimate purposes and are very useful to administrators as well. For example I can use a network sniffer to diagnose a low level network problem or I can use it to collect your password. It just depends which shade of hat I choose to wear.
General Network Tools
As surprising as it might sound, some of the most powerful tools especially in the beginning stages of an attack are the regular network tools available with most operating systems. For example and attacker will usually query the 'whois' databases for information on the target. After that he might use 'nslookup' to see if he can transfer the whole contents of their DNS zone (called a zone transfer -- big surprise !!). This will let him identify high profile targets such as webservers, mailservers, dns servers etc. He might also be able to figure what different systems do based on their dns name -- for example sqlserver.victim.com would most likely be a database server. Other important tools include traceroute to map the network and ping to check which hosts are alive. You should make sure your firewall blocks ping requests and traceroute packets.
Exploits
An exploit is a generic term for the code that actually 'exploits' a vulnerability in a system. The exploit can be a script that causes the target machine to crash in a controlled manner (eg: a buffer overflow) or it could be a program that takes advantage of a misconfiguration.
A 0-day exploit is an exploit that is unknown to the security community as a whole. Since most vulnerabilities are patched within 24 hours, 0-day exploits are the ones that the vendor has not yet released a patch for. Attackers keep large collections of exploits for different systems and different services, so when they attack a network, they find a host running a vulnerable version of some service and then use the relevant exploit.
Port Scanners
Most of you will know what portscanners are. Any system that offers TCP or UDP services will have an open port for that service. For example if you're serving up webpages, you'll likely have TCP port 80 open, FTP is TCP port 20/21, Telnet is TCP 23, SNMP is UDP port 161 and so on.
A portscanner scans a host or a range of hosts to determine what ports are open and what service is running on them. This tells the attacker which systems can be attacked.
For example, if I scan a webserver and find that port 80 is running an old webserver -- IIS/4.0, I can target this system with my collection of exploits for IIS 4. Usually the port scanning will be conducted at the start of the attack, to determine which hosts are interesting.
This is when the attacker is still footprinting the network -- feeling his way around to get an idea of what type of services are offered and what Operating Systems are in use etc. One of the best portscanners around is Nmap (https://www.insecure.org/nmap). Nmap runs on just about every operating system is very versatile in how it lets you scan a system and has many features including OS fingerprinting, service version scanning and stealth scanning. Another popular scanner is Superscan (https://www.foundstone.com) which is only for the windows platform.
Network Sniffers
A network sniffer puts the computers NIC (network interface card or LAN card) into 'promiscuous mode'. In this mode, the NIC picks up all the traffic on its subnet regardless of whether it was meant for it or not. Attackers set up sniffers so that they can capture all the network traffic and pull out logins and passwords. The most popular network sniffer is TCPdump as it can be run from the command line -- which is usually the level of access a remote attacker will get. Other popular sniffers are Iris and Ethereal.
When the target network is a switched environment (a network which uses layer 2 switches), a conventional network scanner will not be of any use. For such cases, the switched network sniffer Ettercap (http://ettercap.sourceforge.net) and WireShark (https://www.wireshark.org) are very popular. Such programs are usually run with other hacking capable applications that allow the attacker to collect passwords, hijack sessions, modify ongoing connections and kill connections. Such programs can even sniff secured communications like SSL (used for secure webpages) and SSH1 (Secure Shell - a remote access service like telnet, but encrypted).
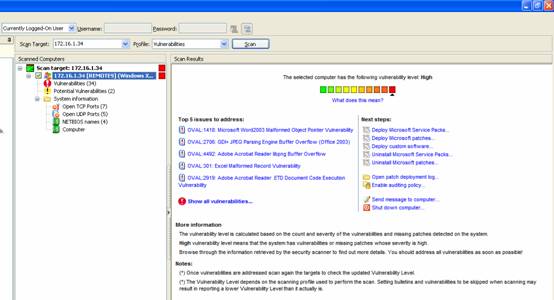
Vulnerability Scanners
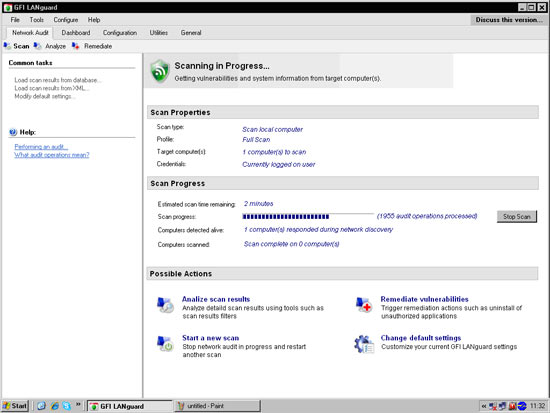
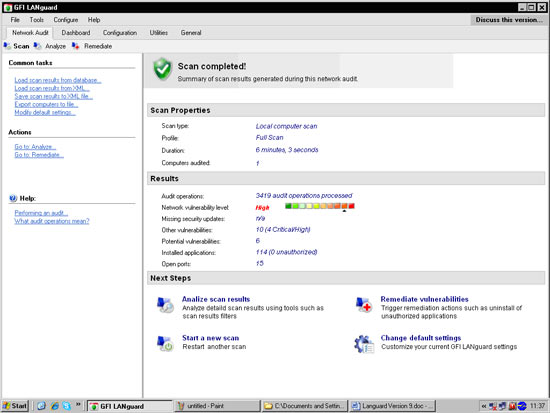
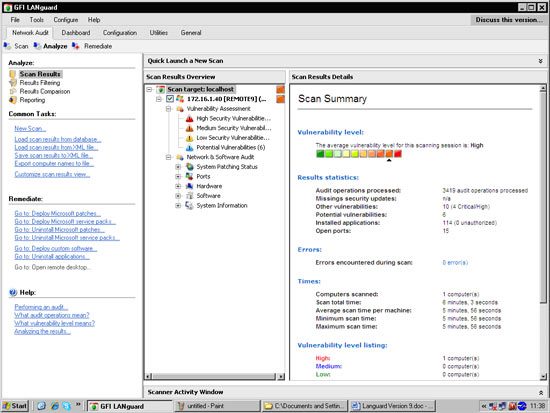
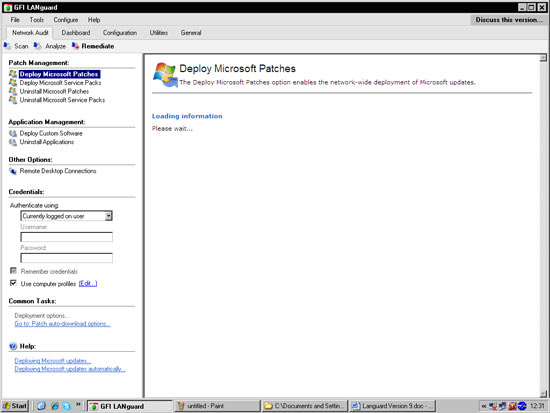
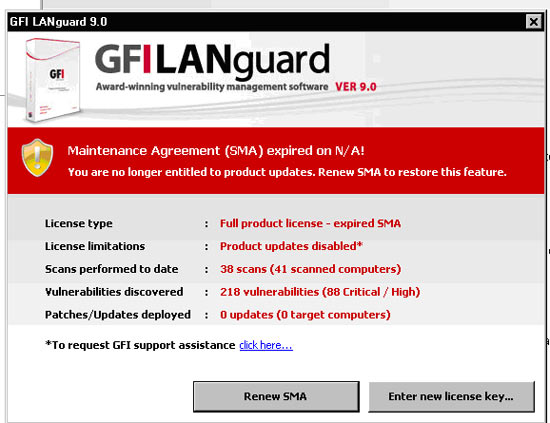
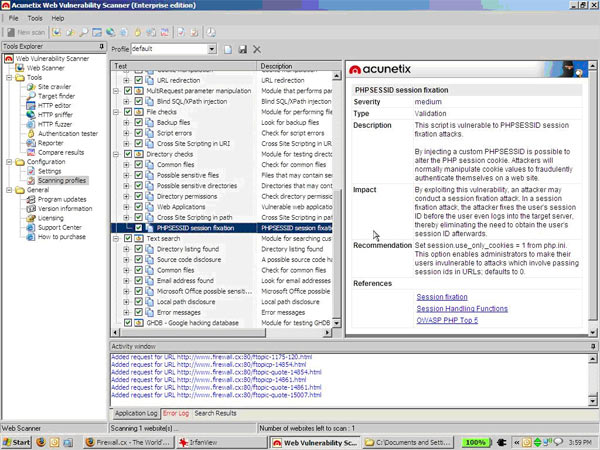
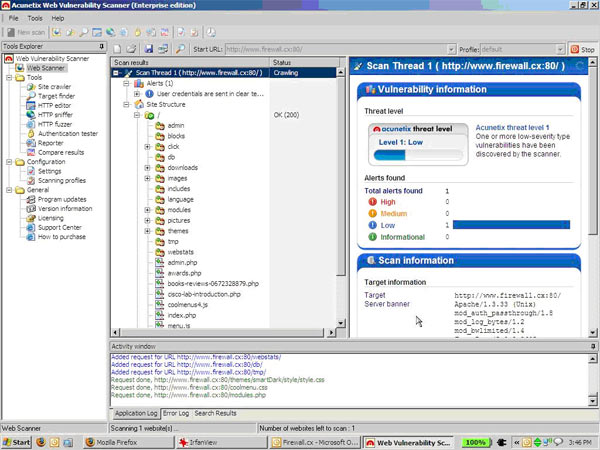
A vulnerability scanner is like a portscanner on steroids, once it has identified which services are running, it checks the system against a large database of known vulnerabilities and then prepares a report on what security holes are found. The software can be updated to scan for the latest security holes. These tools are very simple to use unfortunately, so many script kiddies simply point them at a target machine to find out what they can attack. The most popular ones are Retina (http://www.eeye.com), Nessus (http://www.nessus.org) and GFI LanScan (http://www.gfi.com). These are very useful tools for admins as well as they can scan their whole network and get a detailed summary of what holes exist.
Password Crackers
Once an attacker has gained some level of access, he/she usually goes after the password file on the relevant machine. In UNIX like systems this is the /etc/passwd or /etc/shadow file and in Windows it is the SAM database. Once he gets hold of this file, its usually game over, he runs it through a password cracker that will usually guarantee him further access. Running a password cracker against your own password files can be a scary and enlightening experience. L0phtcrack cracked my old password fR7x!5kK after being left on for just one night !
There are essentially two methods of password cracking :
Dictionary Mode - In this mode, the attacker feeds the cracker a word list of common passwords such as 'abc123' or 'password'. The cracker will try each of these passwords and note where it gets a match. This mode is useful when the attacker knows something about the target. Say I know that the passwords for the servers in your business are the names of Greek Gods (yes Chris, that's a shout-out to you ;)) I can find a dictionary list of Greek God names and run it through the password cracker.
Most attackers have a large collection of wordlists. For example when I do penetration testing work, I usually use common password lists, Indian name lists and a couple of customized lists based on what I know about the company (usually data I pick up from their company website). Many people think that adding on a couple of numbers at the start or end of a password (for example 'superman99') makes the password very difficult to crack. This is a myth as most password crackers have the option of adding numbers to the end of words from the wordlist. While it may take the attacker 30 minutes more to crack your password, it does not make it much more secure.
Brute Force Mode - In this mode, the password cracker will try every possible combination for the password. In other words it will try aaaaa, aaaab, aaaac, aaaad etc. this method will crack every possible password -- its just a matter of how long it takes. It can turn up surprising results because of the power of modern computers. A 5-6 character alphanumeric password is crackable within a matter of a few hours or maybe a few days, depending on the speed of the software and machine. Powerful crackers include l0phtcrack for windows passwords and John the Ripper for UNIX style passwords.
For each category, I have listed one or two tools as an example. At the end of this article I will present a more detailed list of tools with descriptions and possible uses.
What is Penetration-Testing?
Penetration testing is basically when you hire (or perform yourself) security consultants to attack your network the way an attacker would do it, and report the results to you enumerating what holes were found, and how to fix them. It's basically breaking into your own network to see how others would do it.
While many admins like to run quick probes and port scans on their systems, this is not a penetration test -- a penetration tester will use a variety of specialised methods and tools from the underground to attempt to gain access to the network. Depending on what level of testing you have asked for, the tester may even go so far as to call up employees and try to social engineer their passwords out of them (social engineering involves fooling a mark into revealing information they should not reveal).
An example of social engineering could be an attacker pretending to be someone from the IT department and asking a user to reset his password. Penetration testing is probably the only honest way to figure out what security problems your network faces. It can be done by an administrator who is security aware, but it is usually better to pay an outside consultant who will do a more thorough job.
I find there's a lack of worthwhile information online about penetration testing -- nobody really goes about describing a good pen test, and what you should and shouldn't do. So I've hand picked a couple of good papers on the subject and then given you a list of my favourite tools, and the way I like to do things in a pen-test.
This is by no means the only way to do things, it's like subnetting -- everyone has their own method -- this is just a systematic approach that works very well as a set of guidelines. Depending on how much information you are given about the targets as well as what level of testing you're allowed to do, this method can be adapted.
Papers Covering Penetration Testing
I consider the following works essential reading for anyone who is interested in performing pen-tests, whether for yourself or if you're planning a career in security:
'Penetration Testing Methodology - For Fun And Profit' - Efrain Tores and LoNoise, you can google for this paper and find it.
'An Approach To Systematic Network Auditing' - Mixter (http://mixter.void.ru)
'Penetration Testing - The Third Party Hacker' - Jessica Lowery. Boy is this ever a good paper ! (https://www.sans.org/rr/papers/index.php?id=264)
'Penetration Testing - Technical Overview' - Timothy P. Layton Sr. also from the www.sans.org (https://www.sans.org) reading room
Pen-test Setup
I don't like working from laptops unless its absolutely imperative, like when you have to do a test from the inside. For the external tests I use a Windows XP machine with Cygwin (www.cygwin.com) and VMware (www.vmware.com) most linux exploits compile fine under cygwin, if they don't then I shove them into vmware where I have virtual machines of Red Hat, Mandrake and Win2k boxes. In case that doesnt work, the system also dual boots Red Hat 9 and often I'll just work everything out from there.
I feel the advantage of using a microsoft platform often comes from the fact that 90% of your targets may be microsoft systems. However the flexibility under linux is incomparable, it is truely the OS of choice for any serious hacker.. and as a result, for any serious security professional. There is no best O/S for penetration testing -- it depends on what you need to test at a point in time. That's one of the main reasons for having so many different operating systems set up, because you're very likely to be switching between them for different tasks.
If I don't have the option of using my own machine, I like to choose any linux variant.
I keep my pen-tests strictly to the network level, there is no social engineering involved or any real physical access testing other than basic server room security and workstation lockdown (I don't go diving in dumpsters for passwords or scamming employees).
I try as far as possible to determine the Rules Of Engagement with an admin or some other technically adept person with the right authorisation, not a corporate type. This is very important because if you do something that ends up causing trouble on the network, its going to make you look very unprofessional. It's always better to have it done clearly in writing -- this is what you are allowed to do.
I would recommend this even if you're an admin conducting an in-house test. You can get fired just for scanning your own network if its against your corporate policy. If you're an outside tester, offer to allow one of their people to be present for your testing if they want. This is recommended as they will ultimately be fixing most of these problems and being in-house people they will be able to put the results of the test in perspective to the managers.
Tools
I start by visiting the target website, running a whois, DNS zone transfer (if possible) and other regular techniques which are used to gather as much network and generic information about the target. I also like to pick up names and email addresses of important people in the company -- the CEO, technical contacts etc. You can even run a search in the newsgroups for @victim.com to see all the public news postings they have made. This is useful as a lot of admins frequent bulletin boards for help. All this information goes into a textfile. Keeping notes is critically important, it's very easy to forget some minor detail that you should include in your end report.
Now for a part of the arsenal -- not in any order and far from the complete list.
Nmap - Mine (and everyone elses) workhorse port scanner with version scanning, multiple scan types, OS fingerprinting and firewall evasion tricks. When used smartly, Nmap can find any Internet facing host on a network.
Nessus - My favourite free vulnerability scanner, usually finds something on every host. Its not too stealthy though and will show up in logs (this is something I don't have to worry about too much).
Retina - A very good commercial vulnerability scanner, I stopped using this after I started with nessus but its very very quick and good. Plus its vulnerability database is very up-to-date.
Nikto - This is a webserver vulnerability scanner. I use my own hacked up version of this perl program which uses the libwhisker module. It has quite a few IDS evasion modes and is pretty fast. It is not that subtle though, which is why I modified it to be a bit more stealthy.
Cisco Scanner - This is a small little windows util I found that scans IP ranges for routers with the default password of 'cisco'. It has turned up some surprising results in the past and just goes to show how even small little tools can be very useful. I am planning to write a little script that will scan IP ranges looking for different types of equipment with default passwords.
Sophie Script - A little perl script coupled with user2sid and sid2user (two windows programs) which can find all the usernames on a windows machine.
Legion - This is a windows file share scanner by the erstwhile Rhino9 security group. It is fast as hell and allows you to map the drive right from in the software.
Pwdump2 - Dumps the content of the windows password sam file for loading into a password cracker.
L0phtcrack 3.0 - Cracks the passwords I get from the above or from its own internal SAM dump. It can also sniff the network for password hashes or obtain them via remote registry. I have not tried the latest version of the software, but it is very highly rated.
Netcat - This is a TCP/UDP connection backend tool, oh boy I am lost without this ! Half my scripts rely on it. There is also an encrypted version called cryptcat which might be useful if you are walking around an IDS. Netcat can do anything with a TCP or UDP connection and it serves as my replacement to telnet as well.
Hping2 - A custom packet creation utility, great for testing firewall rules among other things.
SuperScan - This is a windows based port scanner with a lot of nice options. Its fast, and has a lot of other neat little tools like NetBIOS enumeration and common tools such as whois, zone transfers etc.
Ettercap - When sniffing a switched network, a conventional network sniffer will not work. Ettercap poisons the ARP cache of the hosts you want to sniff so that they send packets to you and you can sniff them. It also allows you to inject data into connections and kill connections among other things.
Brutus - This is a fairly generic protocol brute forcing tool. It can bruteforce HTTP, FTP, Telnet and many other login authentication systems. This is a windows tool, however I prefer Hydra for linux.
Bunch of Common Exploits Effeciently Sorted
This is my collection of exploits in source and binary form. I sort them in subdirectories by operating system, then depending on how they attack - Remote / Local and then according to what they attack - BIND / SMTP / HTTP / FTP / SSH etc etc. The binary filenames are arbitrary but the source filenames instantly tell me the name of the exploit and the version of the software vulnerable.
This is essential when you're short on time and you need to 'pick one'. I don't include DoS or DDoS exploits, there is nobody I know who would authorise you to take down a production system. Don't do it -- and tell them you arent doing it.. and only if they plead with you should you do it.
Presenting Reports
This is the critical part -- it's about presenting what you found to people who probably don't understand a word of what your job is about other than you're costing them money. You have to show them that there are some security problems in your network, and this is how serious they might be.
A lot of people end the pen-test after the scanning stage. Unless someone specifically tells me to do this, I believe it is important you exploit the system to at least level 1. This is important because there is a very big difference in saying something is vulnerable and actually seeing that the vulnerability is executable. Not to mention when dealing with a corporate type, seeing 'I gained access to the server' usually gets more attention than 'the server is vulnerable to blah blah'.
After you're done, make a VERY detailed chronological report of everything you did, including which tools you used, what version they are, and anything else you did without using tools (eg. SQL injection). Give gory technical details in annexes -- make sure the main document has an executive summary and lots of pie charts that they can understand. Try and include figures and statistics for whatever you can.
To cater to the admins, provide a report for each host you tested and make sure that for every security hole you point out, you provide a link to a site with a patch or fix, . Try to provide a link to a site with detailed information about the hole preferably bugtraq or some well known source -- many admins are very interested in these things and appreciate it.
A Brief Walk-through of an Attack
This is an account of how an attacker in the real world might go about trying to exploit your system. There is no fixed way to attack a system, but a large number will follow the similar methodology or at least the chain of events.
This section assumes that the attacker is moderately skilled and moderately motivated to breaking into your network. He/She has targeted you due to a specific motive -- perhaps you sacked them, or didn't provide adequate customer support (D-link India are you listening ? ;)). Hopefully this will help you figure out where your network might be attacked, and what an attacker might do once they are on the inside.
Remember that attackers will usually choose the simplest way to get into the network. The path of least resistance principle always applies.
Reconnaissance & Footprinting
Here the attacker will try to gather as much information about your company and network as they can without making a noise. They will first use legitimate channels, such as google and your company webpage to find out as much about you as they can. They will look for the following information:
• Technical information is a goldmine, things like a webpage to help your employees log in from home will be priceless information to them. So also will newsgroup postings by your IT department asking how to set up particular software, as they now know that you use this software and perhaps they know of a vulnerability in it.
• Personal information about the company and its corporate structure. They will want information on the heads of IT departments, the CEO and other people who have a lot of power. They can use this information to forge email, or social engineer information out of subordinates.
• Information about your partners. This might be useful information for them if they know you have some sort of network connection to a supplier or partner. They can then include the supplier's systems in their attack, and find a way in to your network from there.
• General news. This can be useful information to an attacker as well. If your website says that it is going down for maintenance for some days because you are changing your web server, it might be a clue that the new setup will be in its teething stages and the admins may not have secured it fully yet.
They will also query the whois databases to find out what block of IP addresses you own. This will give them a general idea of where to start their network level scans.
After this they will start a series of network probes. The most basic of which will be to determine if you have a firewall, and what it protects. They will try and identify any systems you have that are accessible from the Internet.
The most important targets will be the ones that provide public services. These will be :
• Webservers - usually the front door into the network. All webserver software has some bugs in it, and if you're running home made CGI scripts such as login pages etc, they might be vulnerable to techniques such as SQL injection.
• Mail servers - Sendmail is very popular and most versions have at least one serious vulnerability in them. Many IT heads don't like to take down the mail server for maintenance as doing without it is very frustrating for the rest of the company (especially when the CEO doesn't get his mail).
• DNS servers - Many implementations of BIND are vulnerable to serious attacks. The DNS server can be used as a base for other attacks, such as redirecting users to other websites etc.
• Network infrastructure - Routers and switches may not have been properly secured and may have default passwords or a web administration interface running. Once controlled they can be used for anything from a simple Denial of Service attack by messing up their configurations, to channeling all your data through the attackers machine to a sniffer.
• Database servers - Many database servers have the default sa account password blank and other common misconfigurations. These are very high profile targets as the criminal might be looking to steal anything from your customer list to credit card numbers. As a rule, a database server should never be Internet facing.
The more naive of the lot (or the ones who know that security logs are never looked at) may run a commercial vulnerability scanner such as nessus or retina over the network. This will ease their work.
Exploitation Phase
After determining which are valid targets and figuring out what OS and version of software they are using (example which version of Apache or IIS is the web server running), the attacker can look for an exploit targeting that particular version. For example if they find you are running an out of date version of Sendmail, they will look for an exploit targeting that version or below.
They will first look in their collection of exploits because they have tested these. If they cannot find one, they will look to public repositories such as https://www.packetstormsecurity.nl. They will probably try to choose common exploits as these are more likely to work and they can probably test them in their own lab.
From here they have already won half the game as they are behind the firewall and can probably see a lot more of the internal network than you ever intended for them to. Many networks tend to be very hard to penetrate from the outside, but are woefully unprotected internally. This hard exterior with a mushy interior is a recipe for trouble -- an attacker who penetrates the first line of defense will have the full run of your network.
After getting in, they will also probably install backdoors on this first compromised system to provide them with many ways in, in case their original hole gets shut down. This is why when you identify a machine that was broken into, it should be built up again from scratch as there is no way of knowing what kind of backdoors might be installed. It could be tricky to find a program that runs itself from 2:00AM to 4:00AM every night and tries to connect to the attackers machine. Once they have successfully guaranteed their access, the harder part of the intrusion is usually over.
Privilege Escalation Phase
Now the attacker will attempt to increase his security clearance on the network. He/She will usually target the administrator accounts or perhaps a CEO's account. If they are focused on a specific target (say your database server) they will look for the credentials of anyone with access to that resource. They will most likely set up a network sniffer to capture all the packets as they go through the network.
They will also start manually hunting around for documents that will give them some interesting information or leverage. Thus any sensitive documents should be encrypted or stored on systems with no connection to the network. This will be the time they use to explore your internal network.
They will look for windows machines with file sharing enabled and see what they can get out of these. Chances are if they didn't come in with a particular objective in mind (for example stealing a database), they will take whatever information they deem to be useful in some way.
Clean Up Phase
Now the attacker has either found what they were looking for, or are satisfied with the level of access they have. They have made sure that they have multiple paths into the network in case you close the first hole. They will now try to cover up any trace of an intrusion. They will manually edit log files to remove entries about them and will make sure they hide any programs they have installed in hard to find places.
Remember, we are dealing with an intruder who is moderately skilled and is not just interested in defacing your website. They know that the only way to keep access will be if you never know something is amiss. In the event that there is a log they are unable to clean up, they may either take a risk leaving it there, or flood the log with bogus attacks, making it difficult for you to single out the real attack.
Where Can I Find More Information?
Without obviously plugging our site too much, the best place for answers to questions relating to this article is in our forums. The Security/Firewalls Forum is the best place to do this -- so you can ask anything from the most basic to the most advanced questions concerning network security there. A lot of common questions have already been answered in the forums, so you will quite likely find answers to questions like 'Which firewall should I use ?'.
As far as off-site resources are concerned, network security is a very vast field and there is seemingly limitless information on the subject. You will never find information at so-called hacker sites full of programs. The best way to learn about network security is to deal with the first word first -- you should be able to talk networking in and out, from packet header to checksum, layer 1 to layer 7.
Once you've got that down, you should start on the security aspect. Start by reading a lot of the papers on the net. Take in the basics first, and make sure you keep reading. Wherever possible, try to experiment with what you have read. If you don't have a home lab, you can build one 'virtually'. See the posts in the Cool Software forum about VMware.
Also, start reading the security mailing lists such as bugtraq and security-basics. Initially you may find yourself unable to understand a lot of what happens there, but the newest vulnerabilities are always announced on these lists. If you follow a vulnerability from the time its discovered to when someone posts an exploit for it, you'll get a very good idea of how the security community works.. and you'll also learn a hell of a lot in the process.
If you're serious about security, it is imperative that you learn a programming language, or at least are able to understand code if not write your own. The best choices are C and assembly language. However knowing PERL and Python are also valuable skills as you can write programs in these languages very quickly.
For now, here are a few links that you can follow for more information:
www.securityfocus.com - A very good site with all the latest news, a very good library and tools collection as well as sections dedicated to basics, intrusion detection, penetration testing etc. Also home of the Bugtraq mailing list.
www.sans.org - A site with excellent resources in its reading room, people who submit papers there are trying for a certification and as a result its mostly original material and of a very high calibre.
www.security-portal.com - A good general security site.
www.cert.org - The CERT coordination center provides updates on the latest threats and how to deal with them. Also has very good best practice tips for admins.
www.securityfocus.com/archive/1 - This is the link to Bugtraq, the best full disclosure security mailing list on the net. Here all the latest vulnerabilities get discussed way before you see them being exploited or in the press.
www.insecure.org - The mailing lists section has copies of bugtraq, full disclosure, security-basics, security-news etc etc. Also the home of nMap, the wonderful port scanner.
seclists.org - This is a direct link to the security lists section of insecure.org.
www.grc.com - For windows home users and newbies just interested in a non technical site. The site is home to Shields Up, which can test your home connection for file sharing vulnerabilities, do a port scan etc, all online. It can be a slightly melodramatic site at times though.
www.eeye.com - Home of the Retina Security Scanner. Considered the industry leader. The E-Eye team also works on a lot of the latest vulnerabilities for the windows platform.
www.nessus.org - Open source vulnerability scanner, and IMNSHO the best one going. If you're a tiger team penetration tester and you don't point nessus at a target, you're either really bad at your job or have a very large ego. If there's a vulnerability in a system, nessus will find it.
www.zonelabs.com - ZoneAlarm personal firewall for windows, considered the best, and also the market leader.
www.sygate.com - Sygate Personal Firewall, provides more configuration options than ZoneAlarm, but is consequently harder to use.
www.secinf.net - Huge selection of articles that are basically windows security related.
www.searchsecurity.com - A techtarget site which you should sign up for, very good info. Chris writes for searchnetworking.com its sister site.. I don't think the references could be much better.
www.antioffline.com - A very good library section on buffer overflows etc.
www.packetstormsecurity.nl - The largest selection of tools and exploits possible.
Conclusion
This 5-page article should serve as a simple introduction to network security. The field itself is too massive to cover in any sort of article, and the amount of cutting edge research that goes on really defies comprehension.
Some of the most intelligent minds work in the security field because it can be a very challenging and stimulating environment. If you like to think out-of-the-box and are the sort of person willing to devote large amounts of your time to reading and questioning why things happen in a particular way, security might be a decent career option for you.
Even if you're not interested in it as a career option, every admin should be aware of the threats and the solutions. Remember, you have to think like them to stop them !
If you're interested in network security, we highly recommend you read through the networking and firewall sections of this website. Going through the whole site will be some of the most enlightening time you'll ever spend online.
If you're looking for a quick fix, here are a few of the more important areas that you might want to cover:
Introduction to Networking
Introduction to Firewalls
Introduction to Network Address Translation (NAT)
Denial Of Service (DoS) Attacks
Locking down Windows networks
Introduction to Network Protocols
Also check out our downloads section where you will find lots of very good security and general networking tools.
We plan on putting up a lot of other security articles in the near future. Some will be basic and introductory like this one, while some may deal with very technical research or techniques.
As always feel free to give us feedback and constructive criticism. All flames however will be directed to /dev/null ;)

 Windows Servers stand as prime targets for hackers and malicious actors due to their widespread usage and historical vulnerabilities. These systems often serve as the backbone for critical business operations, housing sensitive data and facilitating essential services. However, their prevalence also makes them vulnerable to cyber threats, including ransomware attacks, distributed denial-of-service (DDoS) assaults and more.
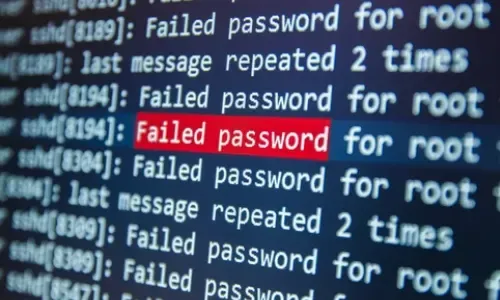
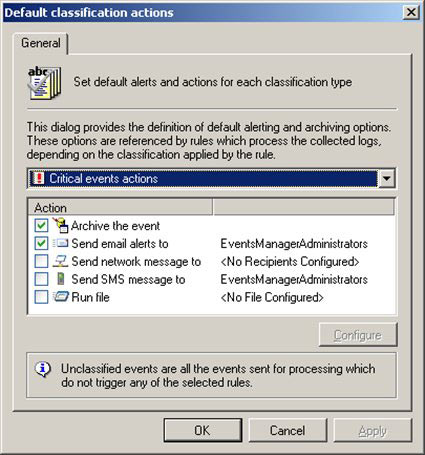
 An event log monitoring system, often referred to as an event log management, is a critical component to IT security & Management, that helps organizations strengthen their cybersecurity posture. It’s a sophisticated software solution designed to capture, analyze, and interpret a vast array of event logs generated by various components within an organization's IT infrastructure such as firewalls (


 This article explains how to detect a SYN Flood Attack using an advanced protocol analyser like Colasoft Capsa. We’ll show you how to identify and inspect abnormal traffic spikes, drill into captured packets and identify evidence of flood attacks. Furthermore we’ll configure Colasoft Capsa to automatically detect SYN Flood Attacks and send automated alert notifications .


 Brute-force attacks are commonly known attack methods by which hackers try to get access to restricted accounts and data using an exhaustive list/database of usernames and passwords. Brute-force attacks can be used, in theory, against almost any encrypted data.


 Colasoft Unified Performance Management (UPM) is a business-oriented network performance management system, which analyzes network performance, quality, fault, and security issues based on business. By providing visual analysis of business performances, Colasoft UPM helps users promote business-oriented proactive network operational capability, ensure the stable running of businesses, and enhance troubleshooting efficiency.


 Peer-to-Peer file sharing traffic has become a very large problem for many organizations as users engage in illegal (most times) file sharing processes that not only consumes valuable bandwidth, but also places the organization in danger as high-risk connections are made from the Internet to the internal network and malware, pirated or copyrighted material or pornography is downloaded into the organization’s systems. The fact is that torrent traffic is responsible for over 29% of US Internet's traffic in North America, indicating how big the problem is.


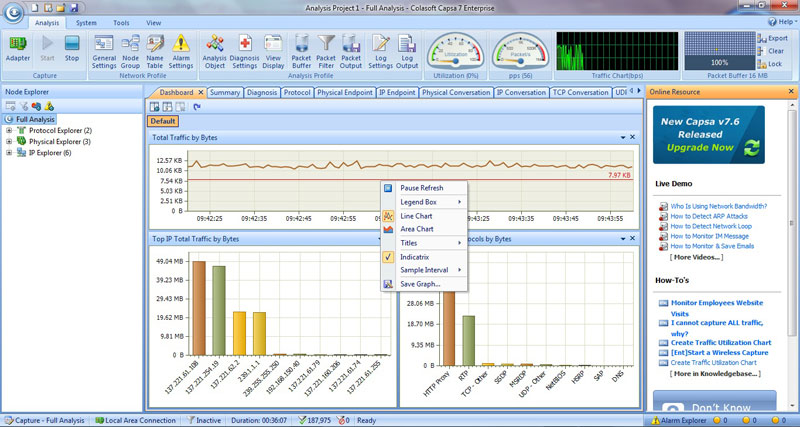
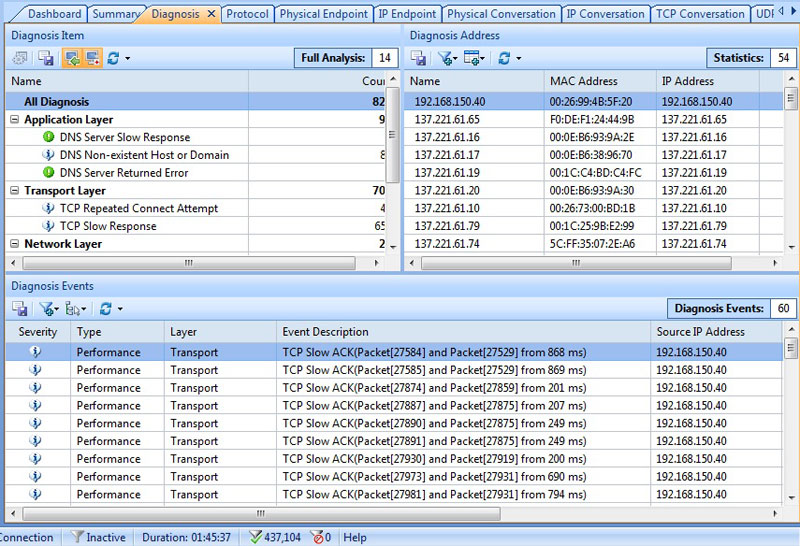
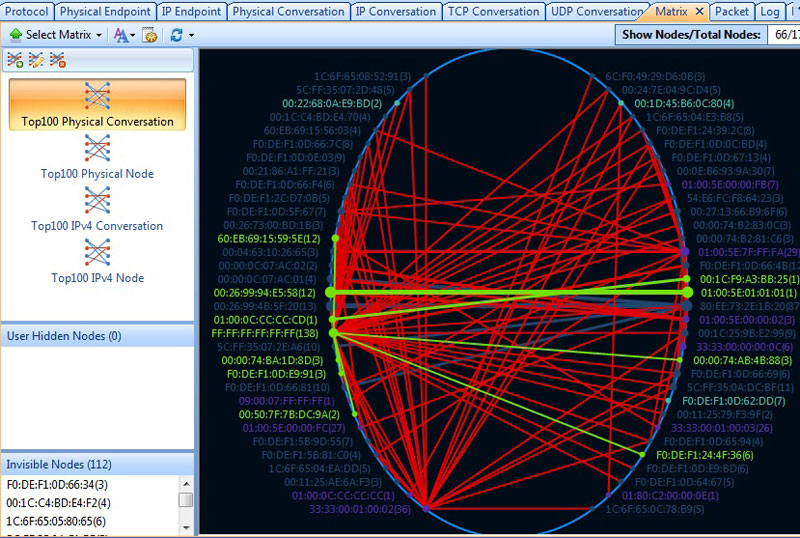
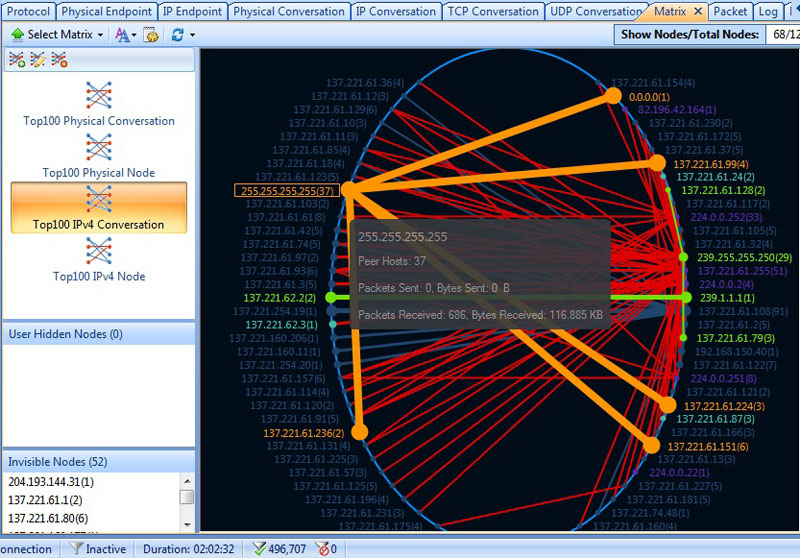
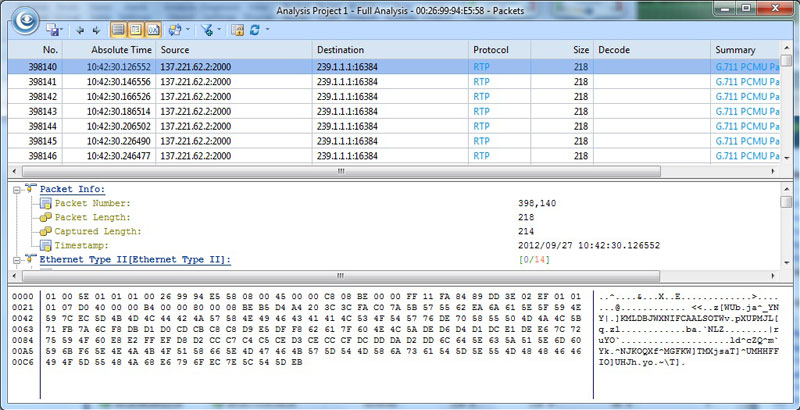
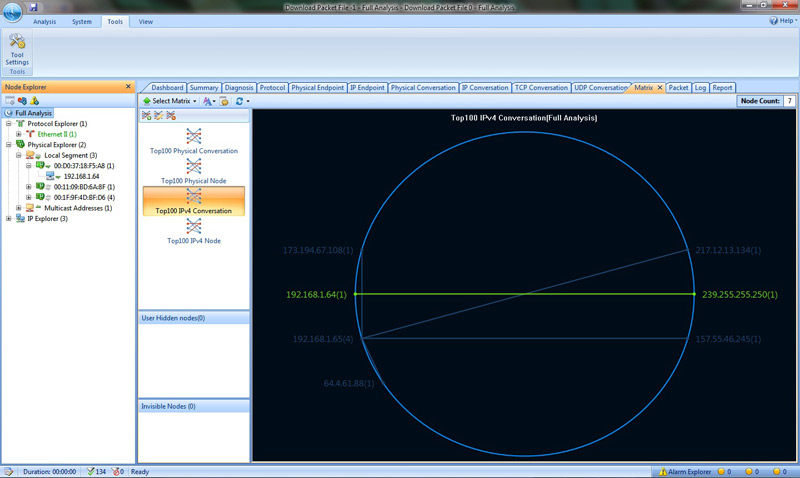
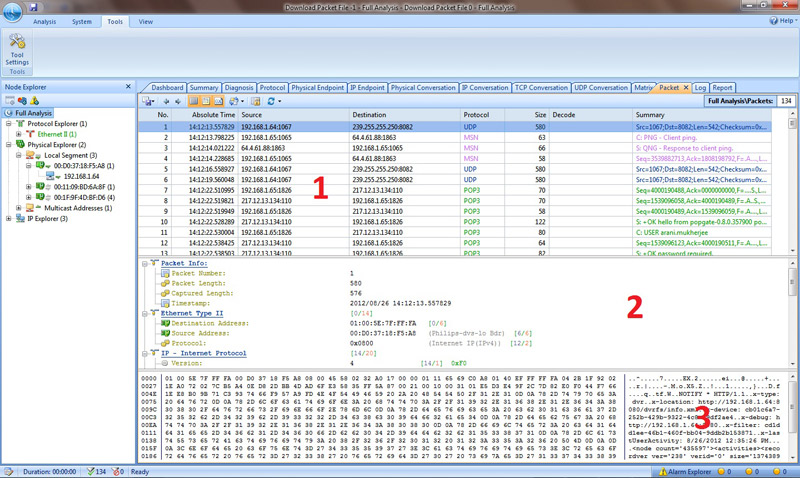
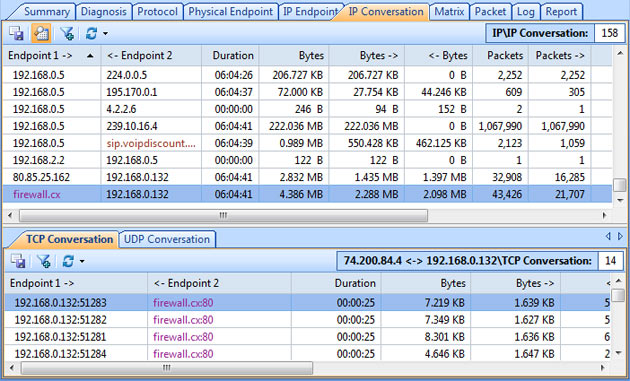
 Troubleshooting network problems can be a very difficult and challenging task. While most IT engineers use a network analyzer to help solve network problems, when analyzing hundreds or thousands of packets, it can become very hard to locate and further research conversations between hosts. Colasoft’s Capsa v8 now introduces a new feature that allows us to highlight-colorize relevant IP conversations in the network based on their MAC address, IP Addresses, TCP or UDP conversations.


 Figure 1. Selecting our Time-Range, and IP Address of interest from Link Analysis
 Figure 2. nChronos HTTP Reconstruction feature in progress.
 Figure 3. The HTTP Reconstruction process completed
 Troubleshooting network problems can be a very intensive and challenging process. Intermittent network problems are even more difficult to troubleshoot as the problem occurs at random times with a random duration, making it very hard to capture the necessary information, perform troubleshooting, identify and resolve the network problem.


 When working with medium to large scale networks, IT departments are often faced dealing with network loops and


 The developers of the popular software PBX, 3CX, have announced another major update to their unified communications solution! The latest release, 3CX v15.5, makes the phone system faster, more secure and more reliable with a number of improvements and brand new features.
  Web-Client provides leading features packed in an easy-to-use GUI
 IP PBX Web Client with integrated Web Conferencing Free of Charge!
 Click-to-Call Feature from any Web page or CRM

 Crazy as it might sound there is one Unified Communications provider who is giving out free fully functional cloud-based PBX systems without obligation from its users/customers.
 Thanks to its support for any SIP-based IP phone and mobile device (iPhone, Android, iPad, Tablet etc.) the 3CX IP PBX has quickly become the No.1 preferred solution.
 3CX
3CX
 VoIP/ IP PBXs and Unified Communication systems have become extremely popular the past decade and are the No.1 preference when upgrading an existing or installing a new phone system. IP PBXs are based on the IP protocol allowing them to use the existing network infrastructure and deliver enhanced communication services that help organizations collaborate and communicate from anywhere in the world with minimum or no costs.


 Recent and continuous website security breaches on large organizations, federal government agencies, banks and thousands of companies world-wide, has once again verified the importance of website and web application security to prevent hackers from gaining access to sensitive data while keeping corporate websites as safe as possible. Though many encounter a lot of problems when it comes to web application security; it is a pretty heavy filed to dig into.
 Without web hosting services most websites would not exist. The most popular methods to host web applications are:regular hosting, where your web application is hosted on a dedicated server that is intended for your website only, and shared hosting, where you share a web server with other users who will in turn run their own web application on the same server.
 Most successful attacks against web applications are due to insecure code and not the underlying platform itself. Case in point,
  When using software that has been developed by a third party, the best way to ensure that the code is secure would be to apply the latest updates. A simple web application will make use of numerous components that can lead to successful attacks if left unpatched. For example, both PHP and MySQL were vulnerable to exploits at a point in time but were later patched, and a default Linux webserver installation will include multiple services all of which need to be updated regularly to avoid vulnerable builds of software being exploited.
 While updating software will ensure that no known vulnerabilities are present on your system, there may still be entry points where an attacker can access your system that have been missed in our previous tips. This is where firewalls come into play. A firewall is necessary as it will limit traffic depending on your configuration and can also be found on most operating systems by default.
 No amount of code reviews and updates can ensure that the end product is not vulnerable and cannot be exploited. Code reviews are limited since the executed code is not being analysed, which is why web vulnerability scanning is essential. Web scanners will view the web application as a black box, where they will be analysing the finished product, which is not possible with white box scanning or code reviews. Meanwhile, some scanners will also provide you with the option to perform grey box scanning, by combining website scans and a backend agent that can analyse code.
 It is imperative to know if your web application has been subjected to an attack. Monitoring the web application, and the server hosting it, would be the best way to ensure that even if an attacker gets past your defence systems, at least you will know how, when and from where it happened. There may be cases when a website is brought offline due to an attack and the owner would not even know about the incident but will find out after precious time has passed.
 Monitoring, Auditing and obtaining Security Alerts for websites and blogs based on popular CMS systems such as WordPress, has become a necessity. Bugs, security exploits and security holes are being continuously discovered for every WordPress version making monitoring and auditing a high security priority. In addition, multi-user environments are often used for large WordPress websites, making it equally important to monitor WordPress user activity.


 SQL Injections have been keeping security experts busy for over a decade now as they continue to be one of the most common type of attacks against webservers, websites and web application servers. In this article, we explain what a SQL injection is, show you SQL injection examples and analyse how these type of attacks manage to exploit web applications and webservers, providing hackers access to sensitive data.
 A few weeks back Security Weekly interviewed Ferruh Mavituna, Netsparker’s CEO and Product Architect. Security Weekly is a popular podcast that provides free content within the subject matter of IT security news, vulnerabilities, hacking, and research and frequently interviews industry leaders such as John Mcafee, Jack Daniel and Bruce Schneier.
 8th of May 2015, Netsparker annouced yesterday the discovery of critical security vulnerability contained an HTML file found on many WordPress themes, including WordPress.org hosted websites. As reported by Netsparker the specific HTML file is vulnerable to cross-site scripting attacks and session hijack. WordPress.org has already issued an official annoucement and patch (v4.2.2) and recommends WordPress administrators update their website files and themes.
 In the world of information security there exist many tools, from small open source products to full appliances to secure a system, a network, or an entire corporate infrastructure. Of course, everyone is familiar with the concept of a firewall – even movies like Swordfish and TV shows like NCIS have so very perfectly described, in riveting detail, what a firewall is. But there are other, perhaps less sexy utilities in a security paradigm.
 Many websites and web applications are like a human fingerprints, with no two being alike. Of course, many websites may use a common backend engine – Wordpress, an MVC framework like Laravel or Ruby on Rails, etc. – but the layers on top of those engines, such as plugins or custom coded additions, are often a quite unique collection.

 Have you ever tried to make a list of all the attack surfaces you need to secure on your networks and web farms? Try to do it and there will be one thing that will stand out; keeping websites and web applications secure. We have firewalls, IDS and IPS systems that inspect every packet that reaches our servers and are able to drop it should it be flagged as malicious, but what about web applications?
 Many automated security tools exist not to test and find security holes, but to exploit them when found. Black-hat hackers intent on disrupting your web application possess automated suites as well, because they too, know a manual approach is a waste of time (that is, until they find a useful exploit, and by then it’s sometimes too late).
 Netsparker use open source web applications such as Twiki for a total different purpose than what they were intended for. They used them to test their own web application security scanners.
 Long gone are the days where a simple port scan on a company’s webserver or website was considered enough to identify security issues and exploits that needed to be patched. With all the recent attacks on websites and webservers which caused millions of dollars in damage, we thought it would be a great idea to analyze the implications vulnerable webservers and websites have for companies, while providing useful information to help IT Departments, security engineers and application developers proactively avoid unwanted situations.
 In June 2014, JPMorgan Chase bank was hit badly and had sensitive personal and financial data exposed for over 80 million accounts. The hackers appeared to obtain a list of the applications and programs that run on the company’s computers and then crosschecked them with known vulnerabilities for each program and web application in order to find an entry point back into the bank’s systems.
 In January 2014, Snapchat’s popular website had over 4.6 million usernames and phone numbers exposed due to a brute force enumeration attack against their Snapchat API. The information was publicly posted on several other sites, creating a major security concern for Snapchat and its users.
 In 2013 a massive underground attack was uncovered, revealing that over 160 million credit and debit cards were stolen during the past seven years. Five Russians and Ukrainians used advanced hacking techniques to steal the information during these years. Attackers targeted over 800,000 bank accounts and penetrated servers used by the Nasdaq stock exchange.
 This article expands on our popular
 In June 2014, Evernote and Feedly, working largely in tandem, went down with a DDoS attack within two days of each other. Evernote recovered the same day, but Feedly had to suffer more. Although there were two more DDoS attacks on Feedly that caused it to lose business for another two days, normalcy was finally restored. According to the CEO of Feedly, they refused to give in to the demands of ransom in exchange for ending the attack and were successful in neutralizing the threat.
 Domino's Pizza had over 600,000 Belgian and French customer records stolen by the hacking group Rex Mundi. The attackers demanded $40,000 from the fast food chain in exchange for not publishing the data online. It is not clear whether Domino's complied with the ransom demands. However, they reassured their customers that although the attackers did have their names, addresses and phone numbers, they however, were unsuccessful in stealing their financial and banking information. The Twitter account of the hacking group was suspended, and they never released the information.
 Companies and users around the world are struggling to keep their network environments safe from malicious attacks and hijacking attempts by leveraging services provided by high-end firewalls, Intrusion Detection Systems (IDS), antivirus software and other means. While these appliances can mitigate attacks and hacking attempts, we often see the whole security infrastructure failing because of attacks initiated from the inside, effectively by-passing all protection offered by these systems.
 Cybercriminals are now focusing their attention on small and mid-sized businesses because they are typically easier targets than large, multinational corporations.
 This is the age of networks. Long ago, they said, ‘the mainframe is the computer’. Then it changed to ‘the PC is the computer’. That was followed by ‘the network is the computer’. Our world has been shrunk, enlightened and speeded up by this globe encapsulating mesh of interconnectivity. Isolation is a thing of the past. Now my phone brings up my entire music collection residing on my home computer. My car navigates around the city, avoiding traffic in real time. We have started living in intelligent homes where we can control objects within it remotely.
 secure documents were stolen. This resulted in an internal cyber man-hunt. The bait was laid and all further intrusions were monitored. A team of 50 Federal Agents finally tracked down 2 hackers who were using US based social networking systems to hack into the Airforce Base. But it was later revealed that the scope of intrusion was not just limited to the base itself: they had infiltrated a much bigger military organisation. The perpetrators were hackers with the aliases of ‘datastreamcowboy’ and ‘kuji’.
 2005: Miami, Florida. A Miami hacker made history in cyber theft. Alberto Gonzales would drive around Miami streets looking for unsecured wireless networks. He hooked onto the unsecure wireless network of a retailer, used it to reach the retailer’s headquarters and stole credit card numbers from its databases. He then sold these card details to Eastern European cyber criminals. In the first year, he stole 11.2 million card details. By the end of the second year he had stolen about 90 million card details.


 The “Cisco Firepower and Advanced Malware Protection Live Lessons” video series by Omar Santos is the icing on the cake for someone who wants to start their journey of Cisco Next-Generation Network Security. This video series contains eight lessons on the following topics:


 Kevin Wallace is a well-known name in the Cisco industry. Most Cisco engineers and Cisco certification candidates know Kevin from his
  Vivek Tiwari holds a Bachelor’s degree in Physics, MBA and many certifications from multiple vendors including Cisco’s CCIE. With a double CCIE on R&S and SP track under his belt he mentors and coaches other engineers.
 Akhil Behl is a Senior Network Consultant with Cisco Advanced Services, focusing on Cisco Collaboration and Security architectures. He leads Collaboration and Security projects worldwide for Cisco Services and the Collaborative Professional Services (CPS) portfolio for the commercial segment. Prior to his current role, he spent 10 years working in various roles at Linksys, Cisco TAC, and Cisco AS. He holds CCIE (Voice and Security), PMP, ITIL, VMware VCP, and MCP certifications.


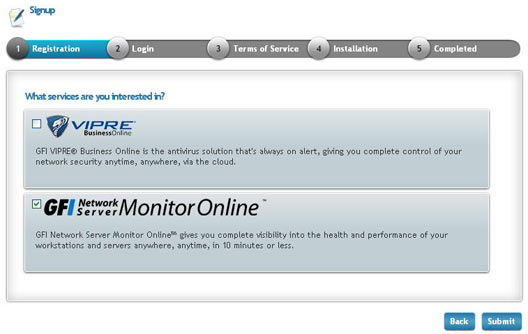
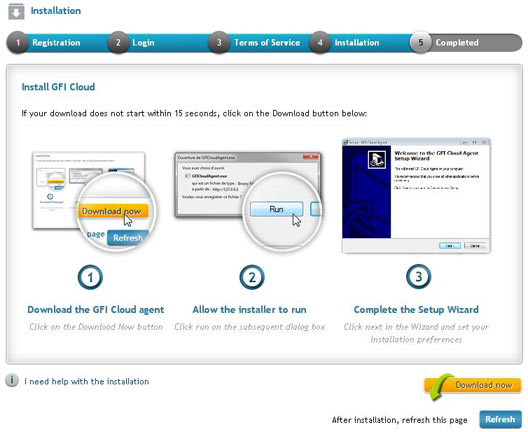
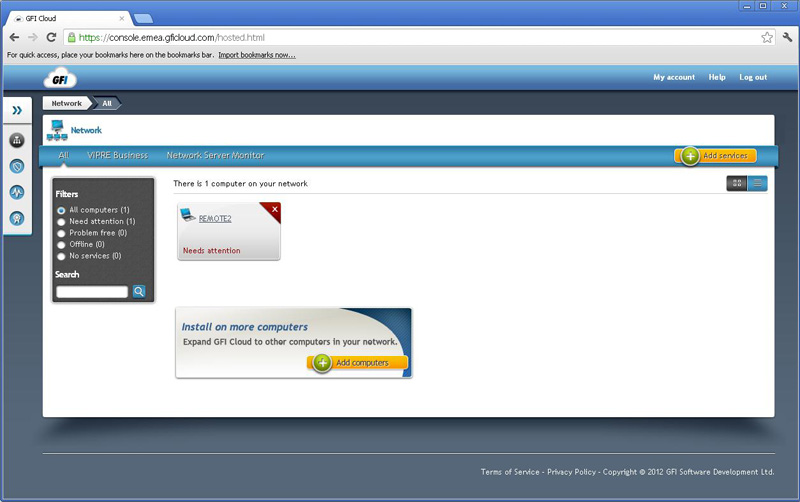
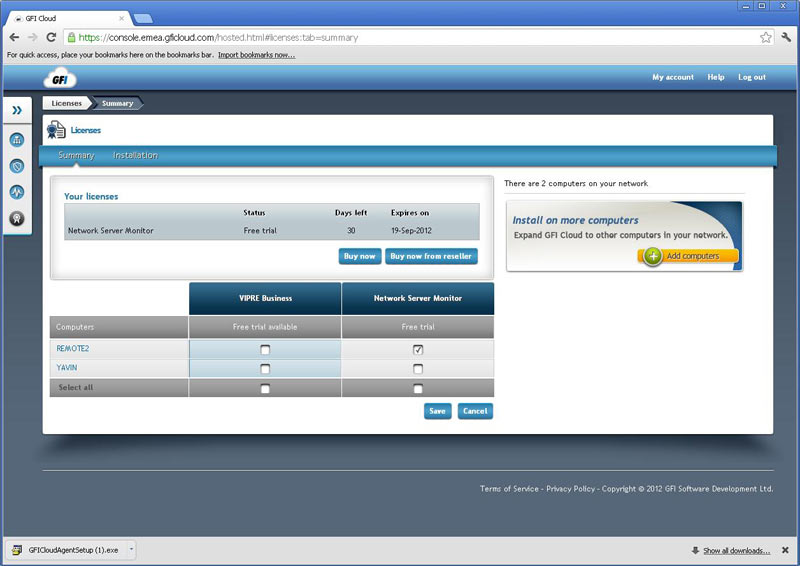
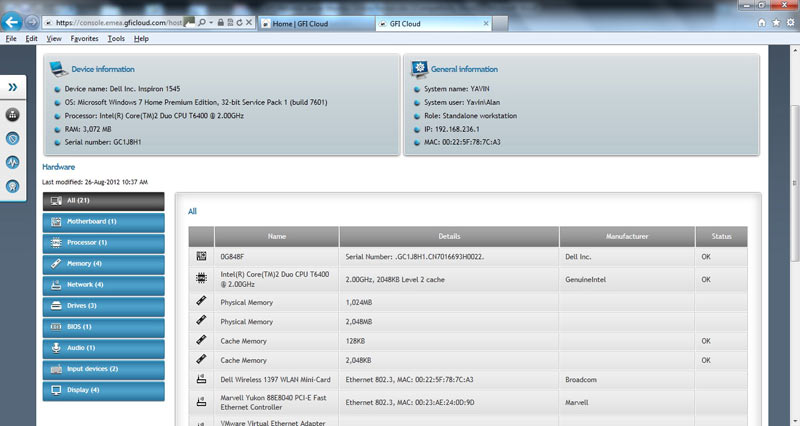
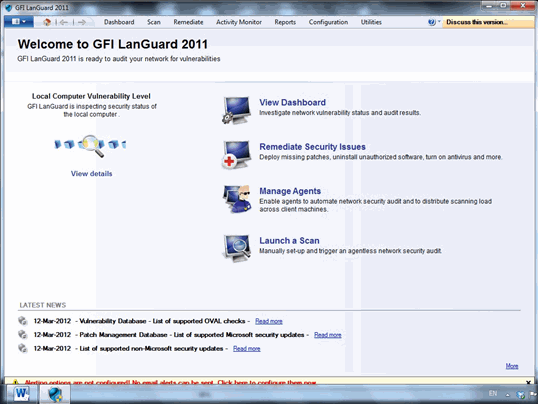
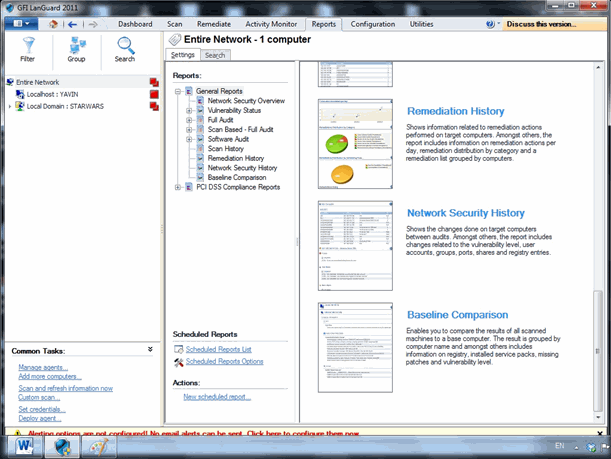
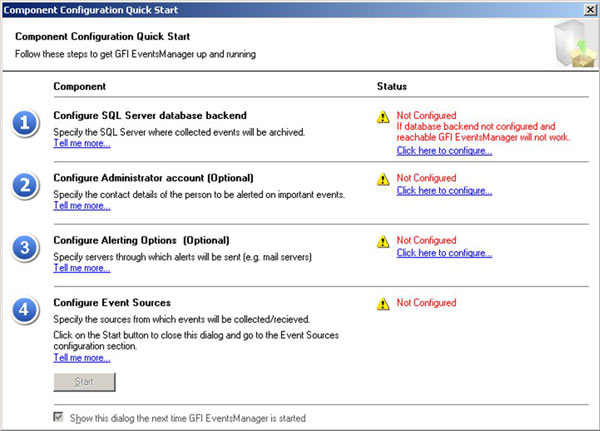
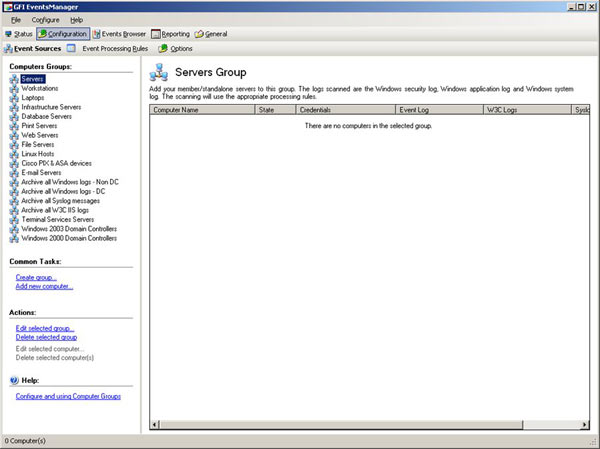
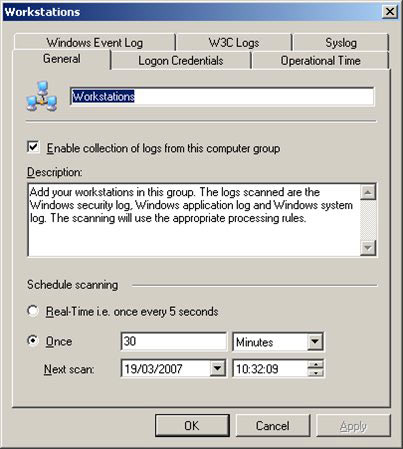
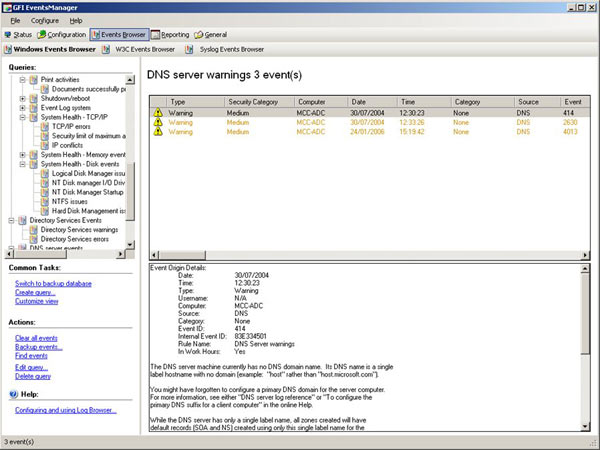
 GFI has once again managed to make a difference: They recently published a free eBook named "Cloud-based network monitoring: The new paradigm" as part of their GFI Cloud offerings.

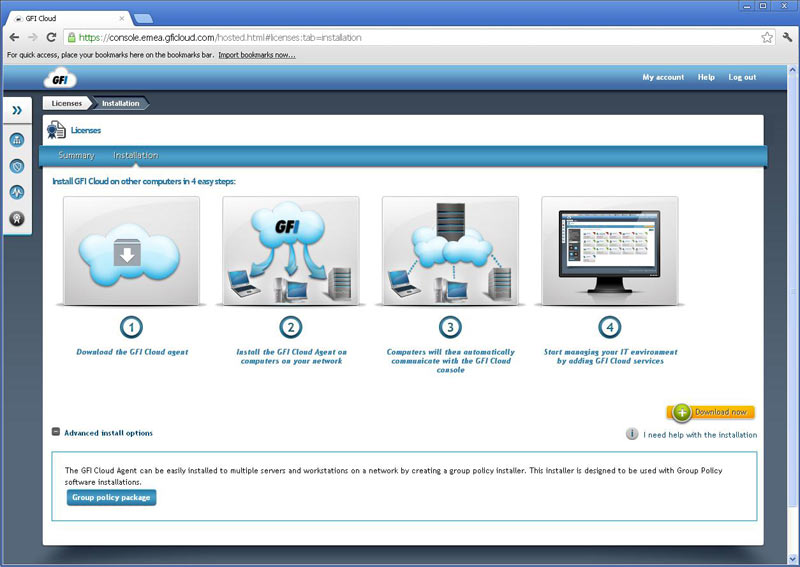
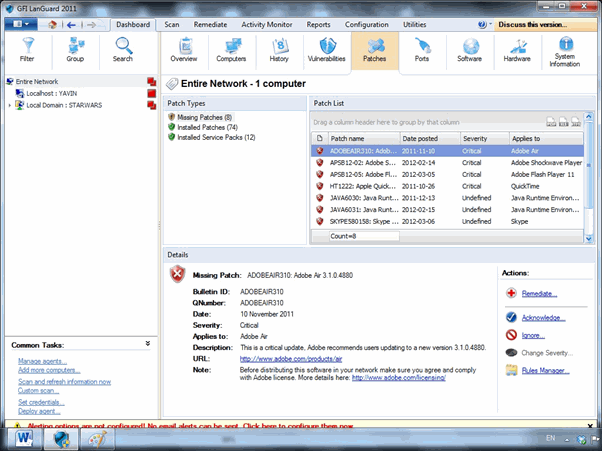
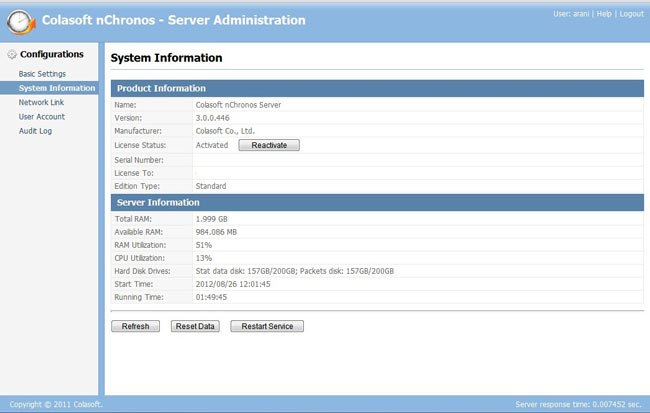 The screenshot above gives you an idea of what the Server Administration page looks like, which is the first page that would open up once the user has logged in. This is the System Information page. On the left pane you will find several other pages to look at i.e. Basic Settings which displays default port info and HDD info of the host machine, User Account (name says it all), and Audit Log (which will basically show the audit trail of user activity.)
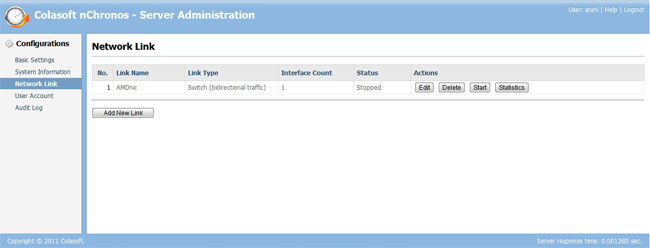
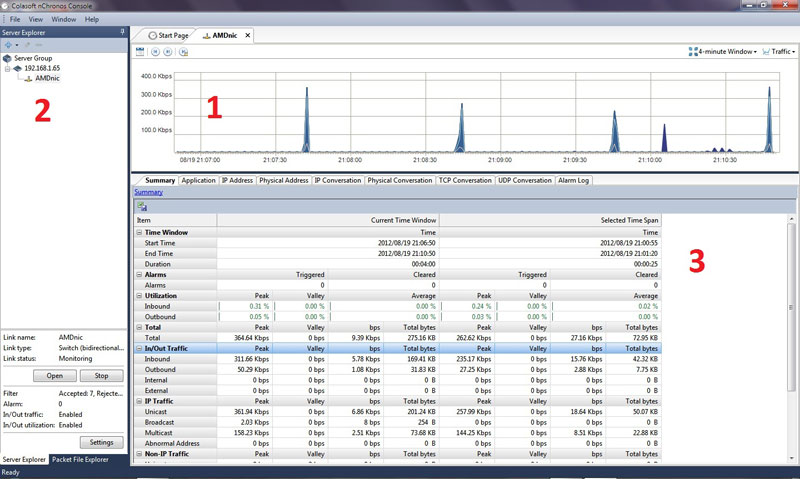

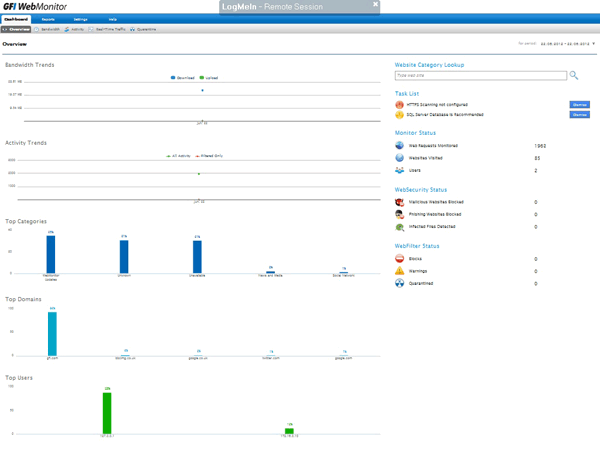 Many of the displays are clickable allowing you to easily drill down into the data, and if you hover the mouse you’ll get handy pop-up explanations. We were able to go from the overview to the detailed activities of an individual user with just a few clicks. A user here is a single source IP, in other words a particular PC rather that the person using it. Ideally we would have liked the product to query the Active Directory domain controller and nail down the actual logged-on user but to be honest given the reasonable price and the product’s undoubted usefulness we’re not going to quibble.


 GFI Software has just revealed GFI OneConnect Beta – its latest Advanced Email Security Protection product. GFI OneConnect is a comprehensive solution that targets the safe and continuous delivery of business emails to organizations around the world.
")
")
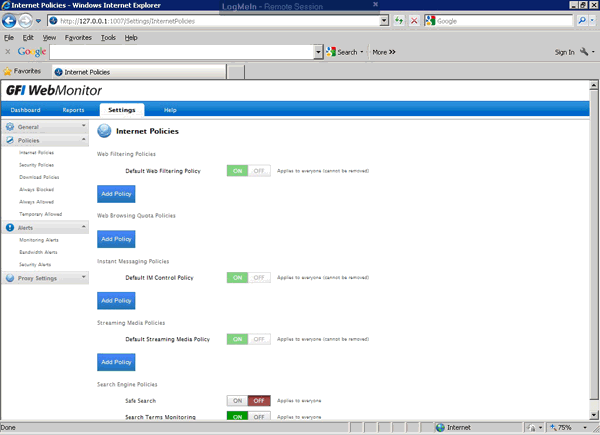
 Ensuring users follow company policies when accessing the internet has become a real challenge for businesses and IT staff. The legal implications for businesses not taking measures to enforce acceptable user policies (where possible) can become very complicated and businesses can, in fact, be held liable for damages caused by their users or guests.


 For every business, established or emerging, the Internet is an essential tool which has proved to be indispensable. The usefulness of the internet can be counteracted by abuse of it, by a business’s employees or guests. Activities such as downloading or sharing illegal content, visiting high risk websites and accessing malicious content are serious security risks for any business.


 In this era of constantly pushing for more productivity and greater efficiency, it is essential that every resource devoted to web access within a business is utilised for business benefit. Unless the company concerned is in the business of gaming or social media, etc. it is unwise to use resources like internet/web access, and the infrastructure supporting it, for a purpose other than business. Like they say, “Nothing personal, just business”
")


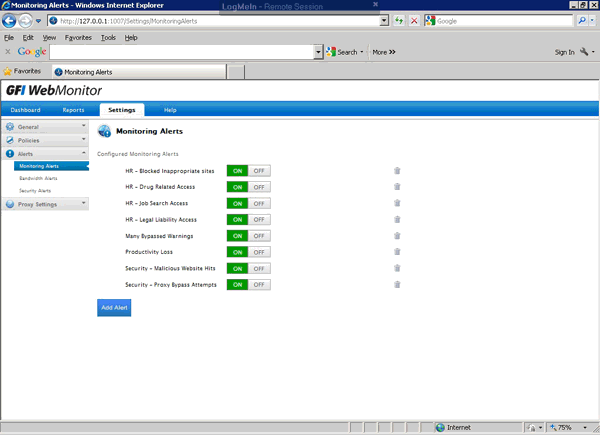
 In our previous article we analysed the risks and implications involved for businesses when there are no security or restriction policies and systems in place to stop users distributing illegal content (torrents). We also spoke about unauthorized access to company systems, sharing sensitive company information and more. This article talks about how specialized systems such as WebMonitor are capable of helping businesses stop torrent applications accessing the internet, control the websites users access, block remote control software (Teamviewer, Remote Desktop, Ammy Admin etc) and put a stop to users wasting bandwidth, time and company money while at work.
 Senior IT Managers, engineers and administrators surely remember the days where controlling TCP/UDP ports at the Firewall level was enough to block or provide applications access to the internet. For some years now, this is no longer a valid way of application control, as most ‘unwanted’ applications can smartly use common ports such as HTTP (80) or HTTPS (443) to circumvent security policies, passing inspection and freely accessing the internet.
 Apart from the imminent security risk, users who have uncontrollable access are also wasting bandwidth – that’s bandwidth the organization is paying for - and are likely to slow down the internet for the rest who are legitimately trying to get work done. In cases where VPNs are running over the same lines then VPN users, remote branches and mobile users are most likely to experience slow connection speeds when accessing the organization’s resources over the internet.
 One of the largest problems faced by organizations of any size is effectively controlling user internet access (from laptops, mobile devices, workstations etc), minimizing the security threats for the organization (ransomware – data loss prevention), user copyright infringement (torrent downloading/sharing movies, games, music etc) and discover where valuable WAN-Internet bandwidth is being wasted.
 Most Businesses are completely unaware of how serious these matters are and the risks they are taking while dealing with other ‘more important’ matters.
 While illegal downloading is one major threat for businesses, stopping users sharing company data and sensitive information (aka Data Loss Prevention or DLP) is another big problem.
 In late 2015, popular Ammy Admin – a remote control software, was
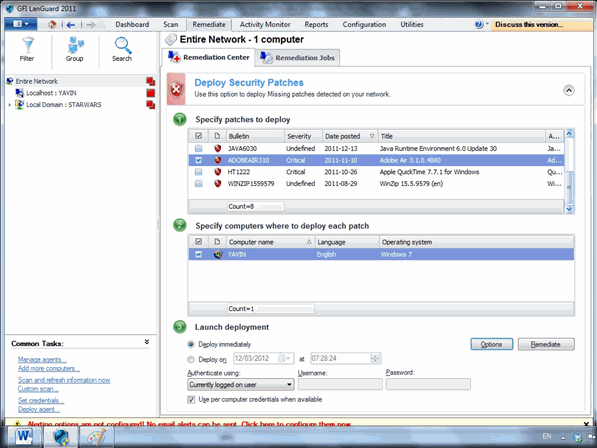
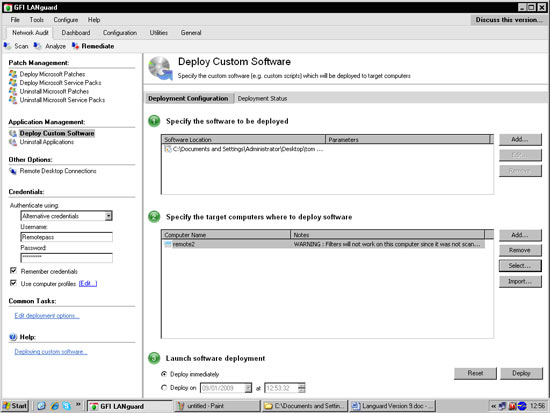
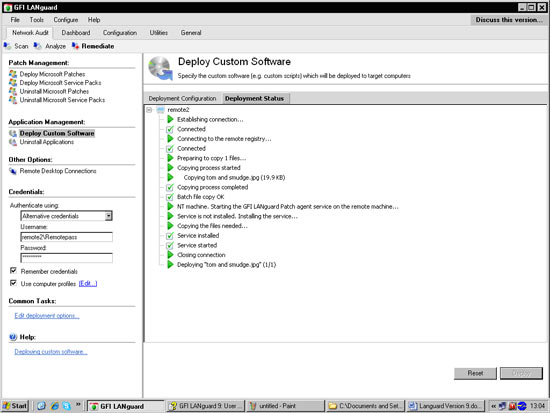
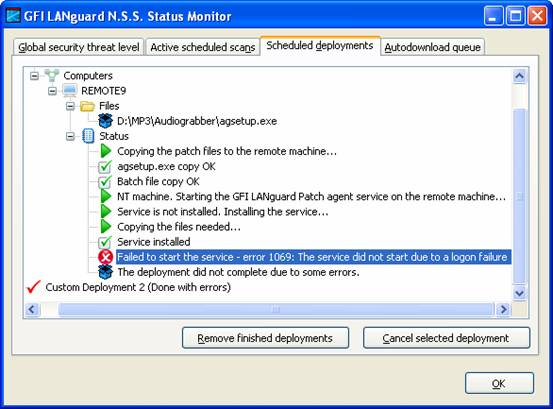
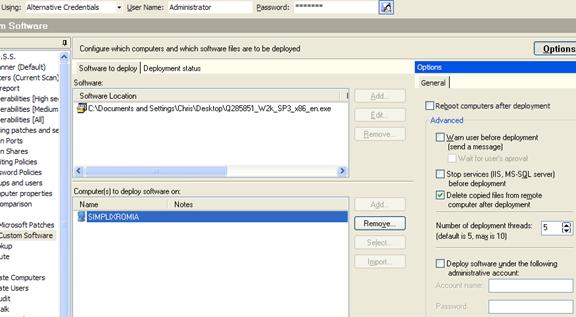
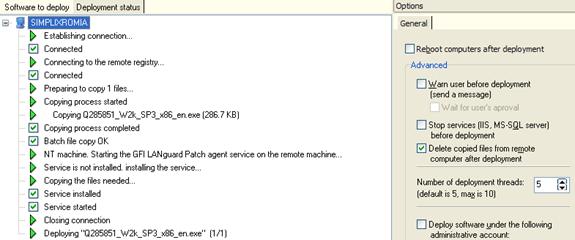
 Figure 2. GFI LanGuard custom software deployment using a parameter for silent installation


 GFI LanGuard Agents are designed to be deployed on local (network) or remote servers and workstations. Once installed, the GFI LanGuard Agents can then be configured via LanGuard’s main server console, giving the administrator full control as to when the Agents will scan the host they are installed on, and communicate their status to the GFI LanGuard server.


 This article shows how any IT Administrator, network engineer or security auditor can quickly scan a network using GFI’s LanGuard and identify the different systems such as Windows, Linux, Android etc. More importantly, we’ll show how to uncover vulnerable, unpatched or high-risk Windows systems including Windows Server 2003, Windows Server 2008, Windows Server 2012 R2, Domain Controllers, Linux Servers such as RedHat Enterprise, CentOS, Ubuntu, Debian, openSuse, Fedora, any type of Windows workstation (XP, Vista, 7, 8, 8.1,10) and Apple OS X.


 Cisco announced a major update to their CCNA, CCNP and CCIE certification program at Cisco Live last week, with the changes happening on the 24th February 2020.


 So you’ve heard all about Windows Server 2019 - now you can see it in action in a live demo webinar on November 8th! The last WS2019 webinar by Altaro was hugely popular with over 4,500 IT pros registering for the event. Feedback from gathered with that webinar and the most popular features will now be tested live by Microsoft MVP Andy Syrewicze. And you’re invited!

 Downloading all necessary drivers and firmware upgrades for your HP Proliant server is very important, especially if hardware compatibility is critical for new operating system installations or virtualized environments (VMware – HyperV). Til recently, HP customers could download the HP Service Pack (SPP) for Proliant servers free of charge, but that’s no longer the story as HP is forcing customers to pay up in order to get access to its popular SPP package.

 HP SPP ISO is just a click away!")

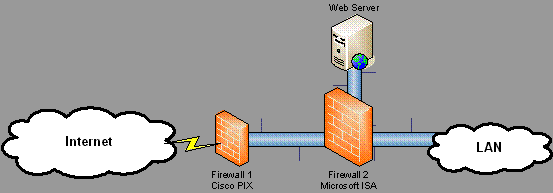 Figure 1. Dual firewall configuration
 Broadband access to the Internet by cable modem promises users lightning-fast download speeds and an always-on connection. And recent converts to broadband from dial-up technology are thrilled with complex Web screens that download before their coffee gets cold.

 Firewall.cx’s download section now includes the

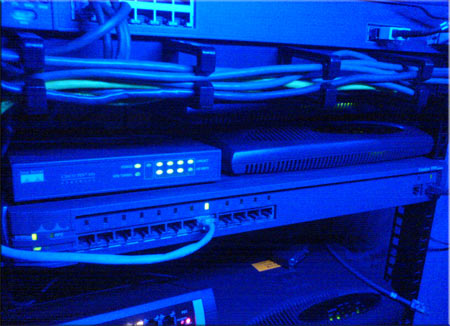
 Cisco Lab No.3 - Three high-end Cisco switches flooded in blue lighting, making VLAN services a reality.