Network Security Product Review: GFI LanGuard 2014 - The Ultimate Tool for Admins and IT Managers
Review by Arani Mukherjee
 For a company’s IT department, it is essential to manage and monitor all assets with a high level of effectiveness, efficiency and transparency for users. Centralised management software becomes a crucial tool for the IT department to ensure that all assets are performing at their utmost efficiency, and that they are safeguarded from any anomalies, be it a virus attack, security holes created by unpatched softwares or even the OS.
GFI LanGuard is one such software that promises to provide a consolidated platform from which software, network and security management can be performed, remotely, on all assets under its umbrella. Review of LanGuard Version 2011 was published previously on Firewall.cx by our esteemed colleagues Alan Drury and John Watters. Here are our observations on the latest version of LanGuard 2014. This is something we would call a perspective from a fresh pair of eyes.
Installation
The installation phase has been made seamless by GFI. There are no major changes from the previous version. Worth noting is that near the end of the installation you will be asked to point towards an existing instance of SQL Server, or install one. This might prolong the entire process but, overall, a very tidy installation package. Our personal opinion is to ensure the hardware server has a decent amount of memory and CPU speed to provide the sheer number crunching needs of LanGuard.
First Look: The Dashboard
Once the installation is complete, LanGuard is ready to roll without the need for any OS restarts or a hardware reboot. For the purpose of this review two computers, one running Windows 7 and the other running Linux Ubuntu, were used. The Dashboard is the first main screen the user will encounter:
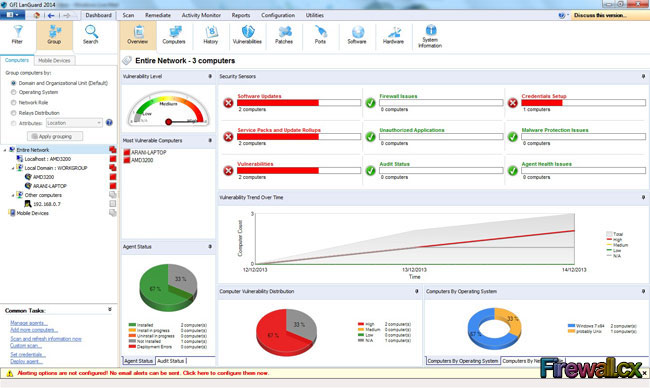 Main Screen (Click to enlarge)
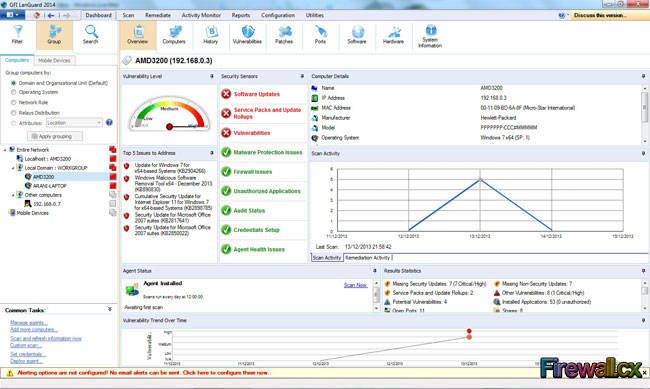
LanGuard will be able to pick up the machines it needs to monitor from the workgroup it belongs to. Obviously it does show a lot of information at one glance. The section of Common Tasks (lower left corner) is very useful for performing repetitive actions like triggering scans, or even adding computers. Adding computers can be done by looking into the existing domain, by computer name, or even by its IP address. Once LanGuard identifies the computer, and knows more about it from scan results, it allocates the correct workgroup under the Entire Network section.
Below is what the Dashboard looked like for a single device or machine:
The Dashboard has several sub categories, but we’ll talk about them once we finish discussing the Scan option.
Scan Option
The purpose of this option is to perform the management scan of the assets that need to be monitored via LanGuard. Once the asset is selected LanGuard will perform various types of scans, called audit operations. Each audit operation corresponds to an output of information under several sections for that device. Information ranges from hardware type, software installed, ports being used, patch information etc.
The following screenshot displays a scan in progress on such a device:
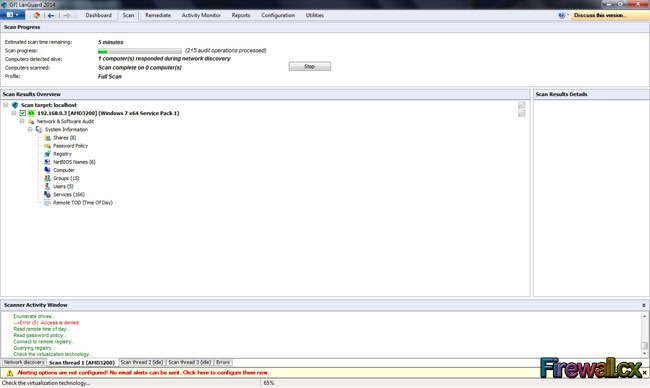 LanGuard Scan Option (Click to enlarge)
The progress of the Scan is shown at the top. The bottom section, with multiple tabs, lets the user know the various types of audit operations that are being handled. If any errors occur they appear in the Errors tab. This is very useful in terms of finding out if there are any latent issues with any device that might hamper LanGuard’s functions.
The Dashboard – Computers Tab
Once the Scan is complete, the Dashboard becomes more useful in terms of finding information about the devices. The Computers Tab is a list view of all such devices. The following screenshot shows how the various sections can be used to group and order the devices on the list:
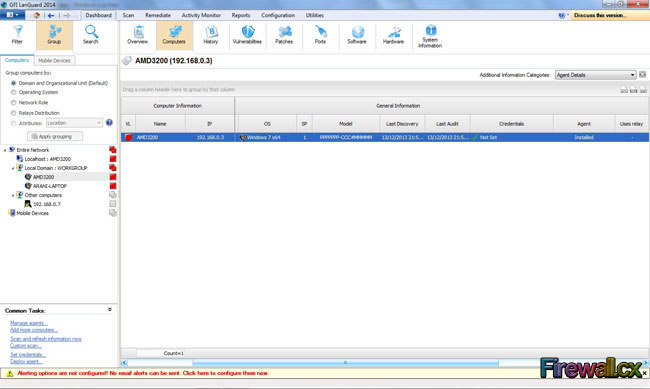 LanGuard Computer Tab (Click to enlarge)
Notice that just above the header named ‘Computer Information’, it asks the user to drag any column header to group the computers using that column. This is a unique feature. This goes to show that LanGuard has given the control of visibility to the user, instead of providing stock views. As well, every column header can be used to set filters. This means the user has multiple viewing options that can be adjusted depending on the need of the hour.
The Dashboard – History Tab
This tab is a listed historical view of all actions that have been taken on a given device. Every device’s functional history is shown, based on which computer has been selected on the left ‘Entire Network’ section. This is like an audit trail that can be used to track the functional progression of the computer. The following screenshot displays the historical data generated on the Windows 7 desktop that was used for our testing.
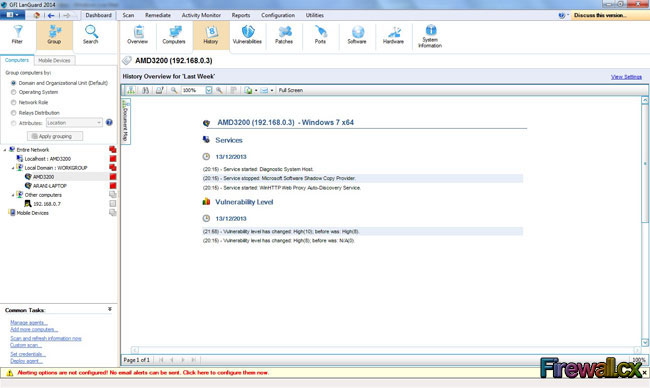 LanGuard History Tab (Click to enlarge)
Information is sectioned in terms of date, and then further sectioned in terms of time stamps. We found the level of reporting to be very useful and easy to read.
The Dashboard – Vulnerabilities
This is perhaps one of the most important tabs under the Dashboard. At once glance you can find out the main weakness of the machine scanned. All such vulnerabilities are sub divided into Types, based on their level of criticality. If the user selects a type, the actual list of issues comes up in the right hand panel.
Now if the user selects a single vulnerability, a clearer description appears at the bottom. LanGuard not only tells you about the weakness, it also provides valid recommendations on how to deal with it. Here’s a view of our test PC’s desktop’s weaknesses. Thanks to LanGuard, all of them were resolved!
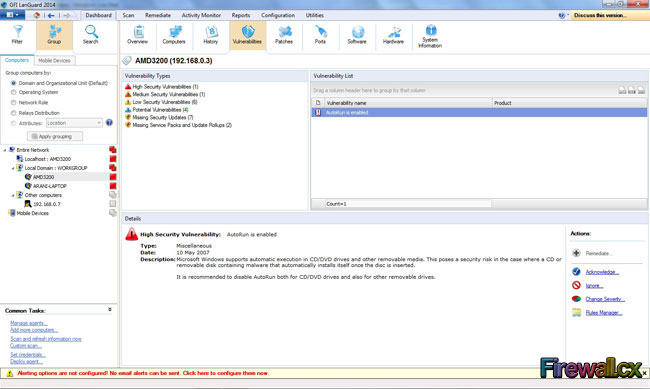 LanGuard Vulnerabilities Tab (Click to enlarge)
The Dashboard – Patches
Like the Vulnerabilities tab, the Patches tab shows the user the software updates and patches that are lacking on the target machine. Below is a screenshot demonstrating this:
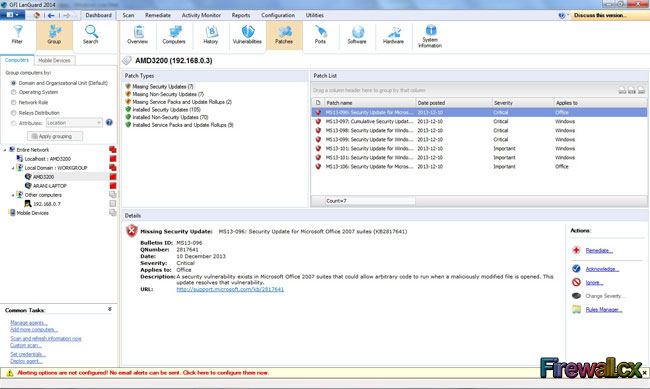 LanGuard Patches Tab (Click to enlarge)
Worth noting is the list of action buttons on the panel at the bottom right corner. The user has the option of acknowledging the patch issue or set it to ‘ignore’. The ‘Remediate’ option will be discussed at a later date.
The Dashboard – Ports Tab
The function of the Ports tab is to display which ports are open on the target machine. They are smarty divided into TCP and UDP ports. When the user selects either of the two divisions, the ports are listed in the right panel. Selecting a port displays the process which is using that port, along with the process path. From a network management point of view, with network security in mind, this is an excellent feature to have.
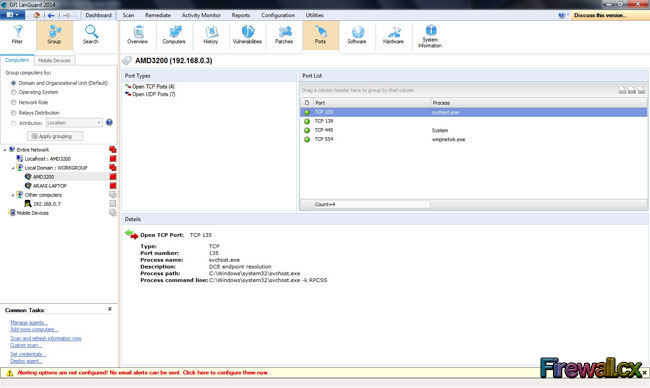 LanGuard Ports Tab (Click to enlarge)
The Dashboard – Software Tab
This tab is a good representation of how well LanGuard scans the target machine and brings out information about it. Any software installed, along with version and authorisation, is listed. An IT manager can use this information to reveal any unauthorised software that might be in use on company machines. This makes absolute sense when it comes to safeguarding company assets from the hazards of pirated software:
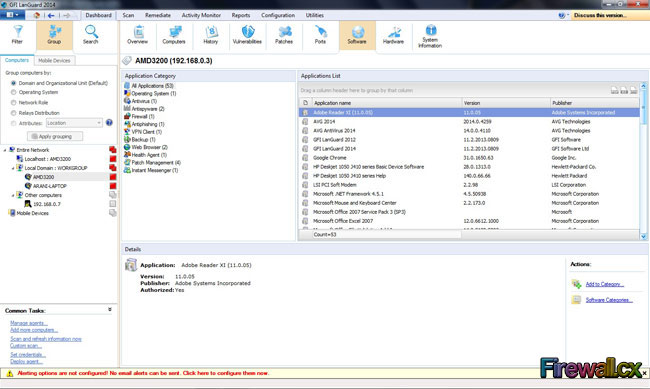 LanGuard Software Tab (Click to enlarge)
The Dashboard – Hardware Tab
The main purpose of the Hardware tab is titular, displaying the hardware components of the machines. The information provided is very detailed and can be very useful in maintaining a framework of similar hardware for the IT Infrastructure. LanGuard is very good at obtaining detailed information about a machine and presenting it in a very orderly fashion. Here’s what LanGuard presented in terms of hardware information:
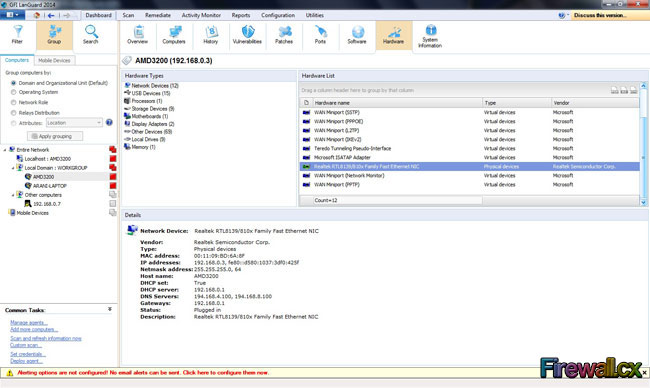 LanGuard Hardware Tab (Click to enlarge)
The Dashboard – System Information
Obviously, LanGuard was providing user specific information along with services and shares on the machines. This shows all the processes and services running on the machines. It also shows all the various user profiles and current users logged onto the machine. It can be used to see if a user is available on a machine, the shares that are listed, and identify them as authorised or not. Same can be done for the users that reside on that machine. As always selecting the System Information List on the right hand panel would display more details on the bottom panel.
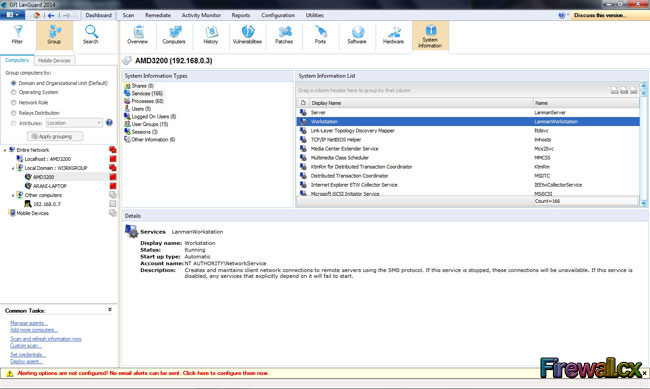 LanGuard System Information Tab (Click to enlarge)
Remediate Option
One of the key options for LanGuard, Remediate, is there to ensure all important patches and upgrades necessary for your machines are delivered as and when required. As mentioned earlier in the Dashboard – Patches section, any upgrade or patch that is missing is listed with a Remediate option. But Remediate not only lets the user deploy patches, but it also helps in delivering bespoke software and malware protection. This is a core vital function as it ensures the security of the IT infrastructure along with its integrity. A quick look at the main screen for Remediate clearly defines its utilities:
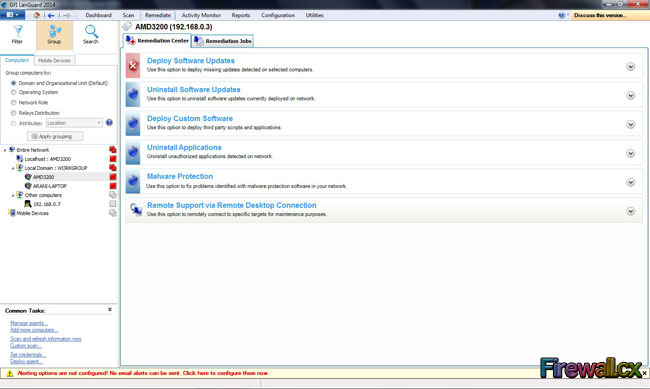 LanGuard Remediate Main Screen (Click to enlarge)
The level of detail provided and the ease of operation was clearly evident.
Here’s a snapshot of the Software Updates screen. The layout speaks for itself:
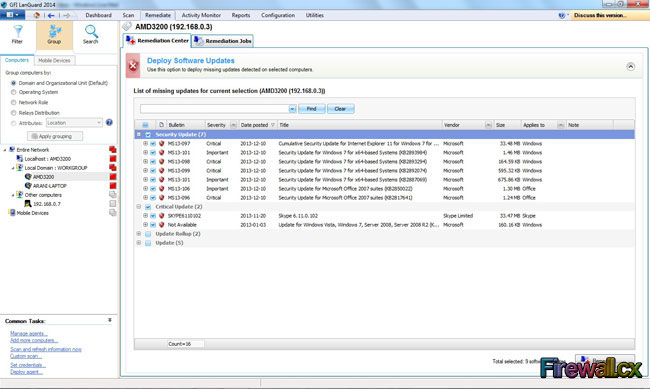 LanGuard Deploy Software Updates Screen (Click to enlarge)
Obviously, the user is allowed to pick and choose which updates to deploy and which ones to shelve for the time being.
Activity Monitor Option
This is more of an audit trail of all the actions, whether manually triggered or scheduled, that have been taken by LanGuard. This helps the user to find out if any scan or search has encountered any issues. This gives a bird’s eye view of how well LanGuard is working in the background to ensure the assets are being monitored properly.
The top left panel helps the user to select which audit trail needs to be seen and, based on that, the view dynamically changes to accommodate the relevant information. Here’s what it would look like if one wanted to see the trail of Security Scans:
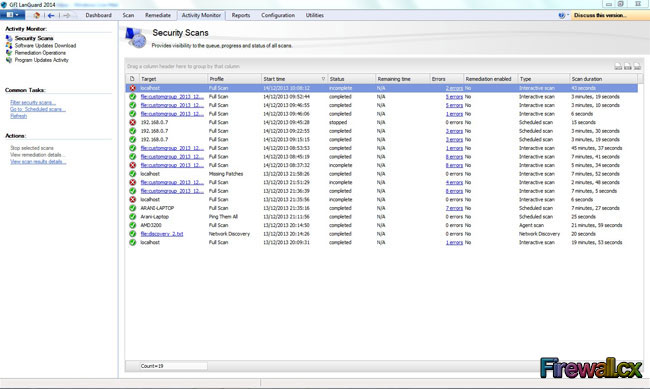 LanGuard Activity Monitor Option (Click to enlarge)
Reports Option
All the aforementioned information is worth gathering if it can be presented for making commercial and technical decisions. That is where LanGuard presents us with a plethora of reporting options. The sheer volume of options was a bit overwhelming but every report has its own merits. The screen shown in the screenshot below does not even show the bottom of the reports menu, there’s a lot to scroll below as well:
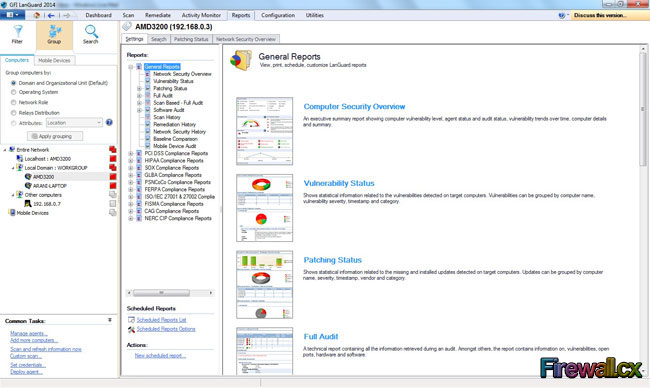 LanGuard Reports Option (Click to enlarge)
Running the Network Security Report provides a level of presentation which played with every detail, and wasn’t confusing with too much information. Here’s what it looked like:
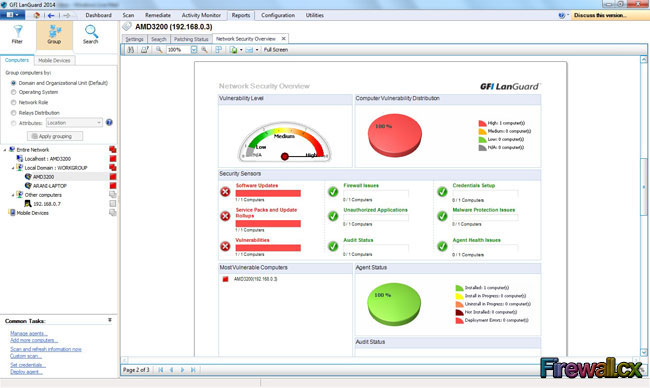 LanGuard Network Security Report (Click to enlarge)
The graphical report was certainly eye catching.
Configuration Option
Clearly LanGuard has not shied away from letting users having the power to tweak the software to their best advantage. Users can scan the network for devices and remotely deploy the agents which would perform the repeated scheduled scans.
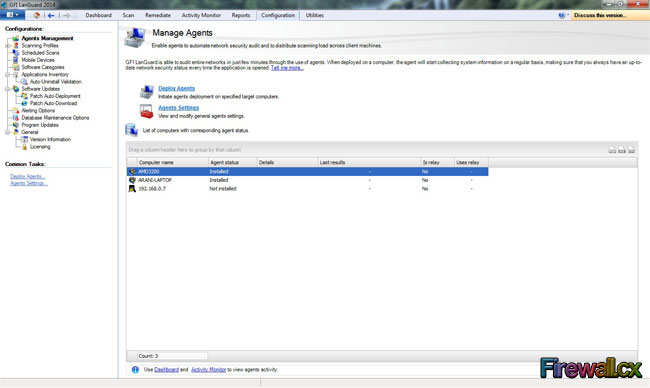 LanGuard Configuration Option (Click to enlarge)
LanGuard was unable to scan the Ubuntu box properly and refused to deploy the agent, in spite of being given the right credentials.
A check on GFI’s website for the minimum level of Linux supported showed that the Ubuntu was two versions above the requirements. The scan could recognise it as ‘Probably Unix’ and that’s the most LanGuard managed. We suspect the problem to be related with the system's firewall and security settings.
The following message appeared on the Agent Dialog box when trying to deploy it on the Linux machine: “Not Supported for this Operating System”
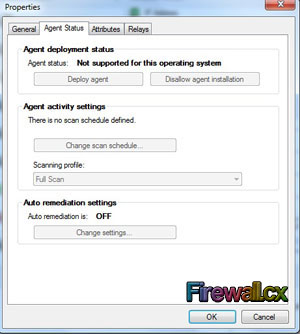 Minor issues identifing our Linux workstation (Click to enlarge)
Moving on to LanGuard’s latest offering, the ability to manage mobile devices. This is a new addition to LanGuard’s arsenal. It can manage and monitor mobile devices that use an Microsoft Exchange Server for email access etc. Company smart phones and tablets can be managed using this new tool. Here’s the interface for the same purpose.
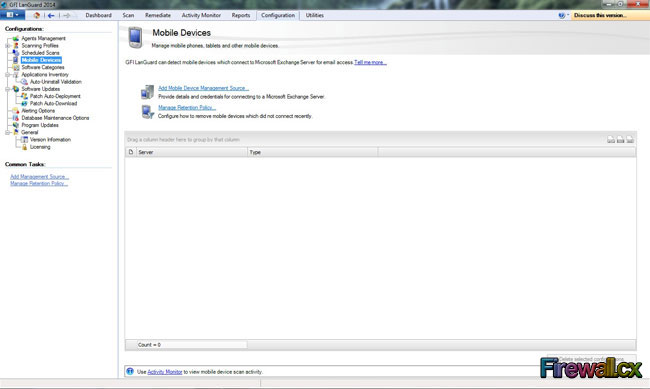 LanGuard Managing Mobile Devices (Click to enlarge)
Utilities Option
We call it the Swiss Army Knife for network management. One of our favourite sections, it included some quick and easy way of checking network features of any devices or an IP Address. This just goes to prove that LanGuard is very well thought out piece of software. Not only does it include mission critical functions, it also provides a day to day point of mission control for the IT Manager.
We could not stop ourselves from performing a quick check on the output from the Whois option here:
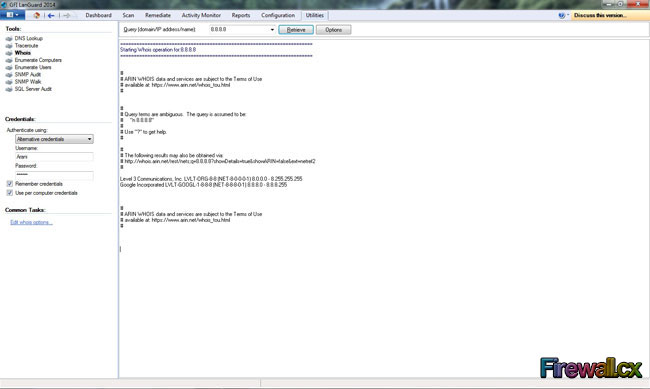 LanGuard Whois using Utilities (Click to enlarge)
The other options were pretty self-explanatory and of course very handy for a network manager.
Final Verdict
LanGuard provides an impressive set of tools. The process of adding machines, gathering information and then displaying the information is very efficient. The reporting is extremely resourceful and caters to every need possible for an IT Manager. Hoping the lack of support for Linux is an isolated incident. It has grabbed the attention of this reviewer to the point that he is willing to engage his own IT Manager and query what software his IT Department uses.
If it’s not LanGuard, there’s enough evidence here to put a case for this brilliant piece of software. LanGuard is a very good tool and should be part of an IT Manager’s or Administrator’s arsenal when it comes to managing a small to large enterprise IT Infrastructure.
Wi-Fi Key Generator
Follow Firewall.cx
Cisco Password Crack
Decrypt Cisco Type-7 Passwords on the fly!


