GFI LANguard Network Security Scanner Version 5.0 Review
In the light of all the recent attacks that tend to focus on the vulnerabilities of Windows platforms, we were increasingly dissatisfied with the common vulnerability scanners that we usually employ. We wanted a tool that didn't just help find holes, but would help administer the systems, deploy patches, view account / password policies etc. In short, we were looking for a Windows specialist tool.
Sure, there's a number of very popular (and very expensive) commercial scanners out there. However, most of them are prohibitively priced for the networks we administrate and all of them fell short on the administrative front. We tested a previous version of LANguard and our initial impressions were good. Thus we decided to give their latest offering a spin.
Getting Started
Getting the tool was easy enough, a quick visit to GFI's intuitively laid out site, and a 10MB download later, we were set to go. We must mention that we're partial to tools that aren't too heavy on the disk-space. Sahir has started carrying around a toolkit on his cell-phone USB drive, where space is at a premium. 10MB is a reasonable size for a program with all the features of this one.
Installation was the usual Windows deal (Click <next> and see how quickly you can reach <finish>). We fired up the tool and was greeted with a splash screen that checked for a newer version, and downloaded new patch detection files, dictionaries, etc.
We'd prefer to have the option of updating rather than having it happen every time at startup bu we couldn't find the option to change this behaviour; this is a minor point that GFI should add.
Interface
Once the program is fully updated, you're greeted with a slick interface that looks like it's been made in .Net. No low coloured icons and cluttered toolbars here. While some may consider this inconsequential, it's a pleasure to work on software that looks good. It gives it that final bit of polish that's needed for a professional package. You can see the main screen below.
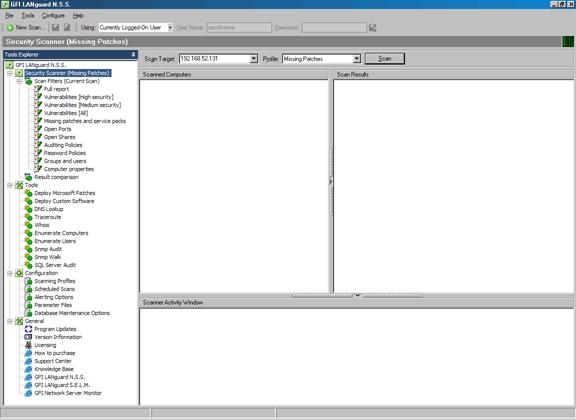
The left panel shows all the tools available and is like an ‘actions' pane. From here you can select the security scanner, filter your scan results in a variety of ways, access the tools (such as patch deployment, DNS lookup, traceroute, SNMP audit, SQL server audit etc) and the program configuration as well. In fact if you look under the menus at the top, you'll find very few options as just about everything can be controlled or modified from the left panel.
The right panel obviously shows you the results of the scan, or the tool / configuration section you have selected. In this case it's on the Security Scanner mode where we can quickly setup a target and scan it with a profile. A profile is a description of what you want to scan for, the built in profiles include:
- Missing patches
- CGI scanning
- Only Web / Only SNMP
- Ping them all
- Share Finder
- Trojan Ports
- Full TCP & UDP port scan
In the Darkness, Scan ‘em...
We setup the default scanning profile and scanned our localhost (a mercilessly locked down XP box that resists spirited break-ins from our practice penetration tests). We scanned as the ‘currently logged on user' (an administrator account), which makes a difference, since you see a lot more when scanning with privileges than without. As we had expected, this box was fairly well locked down. Here is the view just after the scan finished:
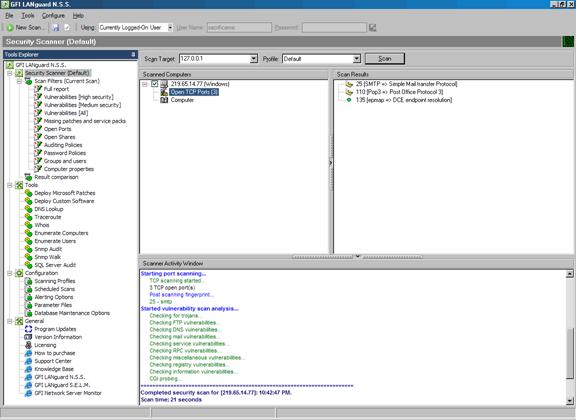
Clicking one of the filters in the left pane brings up a very nicely formatted report, showing you the information you requested (high vulnerabilities, low vulnerabilities, missing patches etc). Here is the full report:
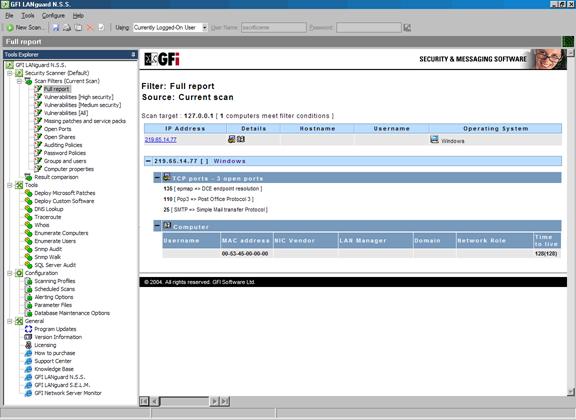
As you can see, it identified three open ports (no filtering was in place on the loopback interface) as well as MAC address, TTL, operating system etc.
We were not expecting much to show up on this highly-secured system, so we decided to wander further.
The Stakes Get Higher...
Target 2 is the ‘nightmare machine'. It is a box so insecure that it can only be run under VMWare with no connection to the Internet. What better place to set LANguard free than on a Windows XP box, completely unpatched, completely open? If it were setup on the ‘net it would go down within a couple of minutes!
However, this was not good enough for our rigorous requirements, so we infected the box with a healthy dose of Sasser. Hopefully we would be able to finish the scan before LSASS.exe crashed, taking the system down with it. To make life even more difficult, we didn't give LANguard the right credentials like we had before. In essence, this was a 'no privilege' scan.
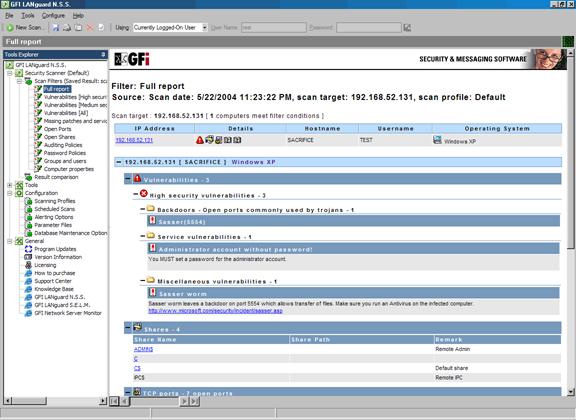
LANguard detected the no password administrator account, the Sasser backdoor, default sharing, Terminal Services active (we enabled it for the scenario). In short, it picked up on everything.
We purposely didn't give it any credentials as we wanted to test its patch deployment features last, since this was what we were really interested in. This was very impressive as more expensive scanners (notably Retina) missed out on a lot of things when given no credentials.
To further extend out scans, we though it would be a good idea to scan our VLAN network that contained over 250 Cisco IP Phones and two Cisco Call Managers. LANguard was able to scan all IP Phones without a problem and also gave us some interesting findings as shown in this screenshot:
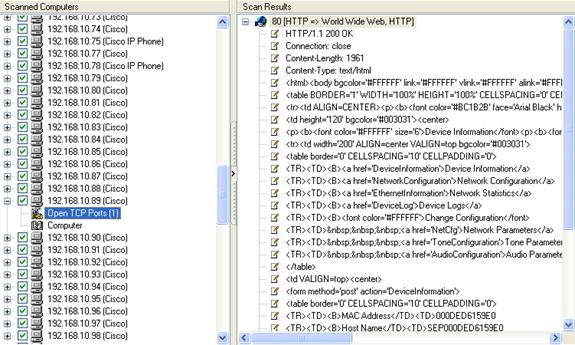
LANguard detected with ease the http port (80) open and also included a sample of the actual page that would be downloaded should a client connect to the target host!
It is quite important to note at this point that the scan shown above was performed without any disruptions to our Cisco VoIP network. Even though no vulnerabilities were detected, something we expected, we were pleased enough to see Languard capable of working in our Cisco VoIP network without problems.
If you can't join them …... Patch them!
Perhaps one of the most neatest features of GFI's LANguard is the patch management system, designed to automatically patch the systems you have previously scanned. The automatic patching system works quite well, but you should download the online PDF file that contains instructions on how to proceed should you decide to use this feature.
The automatic patching requires the host to be previously scanned in order to find all missing patches, service packs and other vulnerabilities. Once this phase is complete, you're ready to select the workstation(s) you would like to patch!
As expected, you need the appropriate credentials in order to successfully apply all selected patches, and for this reason there is a small field in which you can enter your credentials for the remote machine.
We started by selectively scanning two hosts in order to proceed patching one of them. The target host was 10.0.0.54, a Windows 2000 workstation that was missing a few patches:

LANguard successfully detected the missing patches on the system as shown on the screenshot above, and we then proceeded to patch the system. A very useful feature is the ability to select the patch(es) you wish to install on the target machine.
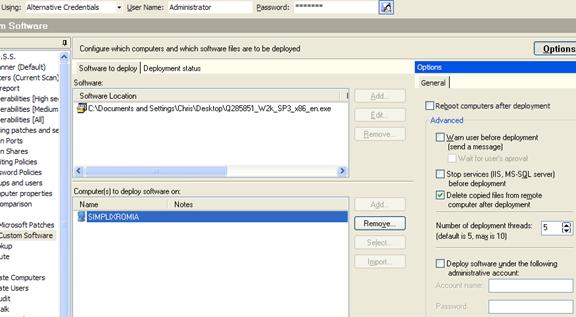
As suggested by LANguard, we downloaded the selected patch and pointed our program to install it on the remote machine. The screen shot above shows the patch we wanted to install, followed by the machine on which we selected to install it. At the top of the screen we needed to supply the appropriate credentials to allow LANguard to do its job, that is, a username of 'Administrator' and a password of ..... sorry - can't tell :)
Because most patches require a system reboot, LANguard includes such options, ensuring that no input at all is required on the other side for the patching to complete. Advanced options such as ‘Warn user before deployment' and ‘Delete copied files from remote computer after deployment', are there to help cover all your needs:
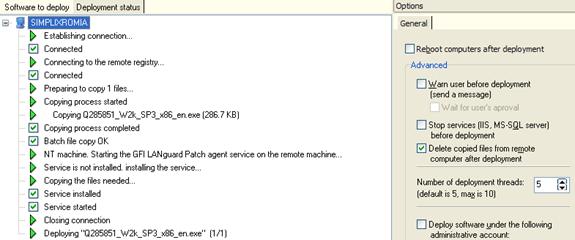
The deployment status tab is another smart feature; it allows the administrator to view the patching in progress. It clearly shows all steps taken to deploy the patch and will report any errors encountered.
It is also worth noting that we tried making life more difficult by running the patch management system from our laptop, which was connected to the remote network via the Internet, and securing it using a Cisco VPN tunnel with the IPSec as the encryption protocol. Our expectations were that GFI's LANguard would fail terribly, giving us the green light to note a weak point of the program.
To our surprise, it seems like GFI's developers had already forseen such situations and the results were simply amazing, allowing us to successfully scan and patch a Windows 2000 workstation located on the end of the VPN tunnel!
Summary
GFI without doubt has created a product that most administrators and network engineers would swear by. It's efficient, fast and very stable, able to perform its job whether you're working on the local or remote LAN.
Its features are very helpful: you won't find many network scanners pointing you to web pages where you can find out all the information on discovered vulnerabilities, download the appropriate patches and apply them with a few simple clicks of a mouse!
We've tried LANguard from small networks with 5 to 10 hosts up to large corporate network with more than 380 hosts, over WAN links and Cisco VPN tunnels and it worked like a charm without creating problems such as network congestions. We are confident that you'll love this product's features and it will quickly become one of your most necessary programs.
Your IP address:
18.220.124.7
Wi-Fi Key Generator
Follow Firewall.cx
Cisco Password Crack
Decrypt Cisco Type-7 Passwords on the fly!


