Installing Windows Server 2012 Active Directory via Server Manager. Active Directory Concepts
This article serves as an Active Directory tutorial covering installation and setup of a Windows 2012 Domain Controller using Windows Server Manager (GUI).
Readers interested in performing the installation via Windows PowerShell can read this article.
FREE Hyper-V & VMware Backup: FREE for Firewall.cx readers for a Limited Time! Download Now!
What is Active Directory?
Active Directory is a heart of Windows Server operating systems. Active Directory Domain Services (AD DS) is a central repository of active directory objects such as user accounts, computer accounts, groups, group policies and so on. Similarly, Active Directory authenticates user accounts and computer accounts when they login into the domain. Computers must be joined to the domain in order to authenticate Active Directory users.
Active Directory is a database that is made up of several components which are important for us to understand before attempting to install and configure Active Directory Services on Windows Server 2012. These components are:
- Domain Controller (DC): - Domain Controllers are servers where the Active Directory Domain Services role is installed. The DC stores copies of the Active Directory Database (NTDS.DIT) and SYSVOL (System Volume) folder.
- Data Store: - It is the actual file (NTDS.DIT) that stores the Active Directory information.
- Domain: - Active Directory Domain is a group of computers and user accounts that share common administration within a central Active Directory database.
- Forest: - Forest is a collection of Domains that share common Active Directory database. The first Domain in a Forest is called a Forest Root Domain.
- Tree: - A tree is a collection of domain names that share common root domain.
- Schema: - Schema defines the list of attributes and object types that all objects in the Active Directory database can have.
- Organizational Units (OUs): - OUs are simply container or folders in the Active Directory that stores other active directory objects such as user accounts, computer accounts and so on. OUs are also used to delegate control and apply group policies.
- Sites: - Sites are Active Directory object that represent physical locations. Sites are configured for proper replication of Active Directory database between sites.
- Partition: - Active Directory database file is made up of multiple partitions which are also called naming contexts. The Active Directory database consists of partitions such as application, schema, configuration, domain and global catalog.
Installing Active Directory Domain Controller In Server 2012
In Windows Server 2012, the Active Directory Domain Controller role can be installed using the Server Manager or alternatively, using Windows PowerShell. The figure below represents our lab setup which includes a Windows Server 2012 (FW-DC01) waiting to have the Active Directory Domain Services server role installed on it:
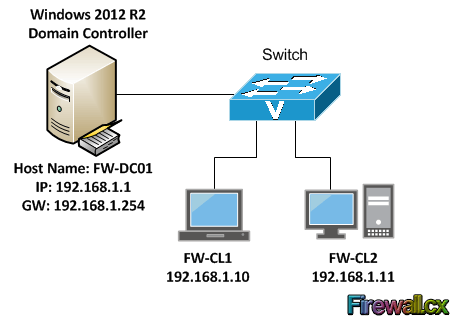
Notice that there are two Windows 8 clients waiting to join the Active Directory domain once installed.
A checklist before installing a Domain Controller in your network is always recommended. The list should include the following information:
- Server Host Name – A valid Hostname or Computer Name must be assigned to domain controller. We've selected FW-DC01 as a server's host name.
- IP Address – You should configure a static IP address, which will not be changed later on. In our example, we've used 192.168.1.1/24 which is a Class C IP address.
- Domain Name – Perhaps one of the most important items on our checklist. We've used firewall.local for our setup. While many will want to use an existing public domain, e.g their company's domain, it is highly recommended this practice is avoided at all costs as it can create a number of problems with DNS resolution when internal hosts or servers are trying to resolve hosts that exist on both private and public name spaces.
Microsoft doesn't recommend the usage of a public domain name in an internal domain controller, which is why we selected firewall.local instead of firewall.cx.
Installing Active Directory Domain Controller Using Server Manager
Initiating the installation of Active Directory is a simple process; however it does require Administrator privileges. Open Server Manager, go to Manage and select Add Roles and Features:

Figure 2. Add Roles and Features
Click Next on the Before you begin page.
On the next screen, choose Role-based or feature-based Installation and click Next:
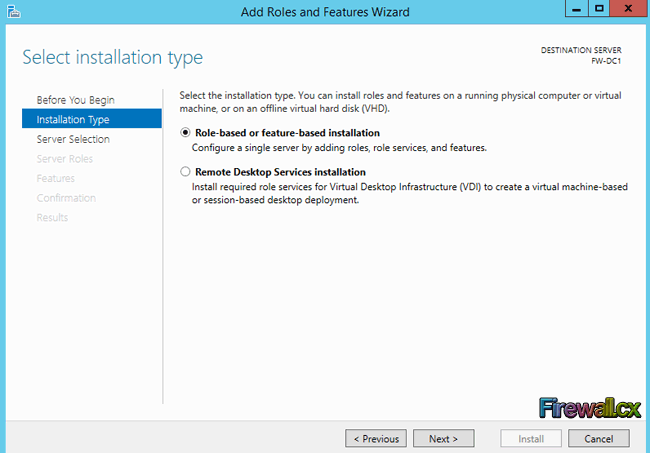
Figure 3. Choose Role Based Installation
Select the destination server by choosing Select a server from the server pool option and select the server and click Next. In cases like our lab where there is only one server available, it must be selected:
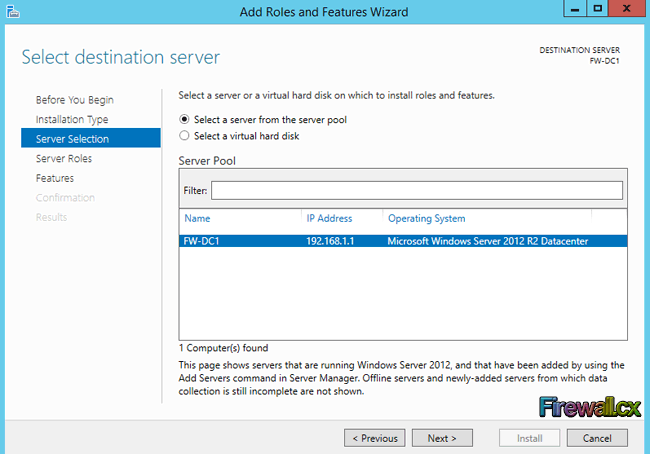
Figure 4. Select Destination Server
In the Select server roles page, select the Active Directory Domain Services role and click Next:
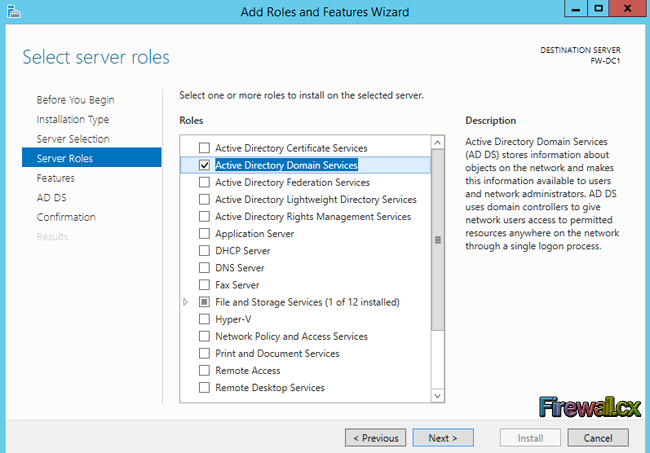
Figure 5. Select AD DS role
The next page is the Features page which we can safely skip by clicking Next
The Active Directory Domain Services page contains limited information on requirements and best practices for Active Directory Domain Services:
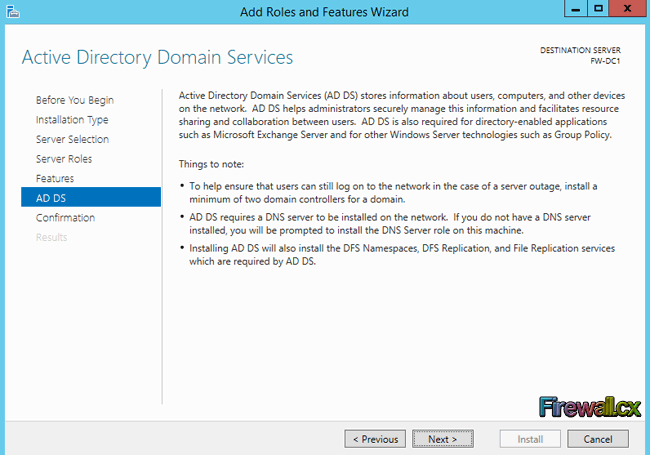
Figure 6. AD DS Page
Once you've read the information provided, click Next to proceed to the final confirmation page.
FREE Hyper-V & VMware Backup: FREE for Firewall.cx readers for a Limited Time! Download Now!
On the confirmation page, select Restart the destination server automatically if required and click on the Install button. By clicking Install, you confirm you are ready to begin the AD DS role installation:
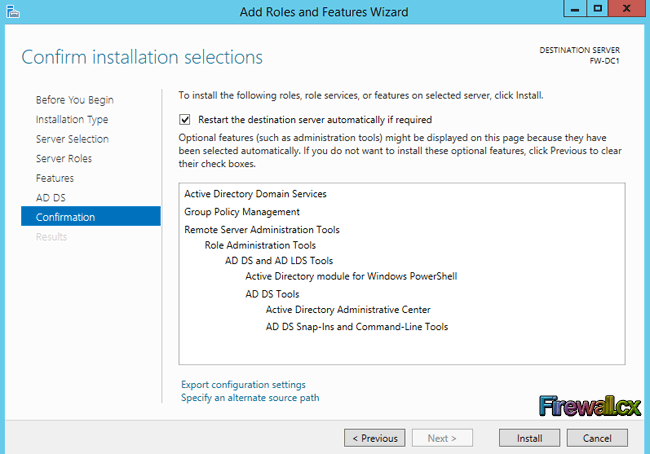
Figure 7. AD DS Confirmation
Note: You cannot cancel a role installation once it begins
The Add Roles and Feature Wizard will continuously provide updates during the Active Directory Domain Services role installation, as shown below:
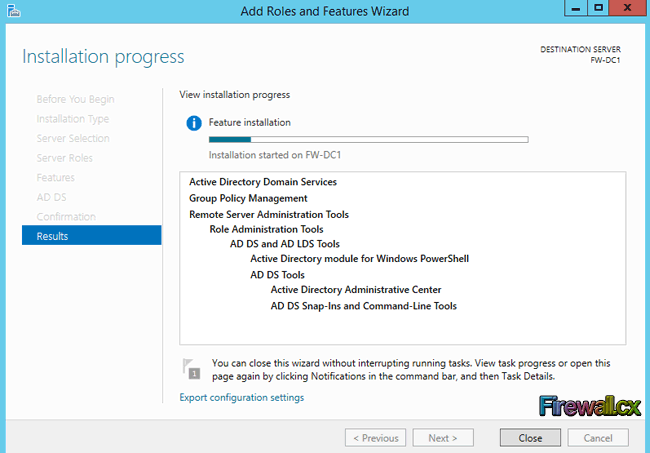
Figure 8. Installation Progress
Once the installation has completed successfully, we should expect to see the Installation succeeded message under the installation progress bar:
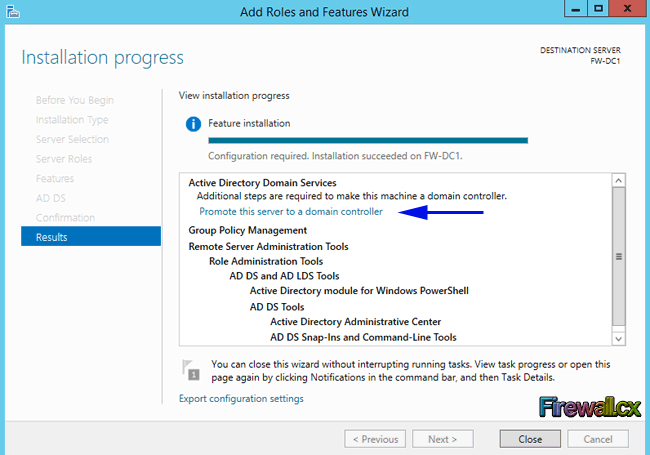
Figure 9. Successful Installation & Promote Server to DC
Promoting Server To Domain Controller
At this point we can choose to Promote this server to a domain controller by clicking on the appropriate link as highlighted above (Blue arrow).
After selecting the Promote this server to a domain controller option, the Deployment Configuration page will appear. Assuming this is the first domain controller in the network, as is in our case, select the Add a new forest option to setup a new forest, and then type the fully qualified domain name under root domain name section. We've selected to use firewall.local:
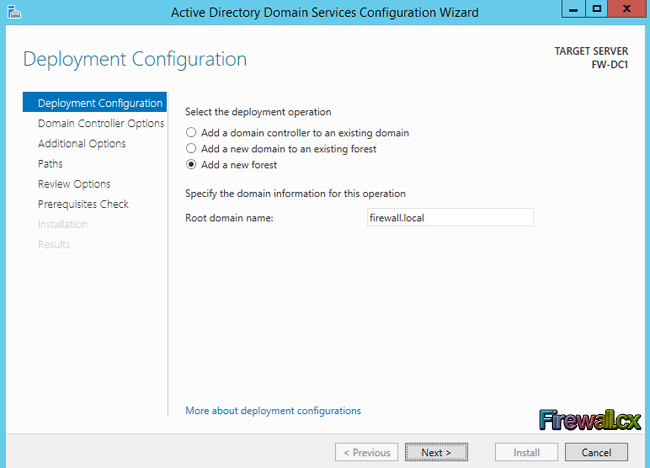
Figure 10. Configure Domain Name
Administrators who already have active directory installed would most likely select the Add a domain controller to an existing domain option. Having at least two Domain Controllers is highly advisable for redundancy purposes. When done click the Next button.
Now select Windows Server 2012 R2 for the Forest functional level and Domain functional level. By setting the domain and forest functional levels to the highest value that your environment can support, you'll be able to use as many Active Directory Domain Services as possible. If for example you do not plan to ever add domain controllers running Windows 2003, but might add a Windows 2008 server as a domain controller, you would select Windows Server 2008 for the Domain functional level. Next, click on the Domain Name System (DNS) server option as shown in the below figure:
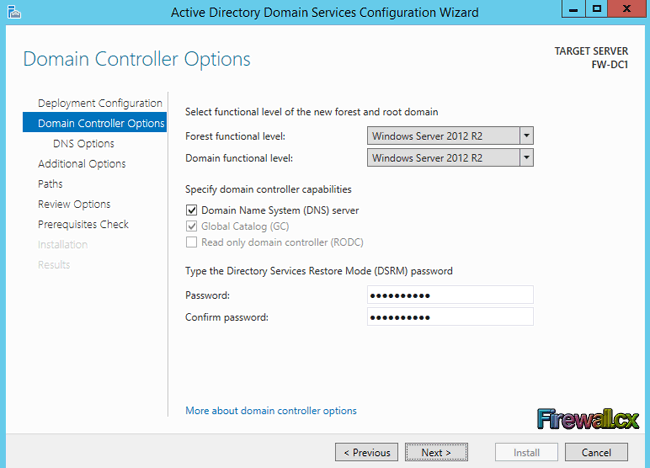
Figure 11. DC Capabilities
The DNS Server role can be later on installed. If for any reason you need to install the DNS Server role later on, please read our How to Install and Configure Windows 2012 DNS Server Role article.
Since this is the first domain controller in the forest, Global Catalog (GC) will be selected by default. Now set the Directory Services Restore Mode (DSRM) password. DSRM is used to restore active directory in case of failure. Once done, click Next.
The next window is the DNS Options page. Here we might encounter the following error which can be safely ignored simply because of the absence of a DNS server (which we are about to install):
Ignore the error and click Next to continue.
In the next window, Additional Options, leave the default NetBIOS domain name and click Next. The Windows AD DS wizard will automatically remove the .local from the domain name to ensure compatibility with NetBIOS name resolution:
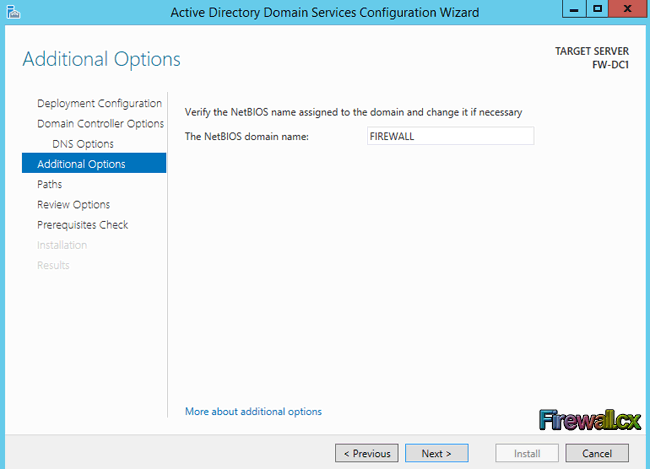
Figure 12. Additional Options
The next step involves the Paths selection which allows the selection of where to install the Database, Log Files and SYSVOL folders. You can either browse to a different location or leave the default settings (as we did). When complete, click Next:
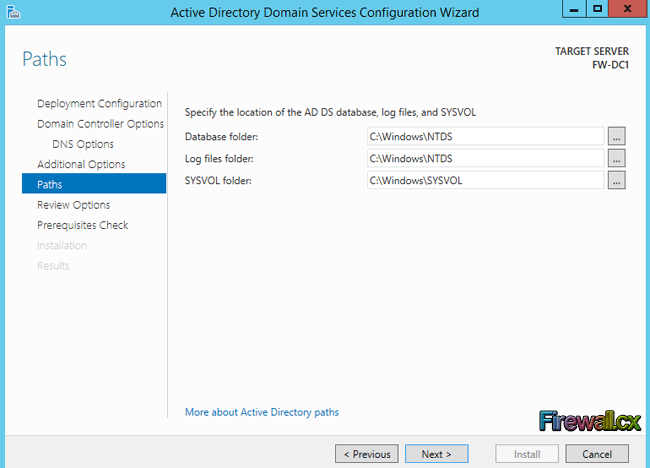
Figure 13. Paths
Note: When the installation is complete, the Database folder will contain a file named NTDS.DIT. This important file is database file of your active directory.
Finally, the next screen allows us to perform a quick review of all selected options before initiating the installation: Once reviewed, click Next.
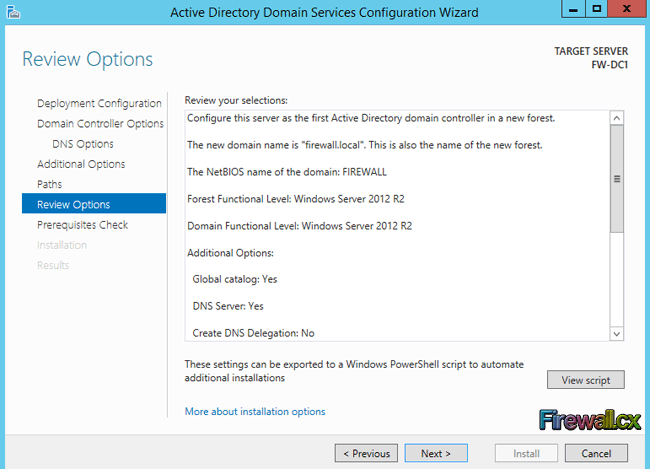
Figure 14. Review Options
The server will now perform some prerequisites check. If successful, it will show green check mark on the top. Some warnings may appear, however if these are non-critical, we can still proceed with the installation. Click the Install button to promote this server to domain controller:
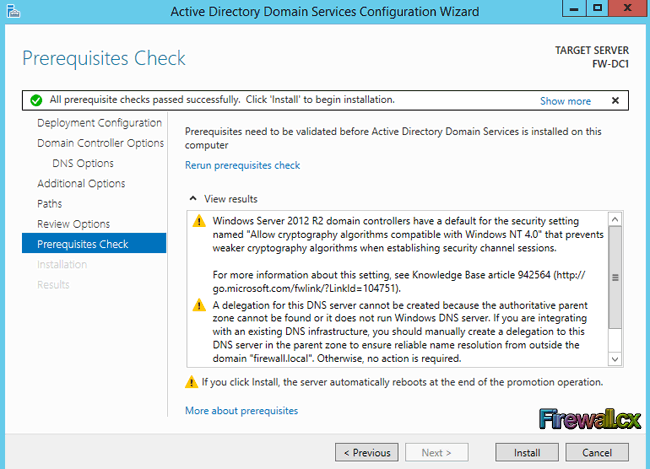
Figure 15. Prerequisites Check
The installation begins and the server's installation progress is continuously updated:
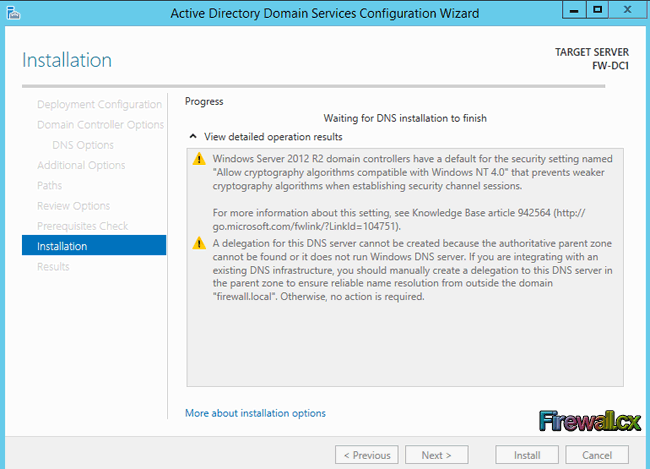
Figure 16. Installation Begins
When the installation of Active Directory is complete, the server will restart.
Assuming we've restarted, we can now open Active Directory Users and Computers and begin creating user accounts, computer accounts, apply group policies, and so on.
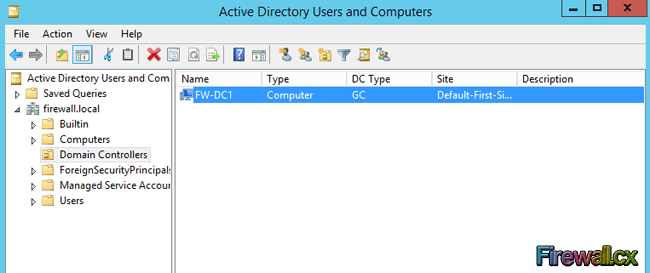
Figure 17. Active Directory Users and Computers
As expected, under the Domain Controllers section, we found our single domain controller. If we were to add our new domain controller to an existing active directory, then we would expect to find all domain controllers listed here.
FREE Hyper-V & VMware Backup: FREE for Firewall.cx readers for a Limited Time! Download Now!
Your IP address:
3.141.18.167
Wi-Fi Key Generator
Follow Firewall.cx
Cisco Password Crack
Decrypt Cisco Type-7 Passwords on the fly!


