Configuring QoS on Palo Alto Firewalls: Class-based Policies, QoS Profiles, Enabling QoS on Firewall Interfaces
 This article’s purpose is to help you quickly master Palo Alto QoS concepts and learn to configure QoS on Palo Alto Firewalls in a simple and efficient way. QoS is considered a complicated topic however thanks to Palo Alto’s intuitive firewall GUI interface and our real-scenarios, you’ll quickly grasp all necessary QoS basics and be ready to implement your own QoS policies!
You’ll learn basic QoS terms such as Ingress and Egress traffic, Differentiated Service Code Point (DSCP), Traffic Policing, Traffic Shaping, Palo Alto QoS Classes, Palo Alto QoS Policies, how to build Palo Alto QoS policies, how to configure Palo Alto QoS Classes and finally how to enable and monitor QoS on Palo Alto firewall interfaces (both standalone & AE Aggregate interfaces), view QoS bandwidth graphs and more!
Key Topics:
- Introduction to Palo Alto QoS
- Palo Alto QoS Classes
- Palo Alto QoS Policies
- Configuring QoS Class-based Policies & Profiles
- Enabling QoS on Palo Alto Firewall Physical & Aggregate (AE) Interfaces
- Summary
Find more great articles by visiting our Palo Alto Firewall Section.
Introduction to Palo Alto QoS
QoS was born from the IEEE group during 1995-1998 by establishing the standard IEEE 802.1P. The main purpose of QoS is to prioritise desired traffic over other type of traffic or to limit the amount of bandwidth applications can consume, by utilizing different mechanisms. This ensures network performance, avoids bottlenecks, congestion or overutilization of network links. A frequently used example of QoS is the prioritising Real-time traffic e.g voice or video, over other type of traffic:
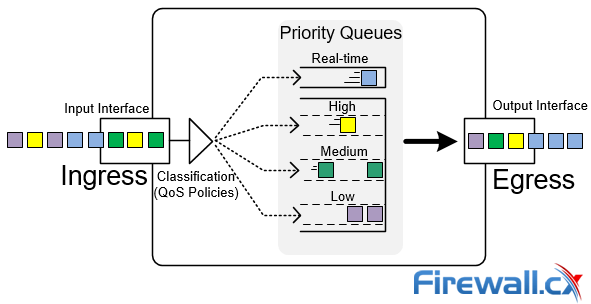 QoS Priority Queues - Packet classification and prioritization
In the example above, voice packets (blue) are given a higher priority against others, therefore immediately being forwarded by the firewall out via the output interface. Since voice packets are very sensitive to delay, they are usually handled with priority to avoid issues in a real-time voice streams e.g VoIP telephone call between two endpoints.
Overview of QoS Configuration on Palo Alto Firewalls
QoS configuration on Palo Alto Firewalls is a fairly simple process once you understand its components and how to correctly prepare the necessary building blocks. We'll being by explaining QoS Classes followed by QoS Policies and show how to use them to configure your QoS policies.
Palo Alto QoS Classes
QoS Classes are used to determine the priority (think of the QoS Priority Queuing example above) and bandwidth allocated to packets traversing the firewall. Palo Alto Firewalls support up to 8 different Classes.
On Palo Alto Firewalls, QoS Classes are configured under the Network > Network Profiles > QoS Profile submenu:
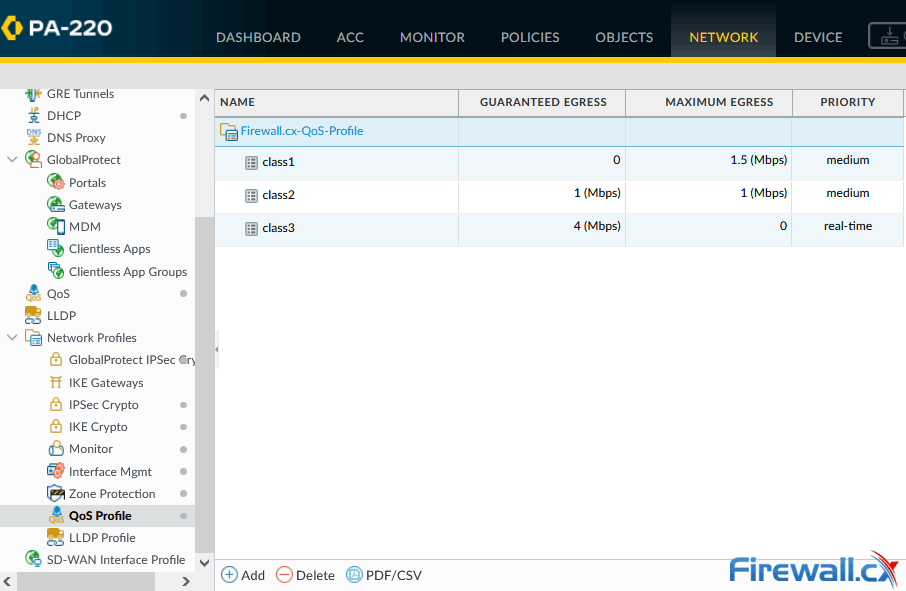
Each QoS Profile can contain any of the available 8 Classes. Multiple QoS Profiles can be configured however only one QoS Profile can be assigned per physical or AE (Aggregated Ethernet) interface.
Each Class can be configured with the following parameters:
- QoS Priority Queue (covered above).
- Egress Max speed in Mbps or percentage. Egress Max is the maximum bandwidth the Class is allocated. The value is zero (0) by default, which defines the firewall limit 60Gbps (PAN-OS-7.1.16 and later).
- Egress Guaranteed speed in Mbps or percentage. Egress Guaranteed is the guaranteed bandwidth for the Class, however the bandwidth is not reserved for the Class. Unused bandwidth is made available to all traffic. When Egress Guaranteed bandwidth for a Class is exceeded, the firewall will pass the excess traffic on a best-effort basis.
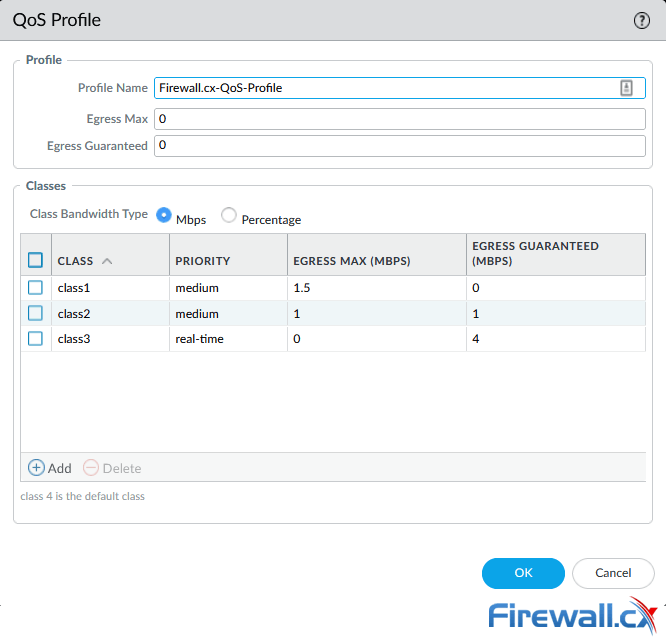
In the above example, Class1 is configured with a medium priority, allocated a maximum of 1.5Mbps bandwidth (Egress Max=1.5) however, there is no guarantee of the bandwidth it will receive (Egress Guaranteed=0) if there is a network congestion.
Class2 is configured with medium priority, allocated a maximum of 1Mbps bandwidth (Egress Max=1) and is guaranteed to receive 1Mbps bandwidth (Egress Guaranteed=1) if there is a network congestion.
Class3 is configured with real-time priority without limits of the bandwidth it can consume (Max Egress=0) and is guaranteed to receive 4Mbps bandwidth (Egress Guaranteed=4) during a network congestion state.
Class4 is the Default Class – this is where all unclassified traffic will end up and is a best-effort class. All packets here receive the same priority and there is no guarantee for the delivery of packets.
Palo Alto QoS Policies
The QoS policies are used to classify packets by assigning them to one of the Classes previously configured. If traffic does not match any of the QoS policies, it then gets assigned to the default Class, usually Class 4 and receives the best-effort delivery.
Below is an example of three QoS policies configured to assign traffic to Class1, Class2 and Class3:
 Configuring QoS Policies
Thanks to Palo Alto’s intuitive GUI interface, we can easily see that Netflix and Disney+ traffic is marked for Class1, FTP traffic is marked for Class2 and SIP/Viber traffic is marked for Class3.
QoS Policies, similar to Security Policies, are processed in a top-down order. Once traffic is matched against a policy, it is marked for the configured Class and no further policies are checked.
Configuring QoS Class-based Policies & Profiles
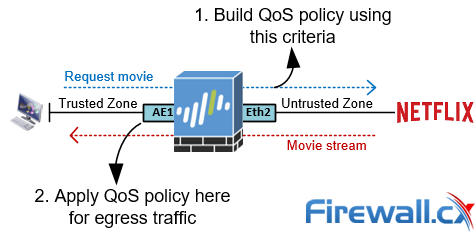 QoS policy considerations
The example above illustrates the factors that need to be considered when building and applying a QoS policy. As previously noted, the QoS policy needs to capture the traffic that initiates the session. In our example, this would be the host sending the request to Netflix. The stateful firewall capabilities of your Palo Alto Firewall will automatically identify incoming traffic (movie stream) as related to the initial request.

Next, under Network > Network Profiles > QoS Profile create a QoS Profile and configure the Class with the desirable bandwidth limits in Mbps:
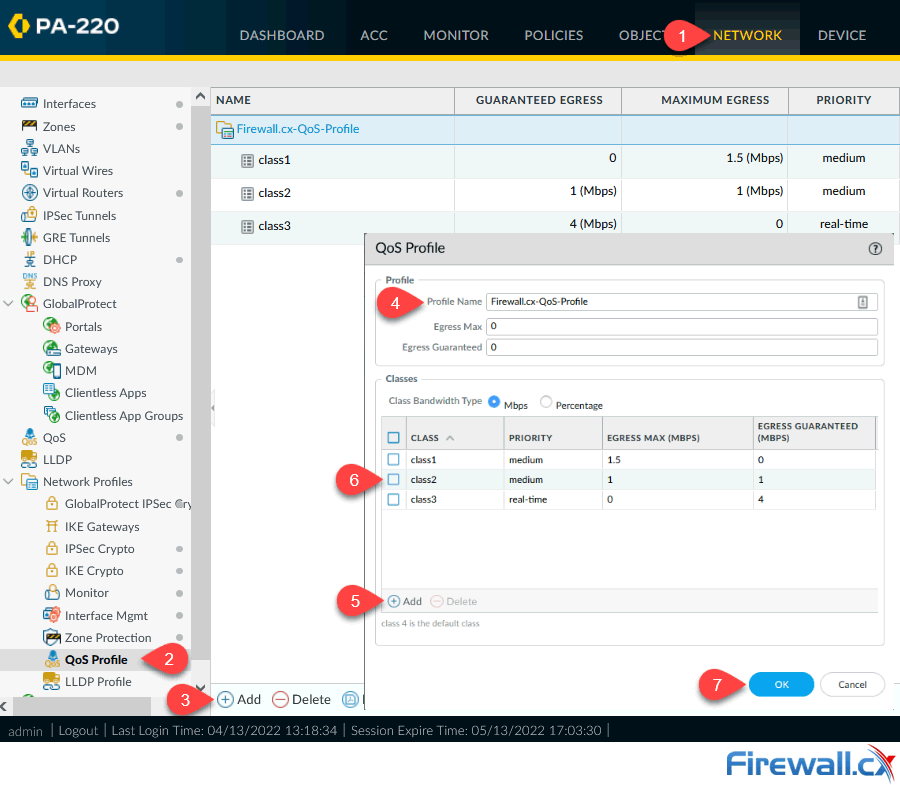
You can optionally configure the Egress Max and Egress Guaranteed for the QoS Profile. The Egress Max value (Mbps), under Profile Name (4), must be less than or equal to the Egress Max for the physical interface enabled with QoS (see next section – Enabling a QoS Profile).
The Egress Guaranteed for the QoS Profile (under Profile Name) specifies the bandwidth, in Mbps, guaranteed for that profile. When the Egress Guaranteed is exceeded, the firewall passes traffic on a best-effort basis.
If unsure or if you wish to keep things simple, leave these fields to their default value of zero (0).
Enabling QoS on Palo Alto Firewall Interfaces
Palo Alto firewalls allow QoS to be enabled on physical interfaces, subinterfaces and Aggregate Ethernet (AE) interfaces, giving you control on how and where QoS is enabled. The limitation on the type of interfaces QoS can be enabled is directly related to the firewall appliance model itself. The Palo Alto product comparison tool provides this information, under the QoS section.
Enabling QoS on an interface is a simple process once all building blocks are in place.
Navigate to Network > QoS and click Add:
Next, in the pop-up window, select the desired Interface on which QoS is to be enabled. Remember, Palo Alto Firewalls apply QoS for Egress traffic, that is, traffic exiting the firewall. In our example this is Aggregate Ethernet 1 or AE1:

We next enter the Egress Max value for the selected interface, that is, AE1. In our lab, AE1 is a 1Gbps (1000Mbps) interface. Finally click on the “Turn on QoS feature on the interface” and select the previously created QoS profile (Firewall.cx-QoS-Profile) from the drop-down box, as shown below:

Next, when ready click OK and then commit all changes to enable QoS.
The Clear Text Traffic tab provides the ability to define additional granularity on the treatment of clear text traffic, while the Tunnelled Traffic tab allows QoS to be enabled and configured on Tunnel interfaces (VPNs). As a minimum, enabling a QoS interface requires you to select a Default (QoS) Profile that defines bandwidth and priority settings for clear text traffic egressing the interface.
Once QoS is configured and pushed to the firewall, the GUI interface is updated to reflect the changes:

The Statistics option (far right in the above screenshot) provides a real-time information for each QoS Class, combined Class traffic and much more.
The below screenshot is an example of our QoS statistics:
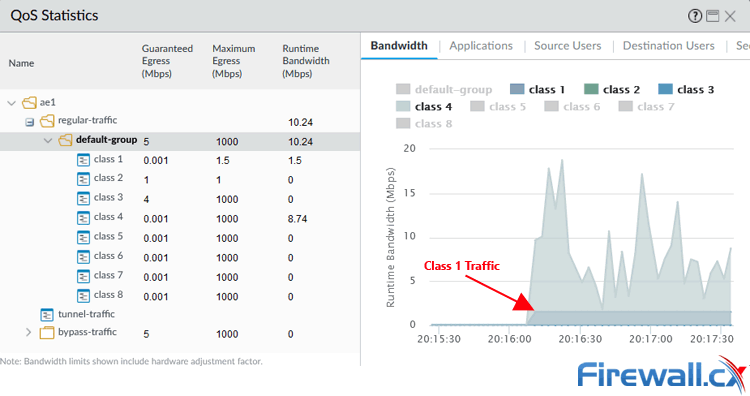
To display additional traffic information for a specific Class, select it from the left pane. The right pane will then automatically refresh and display the bandwidth consumed by that Class. In the below example, we selected Class 1:
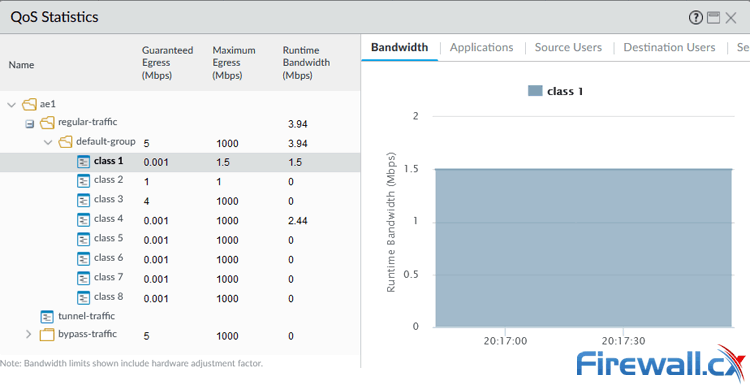
While the bandwidth tab (right pane) is displayed by default for any selected Class (left pane), the rest of the tabs provide very useful information and includes Applications identified under the selected class, Source Users or Destination Users (both require connectivity with AD) and Security Rules utilized by the Class.
Summary
This article dived into the dynamic world of Quality of Service (QoS) with Palo Alto Firewalls. We uncovered the secrets behind essential QoS terms like DSCP values, Traffic Policing, Traffic Shaping, QoS Classes, and the game-changing QoS Priority Queuing. We explored the Ingress and Egress interfaces while guiding you through the exciting process of building and applying QoS Classes and QoS Policies with real-world examples. Finally, we demonstrated how to keep a pulse on the bandwidth consumed by your carefully configured QoS Classes.
Your IP address:
18.119.0.207
Wi-Fi Key Generator
Follow Firewall.cx
Cisco Password Crack
Decrypt Cisco Type-7 Passwords on the fly!


