Configuring Domain Group Policy for Windows 2003
Windows 2003 Group Policies allow the administrators to manage a group of people accessing a resource efficiently. The group policies can be used to control both the users and computers.
They give better productivity to administrators and save their time by allowing them to manage all the users and computers centrally in just one go.
The group policies are of two types, Local Group Policy and Domain-based Group Policy. As the name suggests, the Local Group Policies allow the local administrator to manage all the users of a computer to access the resources and features available on the computer. For example an administrator can remove the use of Run command from the start menu. This will ensure that the users will not find Run command on that computer.
The Domain-based Group Policies on the other hand allow the domain/enterprise administrators to manage all the users and the computers of a domain/ forest centrally. They can define the settings and the allowed actions for users and computers across sites, domains, and OUs through group policies.
There are more than 2000 pre-created group policy settings available in Windows Server 2003. A default group policy already exists. You only need to modify it by setting values of different policy settings according to your specific requirements. You can also create new group policies to meet your specific business requirements. The group policies allow you to implement:
- Registry based settings: Allows you to create a policy to administer operating system components and applications.
- Security settings: Allows you to set security options for users and computers to restrict them to run files based on path, hash, publisher criteria, or URL zone.
- Software restrictions: Allows you to create a policy that would restrict users to run unwanted applications and protect computers against virus and hacking attack.
- Software distribution and installation: Allows you to either assign or publish software application to domain users centrally with the help of a group policy.
- Automation of tasks using computer and User Scripts
- Roaming user profiles: Allow mobile users to see a familiar and consistent desktop environment on all the computers of the domain by storing their profile centrally on a server.
- Internet Explorer maintenance: Allow administrators to manage the IE settings of the user's computers in a domain by setting the security zones, privacy settings, and other parameters centrally with the help of group policy.
Configuring a Domain-Based Group Policy
Just as you used group policy editor to create a local computer policy, to create a domain-based group policy you need to use Active Users and Computers snap-in from where you can open the GPMC.
Follow the steps below to create a domain-based group policy
1. Select Active Directory Users and Computers tool from the Administrative Tools.
2. Expand Active Directory Users and Computers node, as shown below.
3. Right-click the domain name and select Properties from the menu that appears:
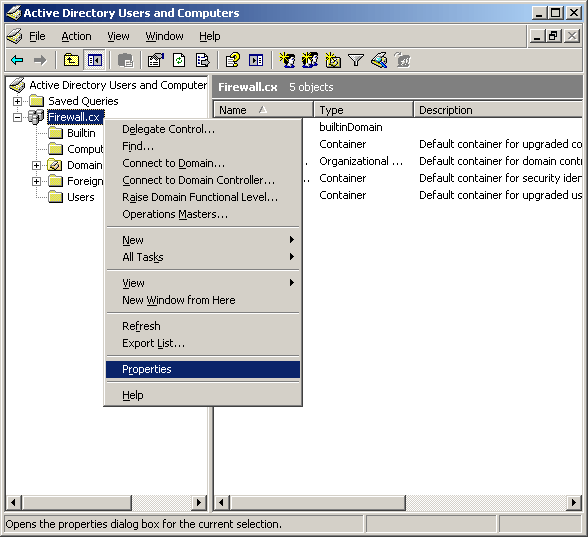
The properties window of the domain appears.
4. Click the Group Policy tab.
5. The Group Policy tab appears with a Default Domain Policy already created in it, as shown in here:
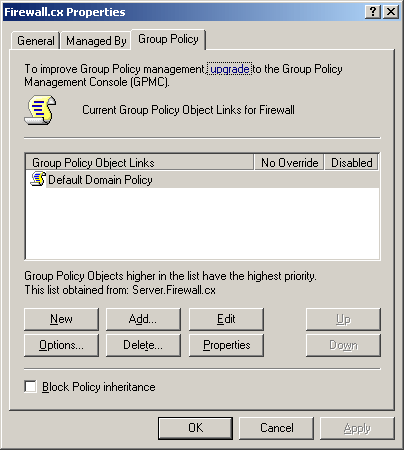
You can edit the Default Domain Policy or create a new policy. However, it is not recommended to modify the Default Domain Policy for regular settings.
We will select to create a new policy instead. Click New to create a new group policy or group policy object. A new group policy object appears below the Default Domain Policy in the Group Policy tab, as shown below:
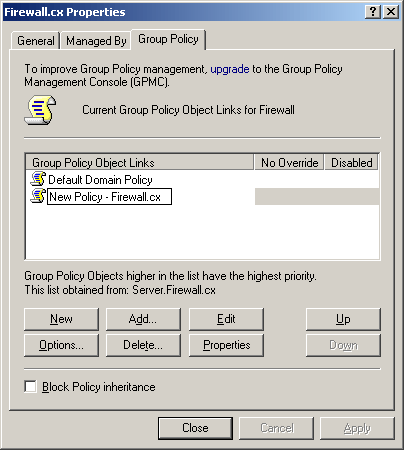
Once you rename this group policy, you can either double-click on it, or select it and click Edit.
You'll next be presented with the Group Policy Object Editor from where you can select the changes you wish to apply to the specific Group Policy:
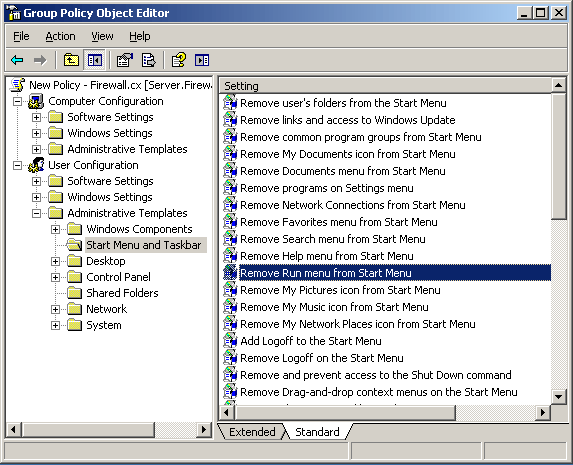
In this example, we have selected to Remove Run menu from Start Menu as shown above. Double-click on the selected setting and the properties of the settings will appear. Select Enabled to enable this setting. Clicking on Explain will provide plenty of additional information to help you understand the effects of this setting.
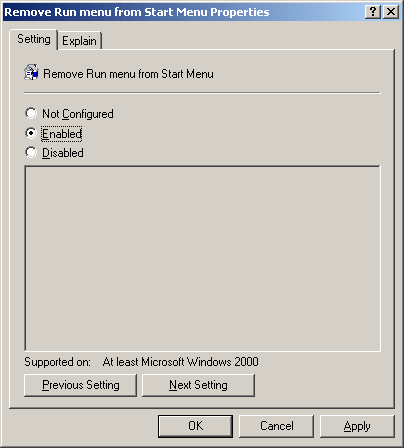
When done, click on OK to save the new setting.
Similarly you can set other settings for the policy. After setting all the desired options, close the Group Policy Object editor . You new group policy will take effect.
Article Summary
Domain Group Policies give the administrator great control over its domain users by enhancing security levels and restricting access to specific areas of the operating system. These policies can be applied to every organisation unit, group or user in the active directory or selectively to the areas you need. This article shows you how to create a domain group policy that can then be applied as required.
If you have found the article useful, we would really appreciate you sharing it with others by using the provided services on the top left corner of this article. Sharing our articles takes only a minute of your time and helps Firewall.cx reach more people through such services.
They give better productivity to administrators and save their time by allowing them to manage all the users and computers centrally in just one go.
The group policies are of two types, Local Group Policy and Domain-based Group Policy. As the name suggests, the Local Group Policies allow the local administrator to manage all the users of a computer to access the resources and features available on the computer. For example an administrator can remove the use of Run command from the start menu. This will ensure that the users will not find Run command on that computer.
The Domain-based Group Policies on the other hand allow the domain/enterprise administrators to manage all the users and the computers of a domain/ forest centrally. They can define the settings and the allowed actions for users and computers across sites, domains, and OUs through group policies.
There are more than 2000 pre-created group policy settings available in Windows Server 2003/ Windows XP. A default group policy already exists. You only need to modify it by setting values of different policy settings according to your specific requirements. You can also create new group policies to meet your specific business requirements. The group policies allow you to implement:
Registry based settings : Allows you to create a policy to administer operating system components and applications.
Security settings : Allows you to set security options for users and computers to restrict them to run files based on path, hash, publisher criteria, or URL zone.
Software restrictions : Allows you to create a policy that would restrict users to run unwanted applications and protect computers against virus and hacking attack.
Software distribution and installation : Allows you to either assign or publish software application to domain users centrally with the help of a group policy.
Automation of tasks using computer and User Scripts
Roaming user profiles : Allow mobile users to see a familiar and consistent desktop environment on all the computers of the domain by storing their profile centrally on a server.
Internet Explorer maintenance : Allow administrators to manage the IE settings of the user's computers in a domain by setting the security zones, privacy settings, and other parameters centrally with the help of group policy.
Configuring a Domain-Based Group Policy
Just as you used group policy editor to create a local computer policy, to create a domain-based group policy you need to use Active Users and Computers snap-in from where you can open the GPMC .
Follow the steps below to create a domain-based group policy
1. Select Active Directory Users and Computers tool from the Administrative Tools.
2. Expand Active Directory Users and Computers node, as shown below.
3. Right-click the domain name and select Properties from the menu that appears.
The properties window of the domain appears.
4. Click the Group Policy tab.
5. The Group Policy tab appears with a Default Domain Policy already created in it, as shown in here:
You can edit the Default Domain Policy or create a new policy. However, it is not recommended to modify the Default Domain Policy for regular settings.
We will select to create a new policy instead. Click New to create a new group policy or group policy object. A new group policy object appears below the Default Domain Policy in the Group Policy tab, as shown below:
Once you rename this group policy, you can either double-click on it, or select it and click Edit.
You'll next be presented with the Group Policy Object Editor from where you can select the changes you wish to apply to the specific Group Policy:
In this example, we have selected to Remove Run menu from Start Menu as shown above. Double-click on the selected setting and the properties of the settings will appear. Select Enabled to enable this setting. Clicking on Explain will provide plenty of additional information to help you understand the effects of this setting.
When done, click on OK to save the new setting.
Similarly you can set other settings for the policy. After setting all the desired options, close the Group Policy Object editor . You new group policy will take effect.
Article Summary
Domain Group Policies give the administrator great control over its domain users by enhancing security levels and restricting access to specific areas of the operating system. These policies can be applied to every organisation unit, group or user in the active directory or selectively to the areas you need. This article shows you how to create a domain group policy that can then be applied as required.
If you have found the article useful, we would really appreciate you sharing it with others by using the provided services on the top left corner of this article. Sharing our articles takes only a minute of your time and helps Firewall.cx reach more people through such services.
About the writers
GFI Software provides the single best source of network security, content security and messaging software for small to medium sized businesses.
Alan Drury is member of the Firewall.cx team and senior engineer at a large multinational company, supporting complex large Windows networks.
Chris Partsenidis is a CCNA certified Engineer, MCP, LCP, Founder & Senior Editor of Firewall.cx
Wi-Fi Key Generator
Follow Firewall.cx
Cisco Password Crack
Decrypt Cisco Type-7 Passwords on the fly!


