Complete Guide: How to Download & Deploy The Cisco 9800-CL Virtual Wireless Controller on VMware ESXi
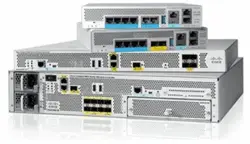 This article covers the deployment of the Cisco WLC 9800-CL cloud-based controller on the VMware ESXi platform. We explain the CPU, RAM and storage requirements, provide URLs to easily download and install the WLC controller using the OVA template, select the appropriate WLC 9800 deployment size (small, medium, large) and help you understand and configure the different WLC VM network interfaces.
Key Topics:
- Introduction to the Cisco 9800 WLC Virtual Controller
- Cisco 9800 WLC Virtual Controller VMware ESXi Requirements
- Cisco 9800 WLC Virtual Controller Deployment Models
- How to Download the Cisco 9800-CL Software
- Installing the Cisco 9800 WLC Virtual Controller in VMware ESXi
- Critical VMware Network Information on the Cisco 9800-CL – vNICs, vSwitch etc.
- Configure a VMware Port Group to Allow Trunking or Single VLAN
- Summary
Introduction to the Cisco 9800 WLC Virtual Controller
Cisco released their next-generation 9800 series Wireless Controllers back in 2018, also offering a cloud-based version that supports VMware ESXi, Microsoft Hyper-V, Amazon AWS, Microsoft Azure, Google Cloud Platform (GCP), Ubuntu/Red Hat Enterprise Linux using KVM, and Cisco NFVIS environments.
The virtualized version of the WLC controller offers great flexibility for organizations while at the same time provides considerable savings thanks to its zero-price tag. Customers are able to freely download and deploy the appliance, with the only restriction being the AP licenses that need to be purchased as an ongoing subscription.
Virtualization offers additional benefits which include:
- Hardware independence. Not hardware involved. Lead times for the hardware-based controllers can sometimes exceed 6-9 months depending on the market demand and other circumstances.
- Decreased cost. The VM option means organizations are saving 6-figure amounts for every 9800-40 or greater model they require. If you’re considering introducing High-Availability (HA), then the Cloud-based controller becomes a much cheaper architecture. Additional savings are added since Smartnet contracts for the hardware are not required.
- Better utilization of virtualization infrastructure. Utilizing the existing virtualization platform increases its ROI.
- Greater Deployment Flexibility. VMs allow you to easily move them from one physical server to another, even between different datacenters or physical locations.
- Increased Redundancy & Backups. Backing up a VM is an easy and simple process. You can even use specialized free VM Backup tools for this process.
Cisco 9800 WLC Virtual Controller VMware ESXi Requirements
Deploying the WLC 9800-CL in an ESXi environment is, as you’ll discover, a simple process. Cisco provides a single OVA file package, roughly around 1.25GB in size:

The OVA file, used by Vmware ESXi, contains three files inside:
- An OVF file, known as a descriptor This is basically an XML file with an ovf extension, consisting of all the metadata about the package, product details, resource requirements and licensing.
- A VMDK This is the VM’s single virtual disk.
- A MF Also known as the manifest file, it’s an optional file that stores the SHA hash key generated when creating the package.
The Cisco 9800-CL can be deployed in a VMware environment regardless if vCenter is present or not, making it possible to run in a more simplified VMware environment e.g home lab. Cisco’s latest release notes provide the most up to date information on system requirements, however as a general rule of thumb the latest version of 9800-CL supports the following VMware environments:
- VMware ESXi vSphere 6.0, 6.5, 6.7, 7.0 & 8.0.
- VMware ESXi vCenter 6.0, 6.5, 6.7, 7.0 & 8.0.
- VMware vSwitch. Standard and Distributed vSwitches are supported.
- Single hard disk is only supported. Multiple hard disks on a VM is not supported.
- Virtual Network Interface Cards (vNICs).
- Virtual CPU cores (vCPU).
- NIC Teaming is supported.
For VMware ESXi 6.5, Cisco recommends the usage of an OVF tool to deploy the OVA files.
Bugs in earlier versions of ESXi might cause errors when trying to deploy using the OVA file e.g A required disk image was missing error. If you encounter this, you have several options:
- Use vCenter, if available. The OVA will usually deploy fine in vCenter, regardless of the version/patch level you are at.
- Use OVFTool. You can download the tool and documentation from VMware’s website.
- Download and deploy the 9800-CL from the ISO instead of the OVA, using the method outlined here: https://www.cisco.com/c/en/us/td/docs/wireless/controller/technotes/8-8/b_c9800_wireless_controller_virtual_dg.html#id_90231
- Upgrade VMware to a supported version, which may or may not resolve the issue. This should be a last resort, as it is fairly simple to work around the error without upgrading VMware.
The next section covers each WLC deployment models, hardware requirements and technical specifications.
Cisco 9800 WLC Virtual Controller Deployment Models
When deploying the Cisco 9800-CL, there are five different deployment options to select from depending on your organization’s requirements and available hardware resources. These are summarized in the table below:
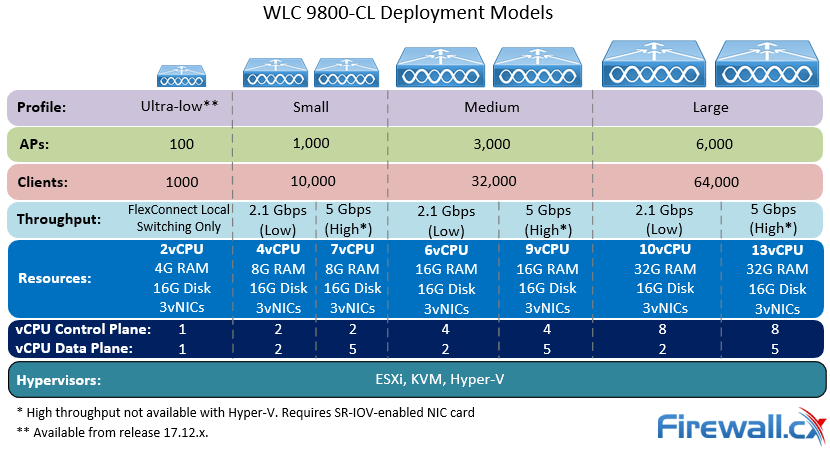
- Ultra Low-Profile: 100 APs, 1K clients - 2 vCPUs, 4GB RAM, 3 vNICs. Local switching FlexConnect only.
- Small Profile: 1K APs, 10K Clients - 4 vCPUs, 8GB RAM, 3 vNICs, 16GB Disk, Max 2.1 Gbps throughput.
- Small Profile: 1K APs, 10K Clients, High Throughput - 7 vCPUs, 8GB RAM, 3 vNICs, 16GB Disk, Max 5 Gbps throughput (with SR-IOV enabled, no Hyper-V support).
- Medium Profile: 3K APs, 32K Clients - 6 vCPUs, 16GB RAM, 3 vNICs, 16GB Disk, Max 2.1Gbps throughput.
- Medium Profile: 3K APs, 32K Clients, High Throughput - 9 vCPUs, 16GB RAM, 3 vNICs, 16GB Disk, Max 5 Gbps throughput (with SR-IOV enabled, no Hyper-V support).
- Large Profile: 6K APs, 64K Clients - 10 vCPUs, 32GB RAM, 3 vNICs, 16GB Disk, Max 2.1Gbps throughput.
- Large Profile: 6K APs, 64K Clients, High Throughput - 13 vCPUs, 32GB RAM, 3 vNICs, 16GB Disk, Max 5 Gbps throughput (with SR-IOV enabled, no Hyper-V support).
The Ultra-low profile was introduced in release 17.12.x, as a beta release with no TAC support offered. Version 17.12.01 shows it supports 100 APs, not 50 APs as per Cisco documentation:
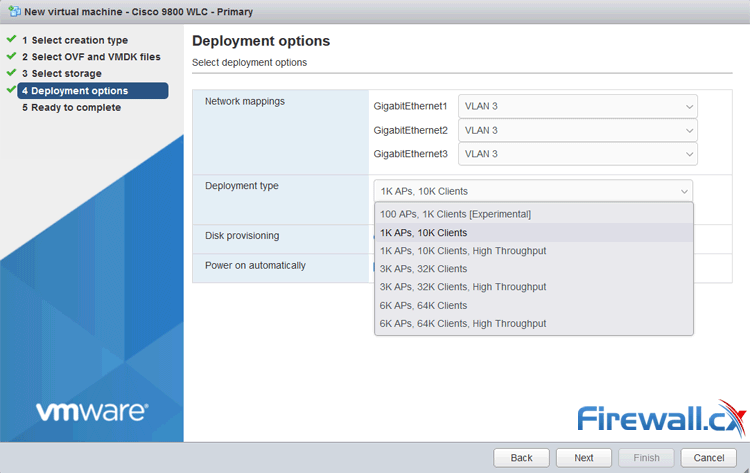
The large variety of deployment models offers great flexibility for any sized organization but also resources needed to run the software.
It’s equally important to know that VMware functions such as vMotion, Distributed Resource Scheduler (DRS), Snapshots and vNIC Teaming are fully supported, as long as Single Root I/O Virtualization (SR-IOV) mode is not enabled.
How to Download the Cisco 9800-CL Software
To download the Cisco 9800-CL software, head to the link below and click on the IOS XE Software option: https://software.cisco.com/download/home/286322605/type:
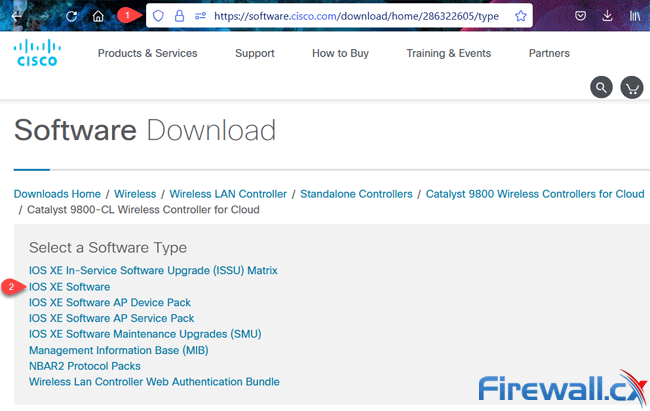
At the next screen, select the desired release version from the left panel, then locate the OVA file from the right panel. Now click the on the download icon next to the filename as shown below:
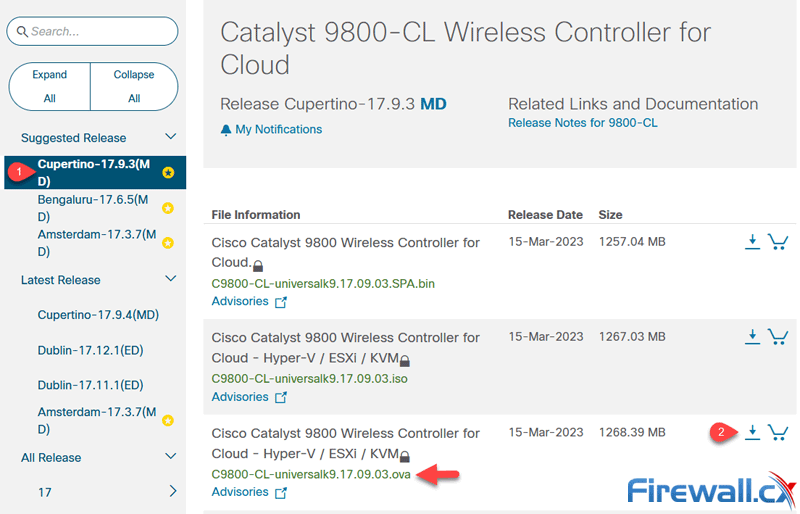
The OVA file is suitable for VMware as explained earlier in this article. Optionally, you can also download the ISO image, but this will need to be mounted to your ESXi host.
You’ll need to log into your Cisco CCO account to start the download. At the time of writing this article, it is not required to have an active Smartnet contract to access and download the software.
It is highly recommend to visit our Cisco WLC Wireless Controllers – Aironet AP & Software compatibility list download page. With this PDF list, you’ll be able to quickly identify the correct WLC software version that supports your infrastructure (Access Points and other software).
Installing the Cisco 9800 WLC Virtual Controller in VMware ESXi
Installing the Cisco 9800-CL is a straight forward process. From your ESXi server, select Create/Register VM:
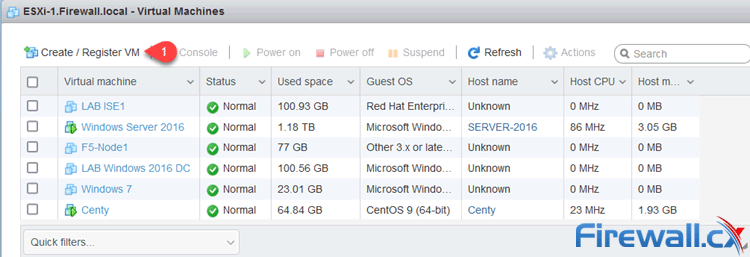
If using vSphere Client, select File > Deploy OVF Template.
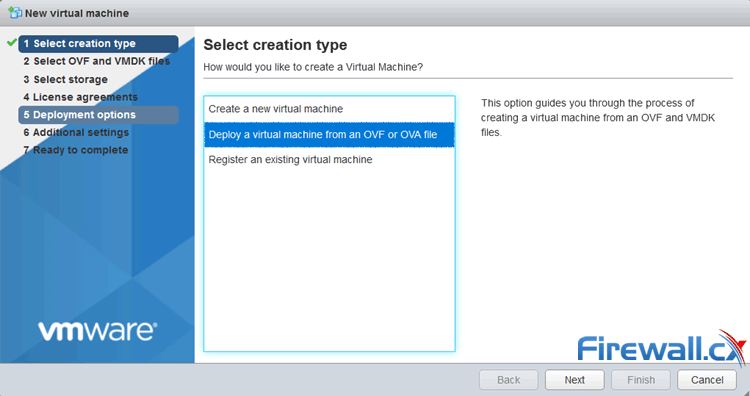
Next, select the Deploy a virtual machine from an OVF or OVA file option and click on Next:
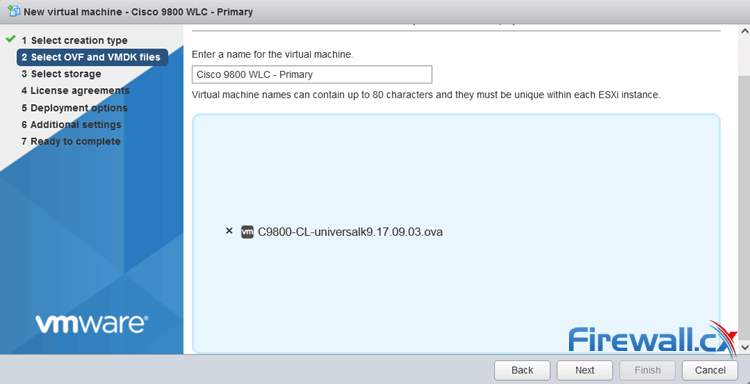
On the next window, enter a name for the VM and drag/drop the OVA file into the area below:
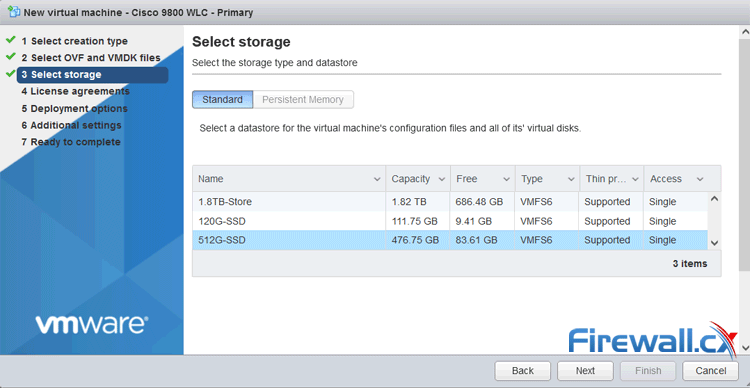
Next, select the storage to be used for the VM. When ready, click on Next:
The next step is the Deployment type where you can select the deployment model best suitable for your infrastructure. We’ve selected the 1K AP – 10K Clients option. Notice the system automatically shows the necessary resources for the selected deployment option:
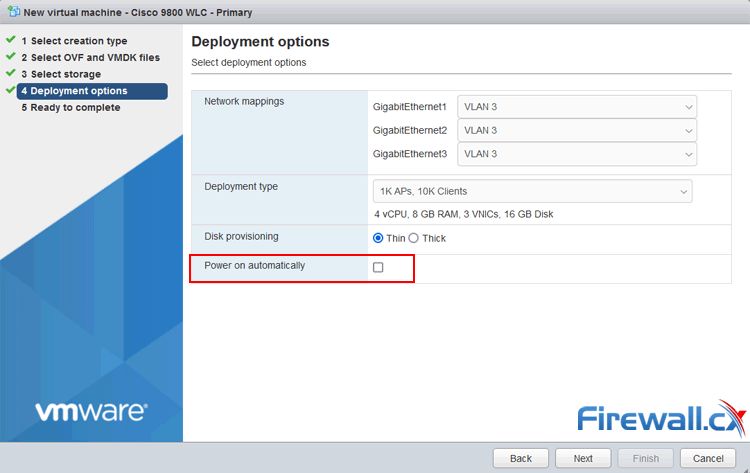
All deployment options require three vNICs. We’ll cover these in detail later. For now, we’ll leave them all on the default selected VLAN. It’s advised to un-check the Power on automatically option. This will provide you with the chance to configure the vNICs before the first power on. When ready, click on Next to continue.
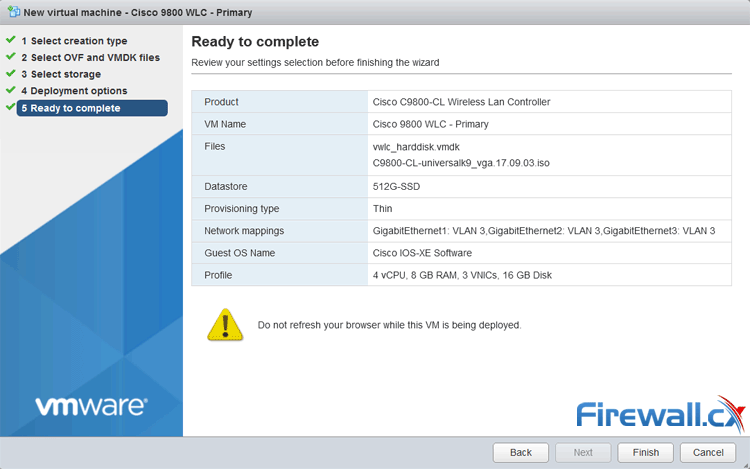
The next screen provides a summary of our deployment and includes VM name, image to be deployed, storage selected and resources to be assigned. When ready, click on Finish to initiate the deployment.
Deployment of the image will depend on your network connection speed to the ESXi host and usually takes between 2-7 minutes.
Critical VMware Network Information on the Cisco 9800-CL
Understanding the underlying network architecture of the Cisco 9800-CL is paramount for a successful deployment.
The Cisco 9800-CL is deployed by default with 3 network interfaces.
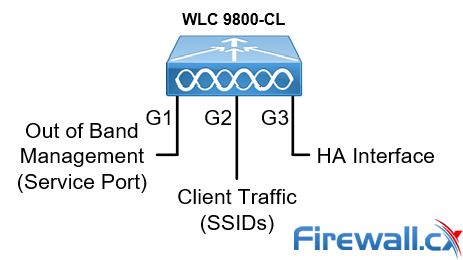
By default, each interface has a specific role which is as follows:
- Gigabit1: Out of Band Management - OBM (Service Port).
- Gigabit2: Network Interface for client traffic.
- Gigabit3: Heartbeat interface for SSO High-Availability (HA).
The Heartbeat interface (Gigabit3) is required only in a HA setup and configured as a Layer 2 interface (VLAN assignment only). It is not used in standalone deployments.
While interfaces not used can be deleted, this must be done before the WLC is powered up for the first time. It is however advisable not to delete any interfaces as they might be used later in the future.
When the WLC boots the first time, scripts are executed that map these interfaces with specific services. If any of the interfaces are deleted from the VM at a later time, the WLC will likely fail to boot.
Gigabit2 is used for client traffic. If you’re planning to use one VLAN only e.g a single SSID mapped to one VLAN, then you can select the VLAN wireless users will connect to.
For most deployments, multiple SSIDs are required, where each SSID maps to a single VLAN network. For this reason its best to create a VMware Port Group to allow trunking of VLANs. This is covered in our next section.
For our deployment, Gigabit 1 will be used for management, Gigabit 2 will be assigned to a Port Group, & Gigabit 3 will not be used.
More information on VLAN theory can be found at our VLAN section.
Configure a VMware Port Group to Allow Trunking or a Single VLAN
It is highly recommend you configure VMware so that the WLC 9800-CL can support multiple SSIDs via trunking. Even if there are plans to configure a single SSID/VLAN, its best to have the infrastructure ready to support multiple VLANs.
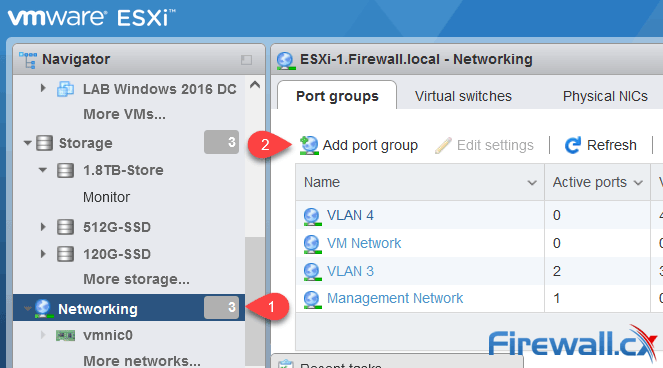
To begin, in ESXi, select Networking from the Navigator menu, then click on Add Port Group on the right:
In the next screen, enter a name and set the VLAN to 4095, this means allow all VLANs and effectively makes the port, a Trunk port. In the Security section, Cisco recommends both Promiscuous mode and Forged transmits are set to Accept:
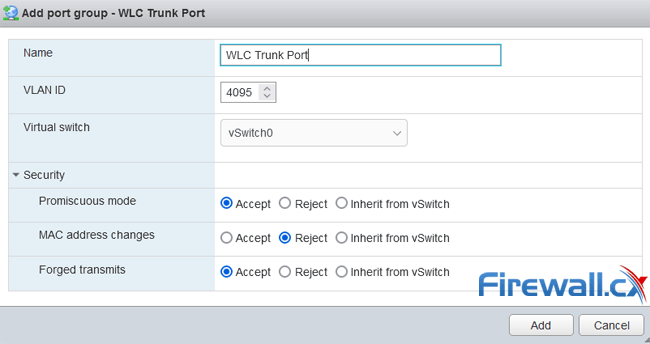
If you do not plan to use trunking, simply type the required VLAN in the VLAN ID field.
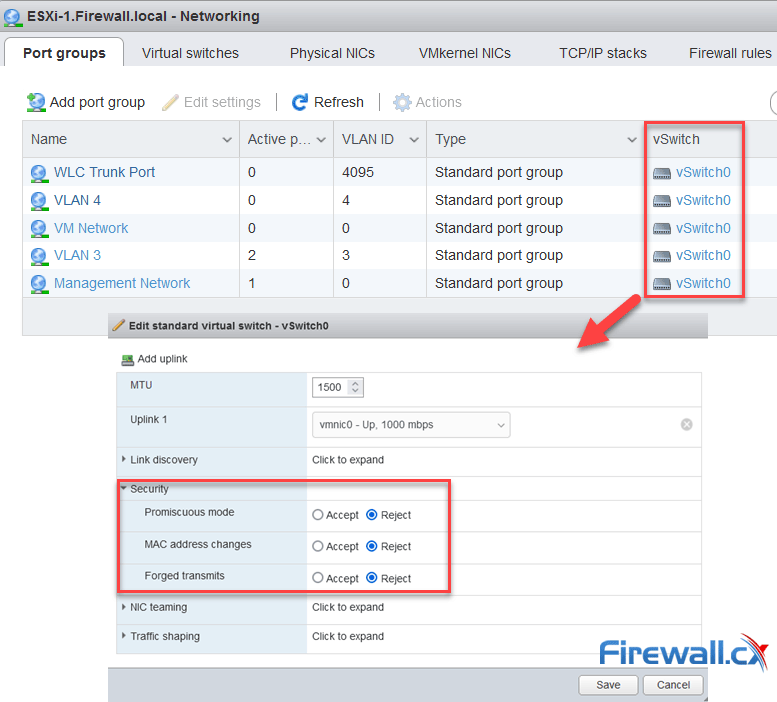
As an additional note, ensure promiscuous mode and forged transmits are set to reject at the vSwitch level. A Broadcast storm can be created if more than one VM with a trunked interface exists (e.g a second 9800-CL WLC) and these settings are enabled at the vSwitch level. Settings at the Port Group will override the vSwitch settings.
You can check verify the vSwitch Security settings as shown below. These should all be set to Reject:
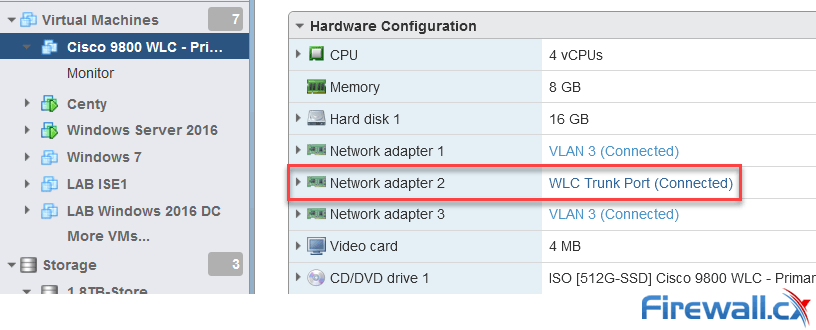
Now the Port Group has been created and configured, assign it to Network adapter 2:
If the Port Group is configured before deploying the WLC 9800-CL image, it will be available as an option during the Deployment stage of the OVA file.
Finally, Network adapter 1 (Gigabit 1) is assigned to VLAN 3, our management VLAN.
Summary
This article has provided a comprehensive overview of the Cisco 9800-CL cloud-based wireless controller, covering its design, download, and deployment process. It has explored various WLC deployment models, outlined hardware requirements, and directed readers to relevant image downloads on Cisco's website. Additionally, detailed instructions have been provided for the installation of the WLC controller using an OVA template (VMware ESXi). Furthermore, the intricacies surrounding the WLC 9800-CL network connectivity, including vNICs, vSwitch, etc., have been discussed, along with guidance on configuring a VMware Port Group for Trunking or a single VLAN.
Upcoming articles will cover WLC TAGs, WLC Profiles, Policy configuration, configuring SSIDs and multiple VLANs, WLC VTP configuration & recommendations, licensing the WLC 9800 controller and joining & configuring Cisco APs to the WLC controller.
Wi-Fi Key Generator
Follow Firewall.cx
Cisco Password Crack
Decrypt Cisco Type-7 Passwords on the fly!


