DNS Leak Testing & Protection – How to Avoid Exposing Your Identity & Online Activity
 Despite innovations in security and technology, it’s difficult to remain anonymous online. Identifying information is seemingly everywhere – from malicious JavaScript tracking to the location services in web browsers. Even secure Linux operating systems like Tails have struggled to protect user’s privacy.
Windows 10 is no safe haven, either. By default, Microsoft collects information from users on an unprecedented level. Data that can be turned over to authorities or a third party. Increasingly, users must take extra steps to ensure privacy and be more knowledgeable about the services they’re using.
This applies even to users with anonymizing software. Virtual Private Networks (VPNs) are sometimes seen as blanket tools that guarantee identity protection. In truth, they have their own vulnerabilities and chief among them is the DNS Leak which only the best VPN service providers are able to resolve.
StrongVPN is our recommended VPN solution offering superior protection using a fast network of servers across the globe!
Understanding VPN DNS Leaks & How They Work
When you type a website URL into your browser, you’re essentially using a nickname. Typing in “firewall.cx” is more like asking a question. You send a request to a Domain Name System server, which then points you to the IP address of the site (208.86.155.203). This saves us typing long strings of numbers each time, and is better for pretty much everyone.
However, it also comes with its own problem. DNS servers are given by your internet service provider (ISP), which offers them a list of every website you visit. Naturally, this compromises anonymity, but VPNs are supposed to fix that. Instead of requesting from your ISP, your traffic is routed through the VPN, protecting you.
Unfortunately, it doesn’t always work. In some cases, the operating system uses its default DNS servers instead of switching things up. This is most common in Windows, but can also happen on OSX, Linux, and mobile devices. It’s aptly named a DNS leak.
In some cases, a VPN is worse than not using one at all. Why? When using anonymising software, users have a sense of security. They may perform activities they wouldn’t otherwise, such as torrenting software or visiting controversial websites. It’s not immediately clear that a leak has occurred, and the user goes on thinking they’re safe for months at a time. In reality, their IP address is open and visible.
DNS leaks aren’t just utilized by service providers either. Websites can discover your true IP address using WebRTC, a collection of communications protocols present in most browsers. WebRTC allows for a request to a service provider’s Session Traversal Utilities for NAT (STUN) servers, listing both the local (internal) and public IP address (router WAN IP) of the user via JavaScript.
This can give a general location of the user and be used to track them across the site or other sites by the same owner. In addition, law enforcement or hackers may be able to gain access to this data, leading to serious repercussions.
DNS Leaks Used By Govenrments and ISPs
For example, DNS leaks were utilized by the Canadian Government in 2015, helping to track users on popular file sharing websites. Revealed by Edward Snowden, the technique combines several tactics to find out the identity of downloaders. In this case, targeted files were primarily terrorism related, but this could easily be extended to other media.

Snowden Digital Surveillance Archive: Screenshot from Canada's Levitation Program
In fact, the UK government recently passed a law that does just that. The Investigatory Powers Bill forces ISPs to store and hand over DNS records in bulk for almost every user. This is used to create a list of websites each person has visited, regardless of any wrongdoing. As a result, UK users should be especially cautious about VPN DNS leaks, and can be certain any slip ups will be recorded.
Another danger is your ISP sending a copyright warning from downloaded files. This is particularly relevant on student connections, where internet activity is more closely monitored. In some cases, it can result in a ban from the service. Your details can also be passed on to the copyright holder, who can then choose to pursue legal action.
In the student case, the user can have all of the correct settings enabled but still get a notice. It’s likely that the VPN cut out momentarily and began sending DNS requests to the wrong place. This allows the DNS to leak even if the anti-DNS leak setting is enabled.
VPN DNS leaks also occur regardless of location. Whether you’re using a VPN to protect yourself on WiFi hotspots, at work, or in your own home, the risk is still there. In fact, public networks may prove a bigger risk. It always pays to be extra cautious outside your home.
VPN DNS Leak Test – Best Sites for Testing Your DNS
Thankfully, there are very simple ways to tell if you have a VPN DNS leak. The most popular tool is an online service: DNS leak test.
First, you run your VPN client and connect from a different country. Clicking Extended Test will then return a list of IP addresses, their service provider, and country of origin. If any of these match your true location, you have a problem.
The DNS leak test sends your client several different domain names, simulating a connection to each one. It then tracks the requests sent to its own DNS servers and other servers that the request bounces around before being resolved. The results are returned in your browser.
The standard test is good enough for most people, completing one round of six queries. However, to be completely sure, you should use the extended test. A total of 36 queries should be enough to discover all DNS servers. However, an extended test can take up to thirty seconds longer, so standard is good enough if you aren’t doing anything too sensitive.
VPN DNS leak testing is essential when you move to any new VPN client, but it’s good to test on occasion regardless. Changes in your operating system, browser settings, or an update to the VPN can all revert to incorrect servers.
VPN DNS Leak Protection is one of the many essential security features a VPN must have. We should note that all VPN clients tested in our Best VPN Service article provide DNS Leak Protection and passed all DNS Leak tests.
VPN DNS Leak Protection
Thankfully, if you do find a leak it's not the end of the world. There are plenty of ways to protect yourself from DNS leaks, and most of them are simple. One of the best methods is force your operating system to use VPN DNS servers instead of your ISP’s. Most services will be happy to provide these, but otherwise you can use a public DNS like Google, OpenDNS or Comodo Secure.
However, those looking for privacy will want to avoid companies looking to profit. Google has been known to use the data to target advertising. DNS providers like OpenNIC give a non-profit, open and uncensored service free of charge. Once you’ve found your preferred host, it’s not difficult to configure on any OS.
Windows 10 DNS Leak Protection & Prevention
In Windows 10, simply navigate to Control Panel>Network and Sharing Centre and left-click on your network adapter connection (usually wireless). In our example this is a WiFi connection with SSID Firewall:
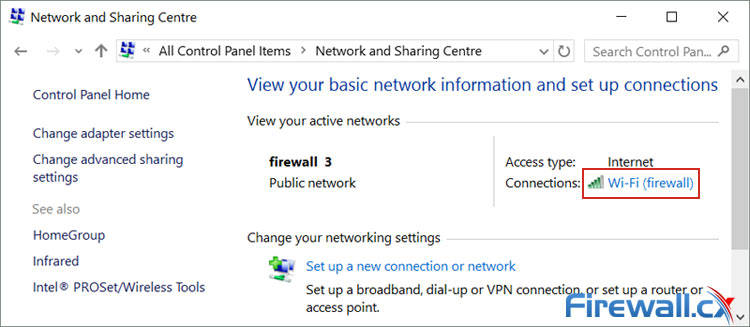
Accessing your Windows 10 wireless or wired network adapter settings
On the next window click on Properties (1). This will open the adapter’s network properties. Now double-click on Internet Protocol Version 4 (2) to open the IPv4 Properties window:
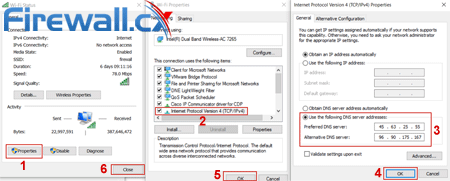 Configuring Windows 10 custom open DNS servers to protect against DNS Leaks (click to enlarge)
Select Use the following DNS server addresses and insert two DNS servers of your choice from OpenNic (3). Finally click on OK/Close (4-6) to close all windows and save the new settings.
If that’s too many steps, you can use a tool like DNS Jumper. You can quickly jump between different DNS servers or set your own custom ones. Furthermore, it requires no install and will test a long list of providers to find the fastest connection. This is particularly useful if you play online games, as it will avoid high ping.
MAC OS & Ubuntu Linux DNS Leak Protection
Though Mac and Linux tend to suffer from fewer issues, you may still want to set things up to be on the safe side. It’s almost the same, so we won’t go into too much detail. Here’s a quick guide:
MAC OS
- Go to System Preferences
- ClickNetwork
- Select your WiFi or ethernet connection
- Hit Advanced…
- Click
- Enter your DNS details and press Okay
Ubuntu Linux
- Navigate to System Settings, then to Network
- Select your connection
- Hit Options…
- Go to the IPv4 Settings tab
- Enter your DNS Servers
- Click Save
You can also configure settings on iOS, Android and even the router itself. This makes it easier to avoid the dangers of WiFi hotspots and can make all your devices safe. However, there are plenty of other ways to prevent VPN DNS leaks. These can often be used in combination with each other for maximum security.
Windows Teredo Can Lead to DNS Leaks
In Windows, a technology called Teredo that allows tunnelling IPv6 traffic through IPv4 packets using the UDP Protocol, can often lead to DNS leaks. Essentially it allows communication between the two major IP protocols, IPv4 and IPv6. Teredo is on by default in Windows 10, but you can turn it off with a single cmd command.
First you’ll need to open a Command Prompt window with administrator privileges. In the Search Windows box (next to the start button) type cmd, right click on Command Prompt and select Run as Administrator:

Opening a Windows Command Prompt with Administrator Privileges
At the command prompt, type the following command: netsh interface teredo set state disabled:
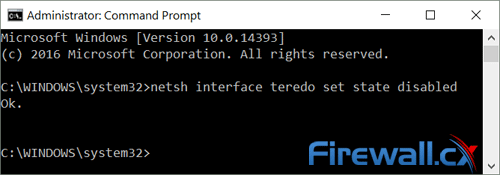
The system will return Ok indicating that teredo has been successfully disabled
In some cases you may need Teredo, but thankfully it’s just as easy to enable it again. This time, type: netsh interface teredo set state type=default.
How to Disable WebRTC in FireFox and Chrome
Unfortunately, the disabling Teredo doesn’t address issue of WebRTC in the browser. The procedure to disable it is different for each browser, and usually involves heading to the config page.
In Mozilla’s Firefox, you can type about:config in the URL bar. The line media.peerconnection.enabled will be shown lower down, and you can then double-click to toggle it off:
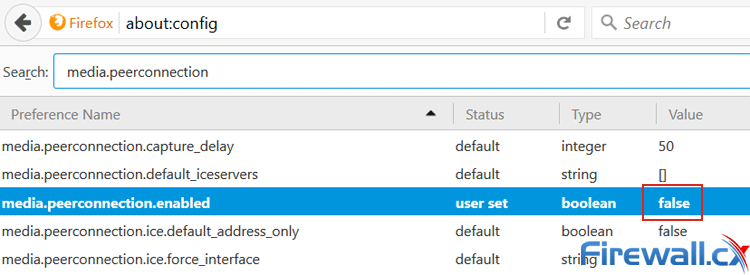
Disabling WebRTC in Mozilla FireFox
Bear in mind that disabling WebRTC may result in a small loss of functionality. The communications protocols allow for video conferencing, file transfer and more without the need for other plugins. However, there is a fall-back method for most tasks, meaning it's far from essential.
Unfortunately, there’s no way to disable WebRTC in Chrome by default. This is to be expected, as Google pioneered the method and wants people to use it. Thankfully, Google addressed concerns early this year by releasing a plugin (make sure you open the link with Chrome).
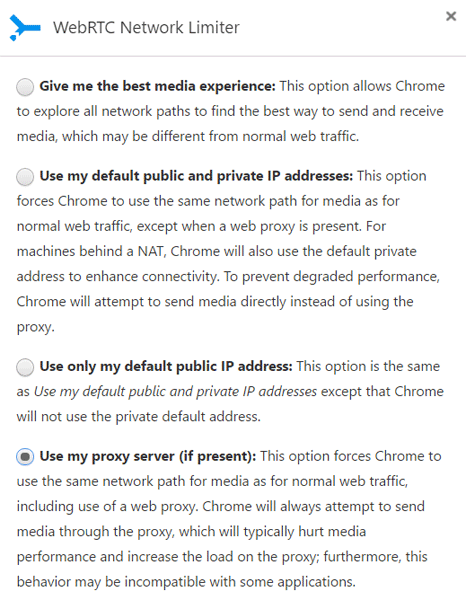
With WebRTC Network Limiter, you can display your Public IP address or you can route it through your proxy server (last option). The latter is recommended for maximum safety, but can cause issues with performance.
Use a VPN with DNS Leak Protection
Fortunately, it's not just users who are aware of the DNS leak issue. Most clients have VPN DNS leak prevention built in and don’t require any input from the customer. Our Best VPN Service Provider article includes the TOP 5 VPN Service Providers with VPN Clients that automatically provide VPN DNS Leak Protection.
In most cases, VPN providers will have their own private DNS servers. StrongVPN has a “Network Lock” option, where all traffic is forced through the VPN tunnel, including domain name requests. When you disconnect from a VPN temporarily, internet is cut out entirely, making sure no traffic leaves the tunnel. This is also known as a Kill Switch.
With PIA, DNS leak prevention is on by default. The client redirects requests to its own name servers (198.18.0.1) much like changing it manually through Windows. This makes it very unlikely that a leak will occur, and combines with a Kill Switch option similar to StrongVPN. PIA also lets you bring up a third-party DNS, so you can OpenNIC and other servers if you prefer. Both methods take a lot of work away from the user, and make it simple to prevent DNS leaks.
Summary
In all, built-in protection provides the most intuitive solution to DNS leaks. Finding a VPN that has a solution to this issue is becoming increasingly important, and without any measures there are serious risks to the privacy. It’s well worth shopping around to find a VPN Service that supports VPN DNS Leak Protection in an intelligent way.
Furthermore, VPNs that take DNS leaks seriously are more likely to take other privacy matters into consideration. A host that won’t take care of the most prevalent issue is less likely to address the smaller ones, or forgo logs.
That said, you shouldn’t blindly trust the provider’s word, either. Operating systems are complex, and it's not always possible for them to patch every hole. Sometimes problems can happen even with the protections in place. As such, DNS leak testing is essential. Taking your own measures will only increase privacy, and combining both will make this vulnerability almost non-existent.
Your IP address:
57.141.6.4
Wi-Fi Key Generator
Follow Firewall.cx
Cisco Password Crack
Decrypt Cisco Type-7 Passwords on the fly!


