How To Change & Configure An IP Address or Set to DHCP, Using The Command Prompt In Windows 7
Not many users are aware that Windows 7 provides more than one way to configure a workstation’s network adaptor IP address or force it to obtain an IP address from a DHCP server. While the most popular method is configuring the properties of your network adaptor via the Network and Sharing Center, the less popular and unknown way for most users is using the netsh Command Prompt. In this tutorial, we show you how to use the Command Prompt netsh command to quickly and easily configure your IP address or set it to DHCP. Competent users can also create simple batch files (.bat) for each network (e.g home, work etc) so they can execute them to quickly make the IP address, Gateway IP and DNS changes.
In order to successfully change the IP address via Command Prompt, Windows 7 requires the user to have administrative rights. This means even if you are not the administrator, you must know the administrative password, since you will be required to use the administrative command prompt.
Opening The Administrative Command Prompt On Windows 7
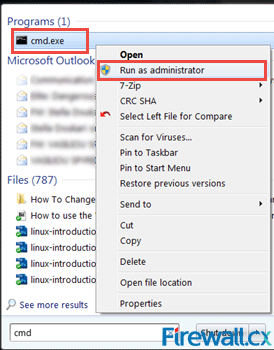
To open the administrative command prompt in Windows 7, first click on the Start icon. In the search dialog box that appears, type cmd and right-click on the cmd search result displayed. On the menu that Windows brings up, click on the Run as administrator option as shown in the below screenshot:
 Figure 1. Running CMD as Administrator
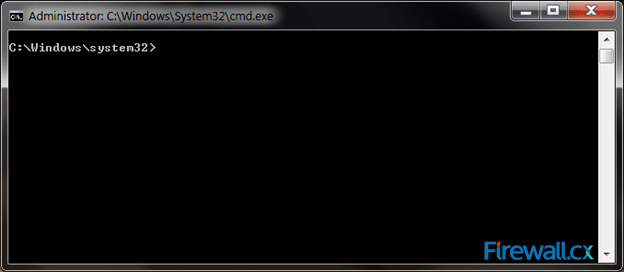
Depending on your User Account Control Settings (UAC), Windows may ask for confirmation. If this happens, simply click on Yes and Windows will present the CLI prompt running in elevated administrator privileged mode:
 Figure 2. The Administrative Command Prompt Windows 7
Using The ‘netsh’ Command Prompt To Change The IP Address, Gateway IP & DNS
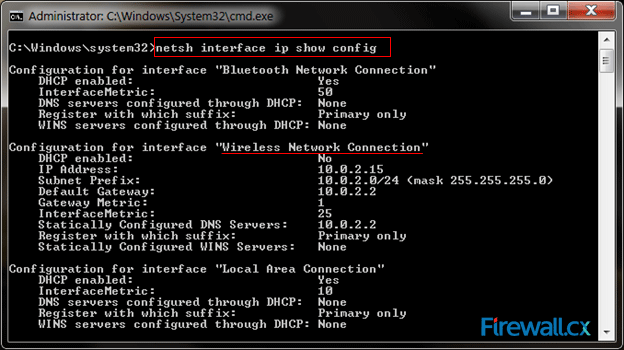
At the Administrative Command Prompt, type netsh interface ip show config, which will display the network adapters available on your system and their names. Note down the name of the network adaptor for which you would like to set the static IP address.
 Figure 3. Finding Our Network Adapter ID
In our example, we’ll be modifying the IP address of the interface named Wireless Network Connection, which is our laptop’s wireless network card.
Even if the Wireless Network Connection is set to be configured via DHCP, we can still configure a static IP address. Following is the command used to configure the interface with the IP address of 192.168.5.50 with a subnet mask of 255.255.255.0 and finally a Gateway of 192.168.5.1:
Next, we configure our primary DNS server using the netsh command with the following parameters:
Note: When entering a DNS server, Windows will try to query the DNS server to validate it. If for any reason the DNS server is not reachable (therefore not validated), you might see the following error:
To configure the DNS server without requiring DNS Validation, use the validate=no parameter at the end of the command:
This command forces the DNS server setting without any validation and therefor no error will be presented at the CLI output in case the DNS server is not reachable.
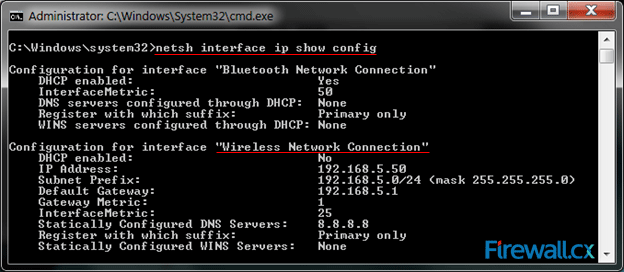
To verify our new settings, use the netsh command with the following parameters:
At this point, we should see the network settings we configured, as shown below:
 Figure 4. Verifying Our New Network Settings
Using The 'netsh' Command Prompt To Set The Network Interface Card To DHCP
You can use the netsh command to switch your current adapter from static to DHCP. To switch your network adaptor from static IP configuration to DHCP, use the following command:
Windows will not return any confirmation after the command is entered, however if the network adaptor has successfully obtained an IP address and has Internet connection, there should not be any network icon with an exclamation mark in the taskbar notification area as shown below:
![]() Figure 5. Wireless Icon with no Exclamation Mark
Figure 5. Wireless Icon with no Exclamation Mark
Finally, to verify that DHCP is enabled and we’ve obtain an IP address, use the netsh command with the following parameters:
This article showed how to configure a Windows 7 network interface with an IP address, Gateway and DNS server, using the Administrative Command Prompt. We also showed how to set a Windows 7 network interface to obtain an IP address automatically from a DHCP server.
Wi-Fi Key Generator
Follow Firewall.cx
Cisco Password Crack
Decrypt Cisco Type-7 Passwords on the fly!


