Configuring Windows 7 To Provide Secure Wireless Access Point Services to Wi-Fi Clients - Turn Windows into an Access Point
 Not many people are aware that Windows 7 has built-in capabilities that allow it to be transformed into a perfectly working access point so that wireless clients such as laptops, smartphones and others can connect to the local network or obtain Internet access. Turning a Windows 7 system into an access point is an extremely useful feature, especially when there is the need to connect other wireless devices to the Internet with no access point available.
When Windows 7 is configured to provide access point services, the operating system is fully functional and all system resources continue to be available to the user working on the system. In addition, the wireless network is encrypted using the WPA2 encryption algorithm.
Even though there are 3rd-party applications that will provide similar functionality, we believe this built-in feature is easy to configure and works well enough to make users think twice before purchasing such applications.
Windows 8 & 8.1 users can visit our article Configuring Windows 8 To Provide Secure Wireless Access Point Services to Wi-Fi Clients - Turn Windows 8 into an Access Point
Creating Your Windows 7 Access Point
While there is no graphical interface that will allow you magically to turn Windows 7 into an access point, the configuration is performed via CLI using one single command. We should note that when turning a Windows 7 station into a Wi-Fi access point, it is necessary to ensure the station’s wired network card (RJ45) is connected to the local network (LAN) and has Internet access. Wireless clients that connect to the Windows 7 AP will obtain Internet access via the workstation’s wired LAN connection and will be located on a different subnet network.
To begin, click on the Start button and enter cmd.exe in the Search Programs and Files area as shown below:
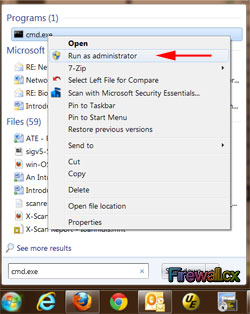
Next, right click on cmd.exe and select Run as administrator from the menu. This will open a DOS prompt with administrator privileges, necessary to execute the CLI command.
As mentioned earlier, a single command is required to create the Windows 7 access point and here it is:
The only parameters that will need to change from the above command are the ssid and key parameters. All the rest can be left as is. The ssid parameter configures the ssid that will be broadcast by the Windows 7 operating system, while the key parameter defines the WPA2-Personal key (password) that the clients need to enter in order to connect to the Wi-Fi network.
Following is an example that creates a wireless network named Firewall.cx with a WPA2 password of $connect$here :
The hosted network mode has been set to allow.
The SSID of the hosted network has been successfully changed.
The user key passphrase of the hosted network has been successfully changed.
C:\Windows\system32>
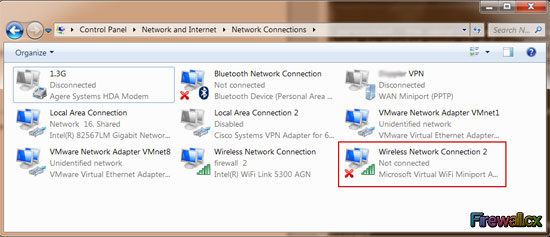
When executed, the above command creates the required Microsoft Virtual WiFi Miniport adapter and will setup the hostednetwork. The new Microsoft Virtual WiFi Miniport adapter will be visible in the Network Connections panel as shown below. In our example the adaptor is named Wireless Network Connection 2. Note that this is a one-time process and users will not need to create the adaptor again:
Next step is to start the hosted wireless network. The command to start/stop the hostednetwork is netsh wlan start|stop hostednetwork and needs to be run as administrator. Simply run the command in the same DOS prompt previously used:
The hosted network started.
C:\Windows\system32>
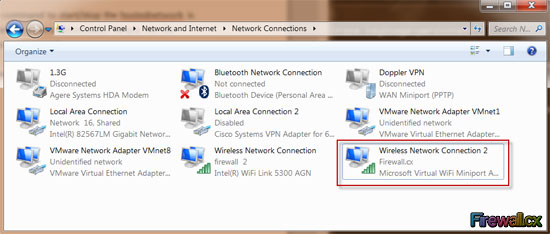
Notice how our Wireless Network Connection 2 has changed status and is now showing our configured SSID Firewall.cx:
To stop the hosted network, repeat the above command with the stop parameter:
The hosted network stopped.
Starting The WLAN via Shortcuts – Making Life Easy
Users who frequently use the above commands can quickly create two shortcuts to start/stop the hosted network.
To help save time and trouble, we've created the two shortcuts and made them available for download in our Administrator Utilities Download Section. Simply download them and unzip the shortcuts directly on the desktop:

Double-clicking on each shortcut will start or stop the hosted network. Users experiencing problems starting or stopping the hosted network can right-click on the shortcuts and select Run as administrator.
Enable Internet Connection Sharing (ICS)
With our hosted network initiated, all that’s required is to enable Internet Connection Sharing on Windows 7. This will force our newly created hosted network (access point) to provide Internet and DHCP services to our wireless clients.
To enable Internet Connection Sharing, go to the Control Panel > Network and Internet > Network and Sharing and select Change Adaptor Settings from the left menu. Right-click on the computer’s LAN network adaptor (usually Local Area Connection) and select properties:
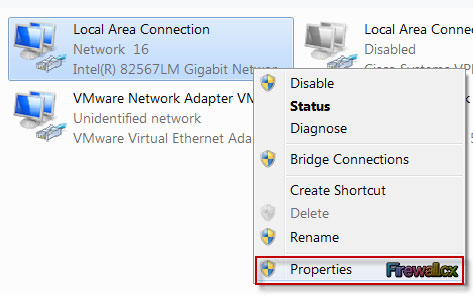
Next, select the Sharing tab and enable the Internet Connection Sharing option. Under Home networking connection select the newly created wireless network connection, in our example this was Wireless Network Connection 2, and untick Allow other network users to control or disable the shared Internet connection setting as shown below:
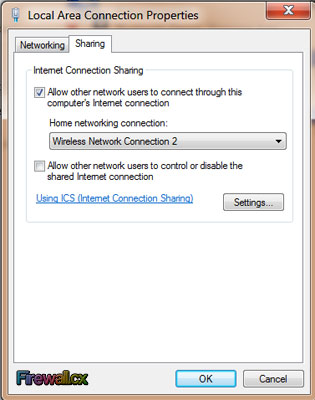
After clicking on OK to accept the changes, we can see that the Local Area Connection icon now has the shared status next to it, indicating this is now a shared connection:

At this point, our Wndows 7 system has transformed into an access point and is ready to serve wireless clients!
Connecting Wireless Clients To Our Wi-Fi Network
Wireless clients can connect to the Windows 7 access point as they would with any normal access point. We connected with success to our Windows 7 access point (SSID: Firewall.cx) without any problem, using a Samsung Galaxy S2 android smartphone:
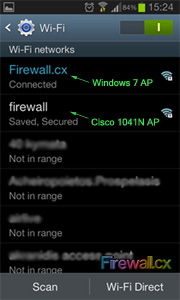
After successfully connecting and browsing the Internet from our android smartphone, we wanted to test this setup and see if using a Windows 7 system as an access point had any impact on wireless and Internet browsing performance.
Comparing Real Access Point Performance With A Windows 7 O/S Access Point
To test this out we used a Cisco 1041N access point, which was placed right next to our android smartphone and configured with an SSID of firewall. Both Windows 7 system and Cisco access point were connected to the same LAN network and shared the same Internet connection – a 10,000 Kbps DSL line (~10Mbps).
The screenshot below confirms our android smartphone had exceptional Wi-Fi signal with both access points:
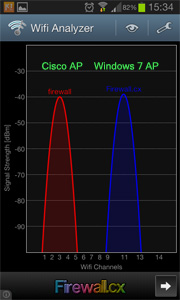
Keep in mind, the Wi-Fi with SSID firewall belongs to the Cisco 1041N access point, while SSID Firewall.cx belongs to the Windows 7 access point.
We first connected to the Windows 7 access point and ran our tests. Maximum download speed was measured at 6,796Kbps, or around 6,6Mbps:

Next, we connected to our Cisco 1041N access point and performed the same tests. Maximum download speed was measured at 7,460Kbps, or 7.3Mbps:

Obviously there was a very small difference in performance, however, this difference is so small that it is hard to notice unless running these kind of tests. In both cases, Internet access was smooth without any interruptions or problems.
Summary
Being able to transform a Windows 7 system into an access point is a handy and much welcomed feature. We’ve used this feature many times in order to overcome limitations where no access point was available and it worked just fine - every time. Performance seems pretty solid despite the small, unnoticeable degradation in speed, which won’t affect anyone.
While this setup is not designed as an permanent access point solution, it can be used to get you out of difficult situations and can serve a small amount of wireless clients without any problem.
Your IP address:
3.21.248.40
Wi-Fi Key Generator
Follow Firewall.cx
Cisco Password Crack
Decrypt Cisco Type-7 Passwords on the fly!


