Cisco ASA Firepower Threat Defense (FTD): Download and Installation/Setup ASA 5500-X. FTD Management Options
One Appliance – One Image is what Cisco is targeting for its Next Generation Firewalls. With this vision, Cisco has created a unified software image named “Cisco Firepower Threat Defense”. In this FirePOWER series article we’ll cover the installation of Firepower Threat Defense (FTD) on a Cisco ASA 5500-X series security appliance. We’ll also explain the management options available: Firepower Management Center (FMC) which is the old FireSIGHT and Firepower Device Manager (FDM).
Cisco Firepower Threat Defense (FTD) is a unified software image, which is a combination of Cisco ASA and Cisco FirePOWER services features that can be deployed on Cisco Firepower 4100 and the Firepower 9300 Series appliances as well as on the ASA 5506-X,ASA 5506H-X, ASA 5506W-X, ASA 5508-X, ASA 5512-X, ASA 5515-X, ASA 5516-X, ASA 5525-X, ASA 5545-X, and ASA 5555-X. However, at the time of writing, the Cisco Firepower Threat Defense (FTD) unified software cannot be deployed on Cisco ASA 5505 and 5585-X Series appliances.
Understanding Cisco Firepower Threat Defense Management & Capabilities
Simplifying management and operation of Cisco’s Next Generation Firewalls is one of the primary reasons Cisco is moving to a unified image across its firewall appliances.
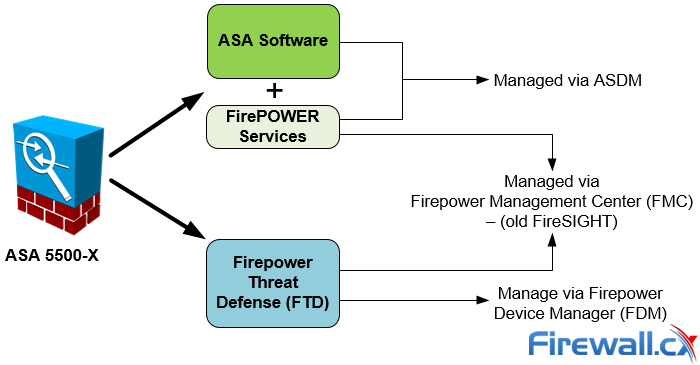
Currently the Firepower Threat Defense can be managed through the Firepower Device Management (similar to Cisco’s ASDM) and Firepower Management Center (analyzed below).

Managing Options for FirePOWER Services and Firepower Threat Defense (FTD)
It should be noted that the Firepower Device Management software is under extensive development and is not currently capable of supporting all configuration options. For this reason it’s best to rely on the Firepower Management Center to manage the Cisco Firepower Threat Defense system.
The Firepower Management Center, also known as FMC or FireSIGHT, is available as a dedicated server or virtual image appliance (Linux based VM server) that connects to the FirePOWER or Firepower Threat Defense and allows you to fully manage either system. Organizations with multiple Firepower Threat Defense systems or FirePOWER Services would register and manage them from the FMC.
Alternatively, users can manage the Firepower Threat Defense (FTD) device using the Firepower Device Manager (FDM) – the concept is similar to ASDM.
Currently the latestCisco Firepower Threat Defense (FTD) unified software image available is version 6.2.x .
The Cisco Firepower Threat Defense is continually expanding the Next-Generation Firewall Servicesit supports which currently includes:
- Stateful Firewall Capabilities
- Static and Dynamic Routing. Supports RIP, OSPF, BGP, Static Routing
- Next-Generation Intrusion Prevention Systems (NGIPS)
- URL Filtering
- Application Visibility and Control (AVC)
- Advance Malware Protection (AMP)
- Cisco Identity Service Engine (Cisco ISE) Integration
- SSL Decryption
- Captive Portal (Guest Web Portal)
- Multi-Domain Management
- Rate Limiting
- Tunnelled Traffic Policies
- Site-to-Site VPN. Only supports Site-to-Site VPN between FTD appliances and FTD to ASA
- Multicast Routing Shared NAT
- Limited Configuration Migration (ASA to Firepower TD)
While the Cisco Firepower Threat Defense is being actively developed and populated with some great features, we feel that it’s too early to place it in a production environment. There are some stability issues, at least with the FTD image on the ASA platform, which should be ironed out with the newer software releases.
If you are already in the process of installing FTD on your ASA then you should heavily test it before rolling it out to production.
Due to the issues encountered, we were forced to remove the FTD installation by reimaging our ASA 5555-X Appliance with Cisco ASA and FirePOWER Services images. We believe the “Cisco Firepower Threat Defense” unified software image is very promising but requires some more time to reach a more mature and stable version.
Problems/Limitations Encountered With Cisco Firepower Threat Defense
While small deployments might be able to overcome the absence of many desired features (e.g IPSec VPN support), enterprise environments will certainly find it more challenging.
Depending on the environment and installation requirements customers will stumble into different limitations or issues. For example, on our ASA 5555-X we had major delays trying to push new policies from the Firepower Management Centre (FMC) to the newly imaged FTD ASA. With a total of just 5 policies implemented it took over 2 minutes to deploy them from the FMC to the FTD.
We also found that we were unable to configure any EtherChannel interfaces. This is considered a major drawback especially for organizations with multiple DMZ zones and high-bandwidth traffic requirements. Cisco has an official announcement for this right here.
In addition to the above, when we completed the conversion of our ASA to the FTD software we needed to open a TAC Service Request in order to get transfer our ASA License to the FTD image, adding additional unnecessary overhead and confusion. We believe this should have been automatically done during the installation process.
Cisco ASA Firepower Threat Defense (FTD) Installation – Quick Overview
Reimaging the Cisco ASA 5555-X Appliance to install the Cisco Firepower Threat Defense image is fairly simple once you understand what needs to be done. Here are the steps in the order they must be executed:
- Download the Cisco Firepower Threat Defense Boot&System image
- Reboot ASA, Break The Startup/Boot Sequence
- Upload the Boot Image and boot the ASA Firewall
- Install Firepower Threat Defense system software
Download the Cisco Firepower Threat Defense Boot & System Image
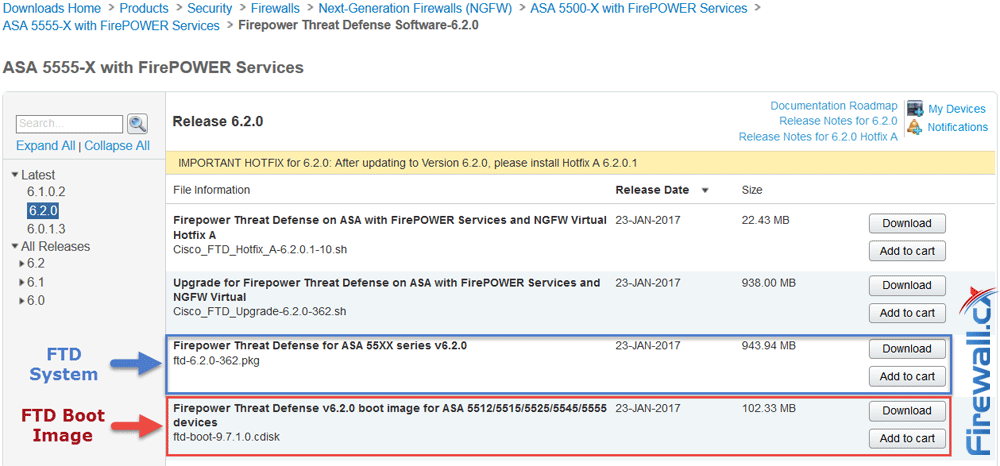
Using a valid CCO account that has the necessary software download privileges visit: Downloads Home>Products Security>Firewalls>Next-Generation Firewalls (NGFW)>ASA 5500-X with FirePOWER Services and select Firepower Threat Defense Software:

Downloading Cisco ASA 55xx Firepower Threat Defense software
Alternatively click on the following URL: Firepower Threat Defense Software Download
Next, select and download the latest boot image and system version. In our example this isversion 6.2.0:

Downloading the latest Firepower Threat Defense System and Boot Image
Reboot ASA, Break The Startup/Boot Sequence
When ready reboot the ASA appliance. During the boot process hit Break or Esc to interrupt boot:
It is strongly recommended you have a complete backup of your ASA Configuration and software before proceeding with the next steps which will erase the configuration and all files
Rebooting... Cisco BIOS Version:9B2C109A
Build Date:05/15/2013 16:34:44
CPU Type: Intel(R) Xeon(R) CPU X3460 @ 2.80GHz, 2793 MHz
Total Memory:16384 MB(DDR3 1333)
System memory:619 KB, Extended Memory:3573 MB
……. <output omitted>
Booting from ROMMON
Cisco Systems ROMMON Version (2.1(9)8) #1: Wed Oct 26 17:14:40 PDT 2011
Platform ASA 5555-X with SW, 8 GE Data, 1 GE Mgmt
Use BREAK or ESC to interrupt boot.
Use SPACE to begin boot immediately.
Boot in 10 seconds.
Boot interrupted.
Management0/0
Link is DOWN
MAC Address: 00f6.63da.e807
Use ? for help.
rommon #1>
At this point we have successfully interrupted the boot process and can proceed to the next step.
Upload the Boot Image and Boot the ASA Firewall
We now need to configure the necessary parameters on the ASA Firewall to download the Cisco Firepower Threat Defence Boot Image. Ensure you have an FTP/TFTP server installed and configured to allow the Firewall to download the image/system files.
Now connect to the ASA console port using a terminal access application, e.g. Putty, configured with the following serial port settings:
- 9600 baud
- 8 data bits
- No parity
- 1 stop bit
- No flow control
Ensure the Cisco ASA 5500-X appliance is running rommon version v1.1.8 or greater by using an IOS command show module to ensure re-immaging will be successful. If the rommon version is earlier than v1.1.8 then the ASA Appliance needs a rommon upgrade.
ciscoasa# show module
.. output omitted…
Mod MAC Address Range Hw Version Fw Version Sw Version
---- --------------------------------- ------------ ------------ ---------------
1 7426.aceb.ccea to 7426.aceb.ccf2 0.3 1.1.8 9.6(1)
sfr 7426.aceb.cce9 to 7426.aceb.cce9 N/A N/A
Next, configure the ASA Firewall with the necessary network settings/variables so it can access the image and system files previously downloaded. ASA 5555-X firewall uses a built-in management interface, hence no need to specify the management interface.
rommon #1> address 10.32.4.129
rommon #2> server 10.32.4.150
rommon #3> gateway 10.32.4.150
rommon #4> file ftd-boot-9.7.1.0.cdisk
rommon #5> set
ROMMON Variable Settings:
ADDRESS=10.32.4.129
SERVER=10.32.4.150
GATEWAY=10.32.4.150
PORT=Management0/0
VLAN=untagged
IMAGE=ftd-boot-9.7.1.0.cdisk
CONFIG=
LINKTIMEOUT=20
PKTTIMEOUT=4
RETRY=20
Explanation of commands:
The Sync command will save the NVRAM parameters, effectively “enabling” the configuration changes. It’s advisable to try and ping the TFTP server. This will not only confirm the TFTP server is reachable but also populate the ARP table of the ASA Firewall:
rommon #6> sync
Updating NVRAM Parameters...
rommon #7> ping 10.32.4.150
Sending 20, 100-byte ICMP Echoes to 10.32.4.150, timeout is 4 seconds:
?!!!!!!!!!!!!!!!!!!!
Success rate is 95 percent (19/20)
When ready, issue the tftpdnld command to initiate the download of the boot image to the ASA Firewall. Once downloaded the system will automatically boot the image file:
rommon #7> tftpdnld
ROMMON Variable Settings:
ADDRESS=10.32.4.129
SERVER=10.32.4.150
GATEWAY=10.32.4.150
PORT=Management0/0
VLAN=untagged
IMAGE=ftd-boot-9.7.1.0.cdisk
CONFIG=
LINKTIMEOUT=20
PKTTIMEOUT=4
RETRY=20
tftp
!!!!!!!!!!!!!!!!!!!!!!!!!!!!!!!!!!!!!!!!!!!!!!!!!!!!!!!!!!!!!!!!!!!!!!!
Received 107292672 bytes
Launching TFTP Image...
Execute image at 0x14000
Cisco Security Appliance admin loader (3.0) #0: Mon Jan 16 09:01:33 PST 2017
Platform ASA5555
Loading...
IO memory blocks requested from bigphys 32bit: 125055
INIT: version 2.88 booting
Starting udev
Configuring network interfaces... done.
Populating dev cache
Found device serial number FCH2023J78M.
Found USB flash drive /dev/sdc
Found hard drive(s): /dev/sda /dev/sdb
fsck from util-linux 2.23.2
dosfsck 2.11, 12 Mar 2005, FAT32, LFN
There are differences between boot sector and its backup.
Differences: (offset:original/backup)
65:01/00
Not automatically fixing this.
/dev/sdc1: 62 files, 825465/2011044 clusters
Launching boot CLI ...
Configuring network interface using DHCP
Bringing up network interface.
Depending on your network, this might take a couple of minutes when using DHCP...
ifup: interface lo already configured
Using IPv6 address: fe80::2f6:63ff:feda:e807
IPv4 address not assigned. Run 'setup' before installation.
INIT: SwitchingStarting system message bus: dbus.
Starting OpenBSD Secure Shell server: sshd
generating ssh RSA key...
generating ssh ECDSA key...
generating ssh DSA key...
Could not load host key: /etc/ssh/ssh_host_ed25519_key
done.
Starting Advanced Configuration and Power Interface daemon: acpid.
acpid: starting up
acpid: 1 rule loaded
acpid: waiting for events: event logging is off
Starting ntpd: done
Starting syslog-ng:[2017-03-16T04:08:41.437297] Connection failed; fd='15', server='AF_INET(127.128.254.1:514)', local='AF_INET(0.0.0.0:0)', error='Network is unreachable (101)'
[2017-03-16T04:08:41.437321] Initiating connection failed, reconnecting; time_reopen='60'
.
Starting crond: OK
Cisco FTD Boot 6.0.0 (9.7.1.)
Type ? for list of commands
FIREWALLCX-boot>
Optionally you can ping the tftp/ftp server to confirm there is still connectivity with the server:
FIREWALLCX-boot> ping 10.32.4.150
PING 10.32.4.150 (10.32.4.150) 56(84) bytes of data.
64 bytes from 10.32.4.150: icmp_seq=1 ttl=128 time=0.722 ms
64 bytes from 10.32.4.150: icmp_seq=2 ttl=128 time=0.648 ms
64 bytes from 10.32.4.150: icmp_seq=2 ttl=128 time=0.856 ms
--- 10.32.4.150 ping statistics ---
3 packets transmitted, 3 received, 0% packet loss, time 2018ms
rtt min/avg/max/mdev = 0.648/0.742/0.856/0.086 ms
Install Firepower Threat Defense System Software
At this point our Firewall has successfully downloaded and booted the Boot image and is ready to accept the System image. At the prompt type setup and simply follow the bouncing ball. The setup process will gather important configuration parameters for the FTD device such as Hostname, IP address, Subnet mask, Gateway, DNS servers and more
Many of the configuration questions involve a yes/no answer. The default value that will be selected when leaving the parameter blank and hitting enter is marked in square brackets [ ]:
FIREWALLCX-boot> setup
Welcome to Cisco FTD Setup
[hit Ctrl-C to abort]
Default values are inside []
Enter a hostname [FIREWALLCX]: FIREWALLCXFTD
Do you want to configure IPv4 address on management interface?(y/n) [Y]: y
Do you want to enable DHCP for IPv4 address assignment on management interface?(y/n) [Y]: n
Enter an IPv4 address: 10.32.4.129
Enter the netmask: 255.255.255.0
Enter the gateway: 10.32.4.150
Do you want to configure static IPv6 address on management interface?(y/n) [N]: n
Stateless autoconfiguration will be enabled for IPv6 addresses
Enter the primary DNS server IP address: 10.32.4.150
Do you want to configure Secondary DNS Server? (y/n) [n]: n
Do you want to configure Local Domain Name? (y/n) [n]: y
Enter the local domain name: firewall.cx
Do you want to configure Search domains? (y/n) [n]: n
Do you want to enable the NTP service? [Y]: n
Please review the final configuration:
Hostname: FIREWALLCXFTD
Management Interface Configuration
IPv4 Configuration: static
IP Address: 10.32.4.129
Netmask: 255.255.255.0
Gateway: 10.32.4.150
IPv6 Configuration: Stateless autoconfiguration
DNS Configuration:
Domain: firewall.cx
DNS Server: 10.32.4.150
NTP configuration: Disable
CAUTION:
You have selected IPv6 stateless autoconfiguration, which assigns a global address
based on network prefix and a device identifier. Although this address is unlikely
to change, if it does change, the system will stop functioning correctly.
We suggest you use static addressing instead.
Apply the changes?(y,n) [Y]: Y
Configuration saved successfully!
Applying...
Restarting network services...
Done.
Press ENTER to continue...
At this point the appliance’s initial configuration phase is complete and ready to begin downloading the FTD system image
To initiate the image download use the system install ftp://10.32.4.150/ftd-6.2.0-362.pkg and replace the IP address portion with your FTP server’s IP address.
During the installation, the process will ask for the necessary credentials to authenticate to the FTP server. Right before the point of no return the system will ask for a final confirmation before erasing the appliance’s disk and initiating the upgrade. When the system image installation is complete, the system will require the user to hit enter to reboot.
Unnecessary output e.g. dots (….) have been removed from the log to make it easier to read and understand.
FIREWALLCX-boot> system install ftp://10.32.4.150/ftd-6.2.0-362.pkg
######################## WARNING ############################
# The content of disk0: will be erased during installation! #
#############################################################
Do you want to continue? [y/N]: y
Erasing disk0 ...
Extracting ...
Verifying. …
Enter credentials to authenticate with ftp server
Username: firewallcx
Password: $etmeup!
Verifying. ... ...
Downloading. … ...
Extracting. … …
Package Detail
Description: Cisco ASA-FTD 6.2.0-362 System Install
Requires reboot: Yes
Do you want to continue with upgrade? [y]: y
Warning: Please do not interrupt the process or turn off the system.
Doing so might leave system in unusable state.
Starting upgrade process .... ….. ….
Populating new system image. ….. ….
Reboot is required to complete the upgrade. Press 'Enter' to reboot the system.
Broadcast message from root@FIREWALLCXFTD (ttyS0) (Thu Mar 16 05:46:03 2017):
The system is going down for reboot NOW!
The ASA FTD Appliance will now reboot. While this process is underway you will see a lot of information during shutdown and startup. When booting into the FTD system image for the first time it is normal to see a number of error/warning messages – do not be alarmed.
When the system has successfully booted it will require you to login using the default username (admin) & password (cisco123) then require you to press Enter to present Cisco’s EULA which must be accepted at the end by pressing again the enter key or typing YES:
Cisco ASA5555-X Threat Defense v6.2.0 (build 362)
firepower login: admin
Password: cisco123
You must accept the EULA to continue.
Press <ENTER> to display the EULA:
END USER LICENSE AGREEMENT
IMPORTANT: PLEASE READ THIS END USER LICENSE AGREEMENT CAREFULLY.
……………………………………..
Product warranty terms and other information applicable to Cisco products are
available at the following URL: http://www.cisco.com/go/warranty.
Please enter 'YES' or press <ENTER> to AGREE to the EULA: YES
Finally the last step involves changing the default admin password and configuring again the system’s network settings.
While it might seem repetitive and pointless to configure the network settings three times during the FTD boot image and system image installation, this allows companies to perform these necessary preparation tasks in an isolated environment, e.g. lab room, to get the device ready for the final deployment that will be in the production environment.
Similar to the previous steps, pressing enter will accept the default value shown between the brackets [ ]:
System initialization in progress. Please stand by.
You must change the password for 'admin' to continue.
Enter new password: $etmeup!
Confirm new password: $etmeup!
You must configure the network to continue.
You must configure at least one of IPv4 or IPv6.
Do you want to configure IPv4? (y/n) [y]: y
Do you want to configure IPv6? (y/n) [n]: n
Configure IPv4 via DHCP or manually? (dhcp/manual) [manual]: manual
Enter an IPv4 address for the management interface [192.168.45.45]: [enter]
Enter an IPv4 netmask for the management interface [255.255.255.0]: [enter]
Enter the IPv4 default gateway for the management interface [data-interfaces]: [enter]
Enter a fully qualified hostname for this system [firepower]: firewall.cx
Enter a comma-separated list of DNS servers or 'none' [208.67.222.222,208.67.220.220]: [enter]
Enter a comma-separated list of search domains or 'none' []:[enter]
If your networking information has changed, you will need to reconnect.
DHCP server is enabled with pool: 192.168.45.46-192.168.45.254. You may disable with configure network ipv4 dhcp-server-disable For HTTP Proxy configuration, run 'configure network http-proxy'
Manage the device locally? (yes/no) [yes]: yes
Configuring firewall mode to router Update policy deployment information - add device configuration Successfully performed firstboot initial configuration steps for Firepower Device Manager for Firepower Threat Defense.
>
The greater-than “>” symbol indicates the FTD setup is complete and running.
More information on the Cisco Firepower Threat Defense, including Installation and Upgrade Guides, can be found at the following Cisco URL:
https://www.cisco.com/c/en/us/support/security/firepower-ngfw/products-installation-guides-list.html
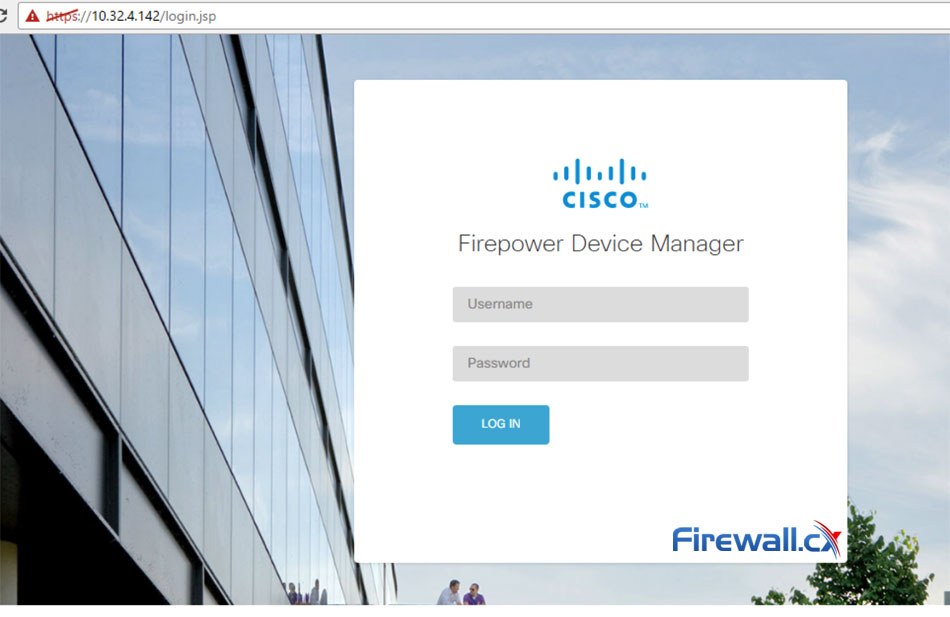
You can now log into the Cisco Firepower Device Manager by entering the ASA Firewall appliance IP address in your web browser:

Cisco Firepower Device Manager Login Screen
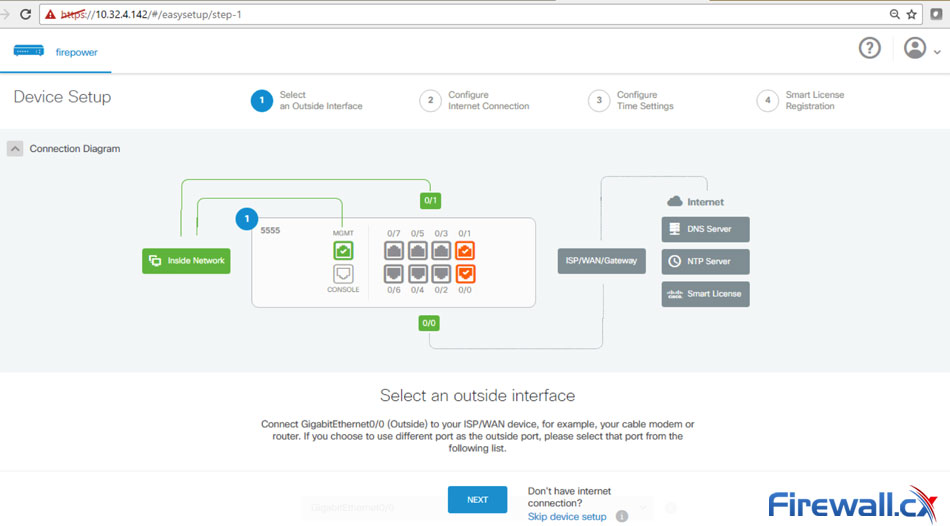
Once logged in, you can follow the step-by-step setup Device Setup Wizard that will take you the necessary steps to initially configure your new ASA FTD device:

Device Setup Page of Cisco FTD
Experienced Firepower Threat Defense users can click on the Skip device setup link located on the lower area of the screen.
Summary
Cisco’s Firepower ThreatDefense(FTD) istheNext-Generation Firewall solution that will eventually replace the well-known ASA software. While FTD is still in its early years it is rapidly being adopted by organizations across the globe. It is important to understand the current limitations of FTD before moving it into a production environment. For example, important features such as site-to-site VPN are not currently supported, however, it does have a great clean and intuitive GUI interface!
For many, installing Cisco’s Firepower Threat Defense on an ASA Firewall appliance can be a confusing task. Our Cisco Firepower Threat Defense (FTD) installation guide has been designed to simplify the process by providing step-by-step instructions presented in an easy-to-understand format while also covering Cisco Firepower Threat Defense management options.
Your IP address:
3.147.73.112
Wi-Fi Key Generator
Follow Firewall.cx
Cisco Password Crack
Decrypt Cisco Type-7 Passwords on the fly!


