How to Easily Change Network Card Profile / Network Location (Private or Public) on Windows Server 2012 R2
Network Location Awareness (NLA) is a feature offered on Windows Server 2012 R2 and all Windows workstation editions from Windows 8.1 and above, including Windows 10. When connecting to a network (LAN or Wireless) it is often misidentified as a Public network instead of a Private network or vice versa. The same problem is also seen when adding an additional network card to a Windows 2012 server. This article explains how to use Windows PowerShell to quickly change any Network Card identification between a Public or Private Network and ensure the correct Firewall rules are applied (if in use).
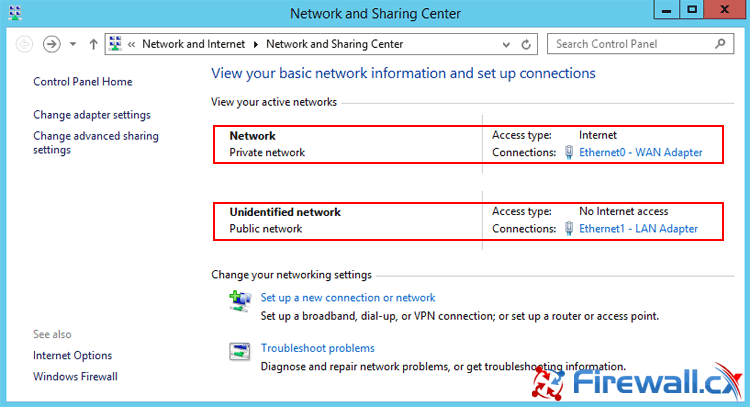
The screenshot below shows our Windows 2012 R2 server configured with two network cards. We’ve renamed the network cards to easily identify them, as such Ethernet0 was renamed to “Ethernet0 – WAN Adapter”, while Ethernet1 was renamed to “Ethernet1 – LAN Adapter”.
The Windows Network Location Awareness (NLA) has incorrectly identified Ethernet0 to be connected to a Private network, while Ethernet1 is also incorrectly identified to be connected to a Public network, as shown below:

Figure 1. Windows Network Location Awareness (NLA) incorrectly identifies the Private & Public networks on our network interface cards
We should note that incorrect network profiles (Private or Public) also means that the Windows Firewall is applying the incorrect rules to the network cards. For example, a Public network could have very strict rules configured, while the Private network might have less restrictive rules applied. As one can understand, this also creates a serious security hole and therefore the correct network profiles (Private or Public) must be applied to each network interface card (network adapter).
Quickly Change Network Profiles (Public or Private) via PowerShell
To begin, launch the Windows PowerShell console by click on the PowerShell icon located on the taskbar:
![]()
Figure 2. Launching the Windows PowerShell console
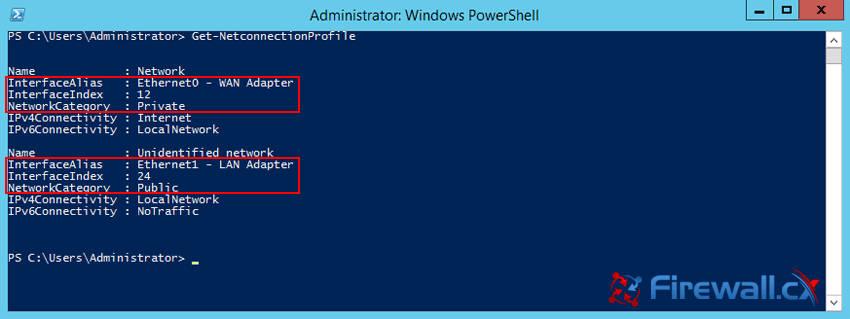
Next, at the prompt enter the command Get-NetconnectionProfile to obtain a list of all network interfaces on the Windows Server, along with their identified network category (Private / Public):

Figure 3. Executing Get-NetconnectionProfile PowerShell cmd to obtain network profile & ID info
Notice that the command output is identical to what we saw in the Network and Sharing Center screenshot at the beginning of the article.
Looking closely to the ouput, we’ll notice that each network card has an InterfaceAlias and InterfaceIndex value. The InterfaceAlias is the name of the network card, in our case Ethernet0 – WAN Adapter and Ethernet1 – LAN Adapter respectively, while the InterfaceIndex represents the index number of the physical interface - that is 12 for Ethernet0 and 24 for Ethernet1.
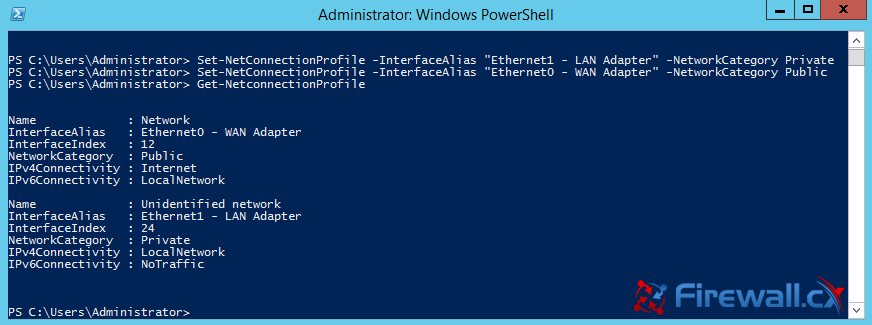
The final step is using the Set-NetConnectionProfile command used to configure each adapter to a network profile. First we set the LAN Network card (Ethernet 1) to the Private network profile and then the WAN Network card (Ethernet 0) to the Public network profile as shown below:

Figure 4. Changing network profile for both network cards using the Set-NetConnectionProfile command
Users can use either the –InterfaceAlias or -InterfaceIndex parameter to select the network interface to be changed. Here are the full commands for each parameter:
or
Set-NetConnectionProfile -InterfaceIndex 24 -NetworkCategory Private
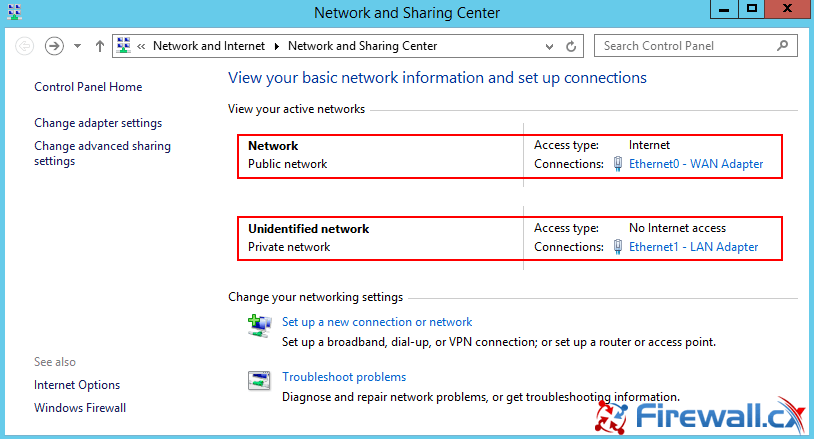
Moving back to the Network and Sharing Center, we can see that both network interfaces are now bound to the correct network profile:

Figure 5. Network interfaces are now bound to the correct network profile
This article explained how to change the network profiles configured on a Windows Server 2012 network interface cards. We talked about the importance of having the correct network profiles configured to each network interface card and how this affect the Windows Firewall rules. We also showed two different PowerShell commands (Set-NetConnectionProfile -InterfaceIndex & Set-NetConnectionProfile –InterfaceAlias) that can be used to make the network profile changes.
Your IP address:
3.144.124.142
Wi-Fi Key Generator
Follow Firewall.cx
Cisco Password Crack
Decrypt Cisco Type-7 Passwords on the fly!


