Windows Server 2012 File Server Resources Manager (FSRM) Installation & Configuration - Block Saving Of Specific File Types on Windows Server
The Windows Server 2008 first carried FSRM or Fie Server Resources Manager, which allowed administrators to define the file types that users could save to file servers. Windows FSRM has been a part of all succeeding Windows Servers, and administrators can now block defined file types from being uploaded to a specific folder or to an entire volume on the server.
Before you can begin blocking file extensions, you may need to install and configure FSRM on your Windows Server 2012 R2. Installation of FSRM can be achieved through the Server Manager GUI or by using the PowerShell console.
This article will examine the installation of FSRM using both methods, Server Manager GUI and Windows Server PowerShell console, while providing all necessary information to ensure a successful deployment and configuration of FSRM services.
FREE Hyper-V & VMware Backup: Easy to use - Powerful features - Just works, no hassle: It's FREE for Firewall.cx readers! Download Now!
Installing FSRM On Server 2012 Using The Server Manager GUI
Assuming you are logged in as the administrator, start with the Server Manager – click on the second icon from left on the bottom toolbar on the desktop as shown below:

Figure 1. Launching the Server Manager Dashboard
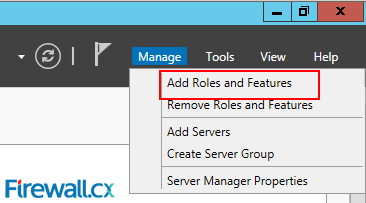
This brings up the Server Manager Dashboard. Proceed to the top right hand corner and click on Manage, then click on Add Roles and Features.
This opens the Add Roles and Features Wizard, where you need to click on Server Selection. Depending on how many servers you are currently managing, the right hand side will show one or multiple servers in the pool. Select the file server on which you want to install FSRM, and click on Next to proceed.
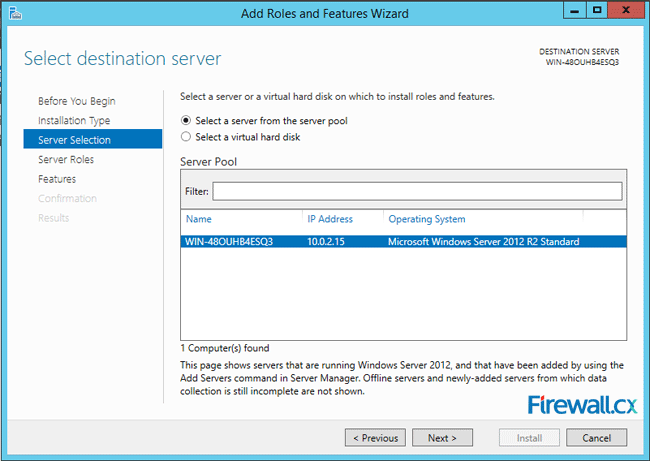
Figure 3. Selecting a Server to add the FSRM role
The next screen shows the server roles that you can install on the selected server. On the right hand side, locate File and Storage Services and expand it. Locate the File and iSCSI services and expand it. Now, locate the File Server Resource Manager entry.
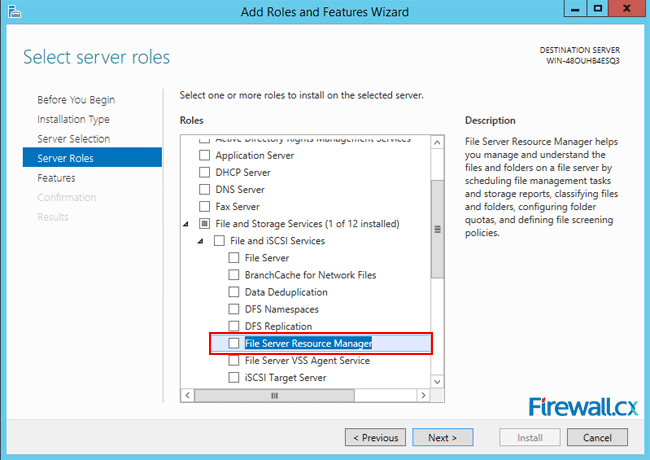
Figure 4. Selecting the File Server Resource Manager role for installation
Click on the check box in front of the entry File Server Resource Manager. This will open up the confirmation dialog box for the additional features that you must first install before installing FSRM.
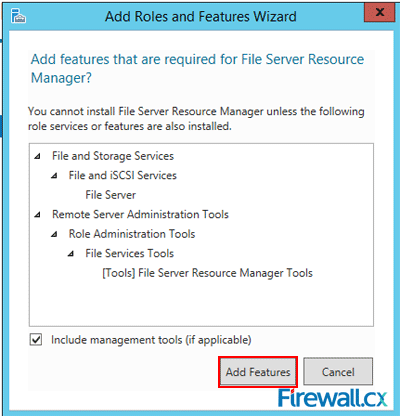
Figure 5. Confirming the installation of additional role services required for FSRM
Click on Add Features and you are all set to install FSRM, as the check box for File Server Resource Manager now has a tick mark (shown below).
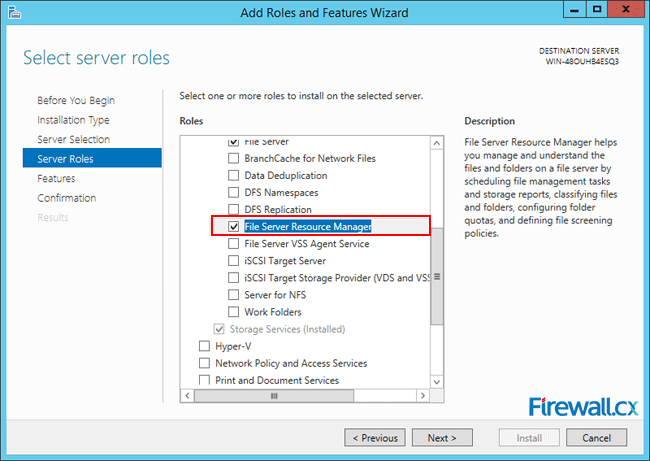
Figure 6. Back to the Server Role installation – Confirming FSRM Role Selection
Clicking on Next allows you to Select one or more features to install on the selected server. We don’t need to add anything here at this stage, so click Next to go to the next step.
This brings up a screen asking you to Confirm installation selections. This is the stage where you have the last chance to go back and make any changes, before the actual installation starts.
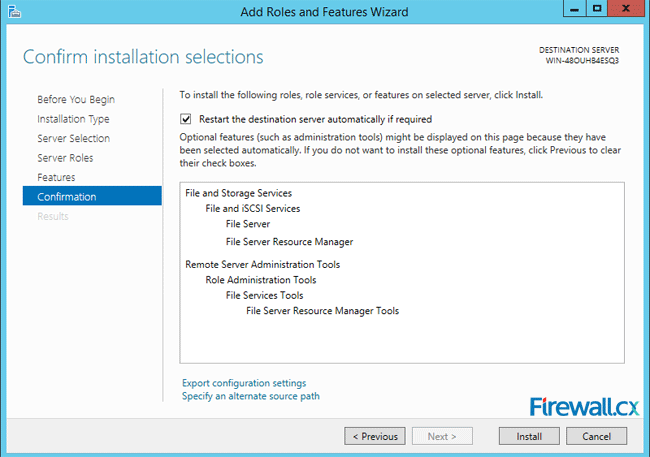
Figure 7. Confirm installation selections
Click on Install to allow the installation to commence and show the progress on the progress bar on the Results screen. Once completed, you can see the Installation successful on … under the progress bar.
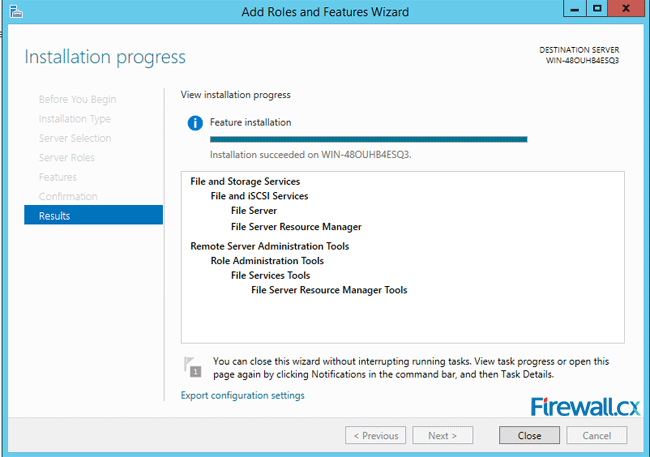
Figure 8. Completion of FSRM role installation
Click on Close to exit the process.
To check if the FSRM has actually started running, go to the Server Manager Dashboard and click on File and Storage Services on the left hand side of the screen.
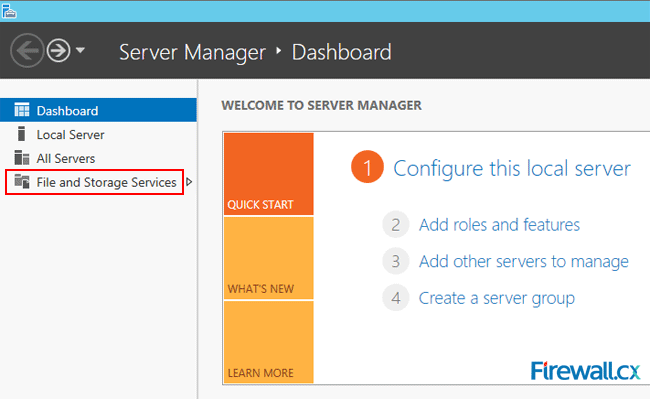
Figure 9. Server Manager Dashboard
The Dashboard now shows all the servers running under the File and Storage Services. Go down to Services and you will see FSRM running with an automatic start up.
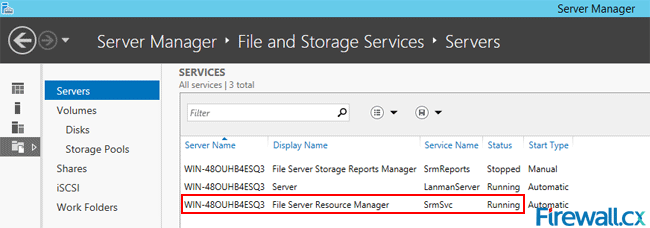
Figure 10. File and Storage Services – Confirming FSRM Service
Installing FSRM On Server 2012 Using The PowerShell Console
This is a comparatively easier and faster process compared to the GUI method.
To invoke the PowerShell, click the third icon from left on the bottom toolbar on the desktop.

Figure 11. Launching Windows PowerShell
This will open up a console with an administrative level command prompt. At the command prompt, type:

Figure 12. Executing PowerShell command to install FSRM
A successful installation will be indicated as True , under the Success column as shown above.
FREE Hyper-V & VMware Backup: Easy to use - Powerful features - Just works, no hassle: It's FREE for Firewall.cx readers! Download Now!
Configuring File Screening
Invoke FSRM from the Tools menu on the top right hand corner of the Server Manager Dashboard.
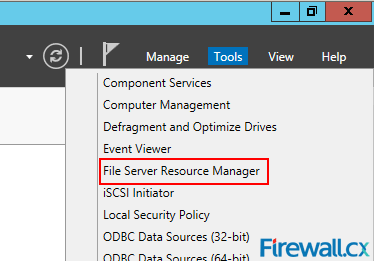
Figure 13. Running the File Server Resource Manager component
The File Server Resource Manager screen opens up. On the left panel, expand the File Screening Management and go to File Groups. The central panel shows the File Groups, the Include Files and the Exclude Files in three columns.
Under the column File Groups, you will find file types conveniently grouped together. The column Include Files lists all file extensions that are included in the specific file group. For a new server, the column Exclude Files is typically empty.
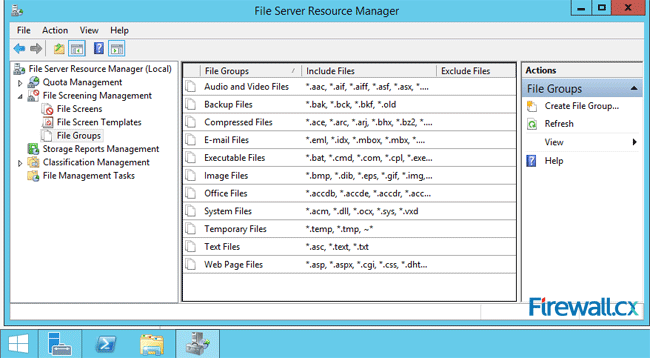
Figure 14 – File Groups, Include File and Exclude Files
On the left panel, go to File Screen Templates and click on it. The central panel shows predefined rules that apply to folders or volumes.
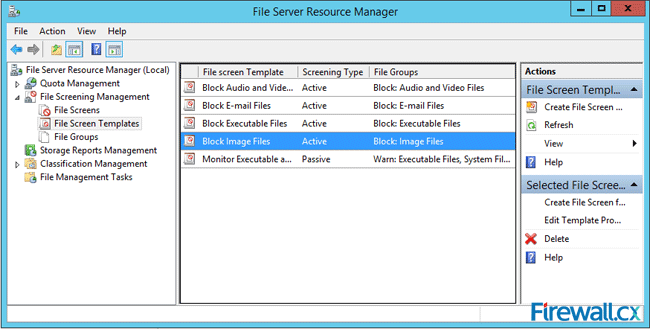
Figure 15. File Server Resource Manager - File Screen Templates
For instance, double-click on Block Image Files in the central panel. This opens up the File Screen Template Properties for Block Image Files. Here you can define all the actions that the server will take when it encounters a situation where a user is trying to save a file belonging to the excluded group.
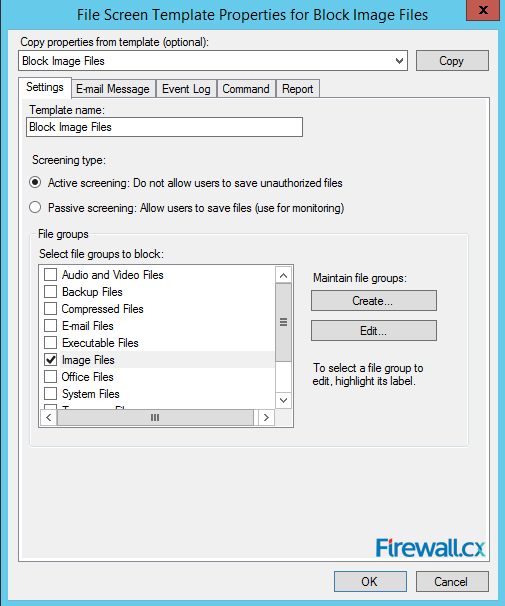
Figure 16. FSRM - File Screen Template Properties for Block Image Files
You can choose to screen the specified file type either actively or passively. Active screening disallows users from saving the specified file group. With passive screening, users are not prevented from saving the files while the administrator can monitor their actions.
The server can send from one to four basic alerts when it encounters an attempt to save a forbidden file. The server can send an Email message to the administrator, create an entry in the Event Log, run a specified Command or Script and or generate a Report. You can set up the details for each action on individual tabs. When completed, exit by clicking on OK or Cancel.
To edit the existing template or to create a new one based on the chosen template, go to the File Screen Templates and in the central panel, right-click on the predefined template you would like to edit. From the Actions menu on the right panel, you can either Create File Screen Template or Edit Template Properties.
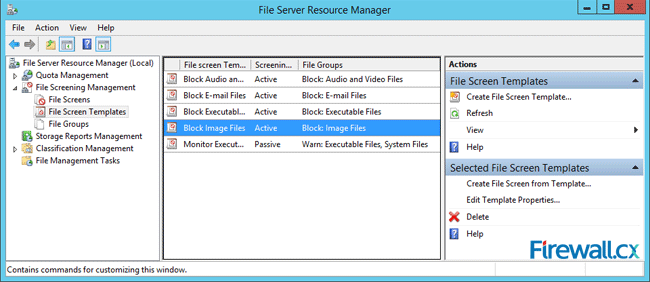
Figure 17. FSRM – Creating or editing a File Screen Template
Clicking on Create File Screen Template opens up a dialog where you can click on Browse to select a folder or volume on which the new rule would be applied. Under How do you want to configure file screen properties? You can either Derive or Create the file screen properties. Click on Create to allow the new file screen rule to appear in the central panel.
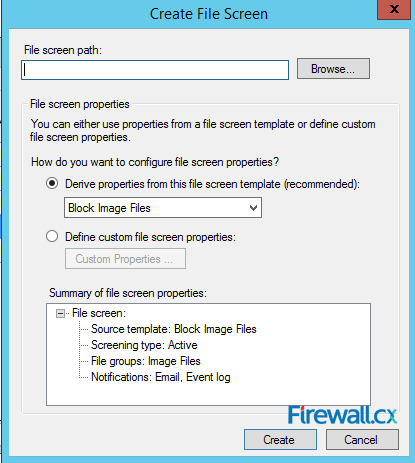
Figure 18. FSRM - Creating a File Screen
Creating Exceptions
Exceptions are useful when you want to allow a blocked file type to be saved in a specific location. Go to the left panel of the FSRM screen and right-click on File Screens.
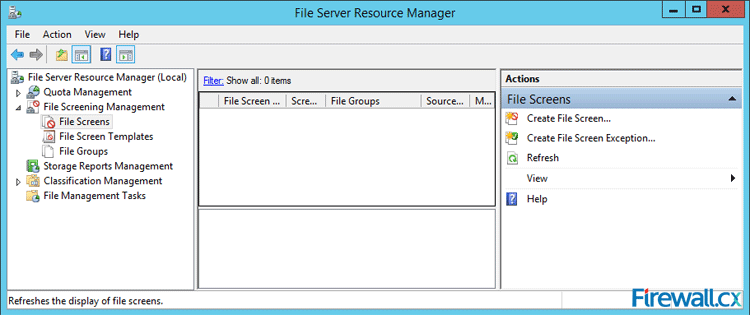
Figure 19. FSRM – Creating a File Screen Exception
From the menu on the right panel, click on Create File Screen Exception. On the menu that opens up, click on Browse to select a folder or volume on which the new rule would be applied and select the group you would like to exclude under the File groups. Click OK and complete the process.
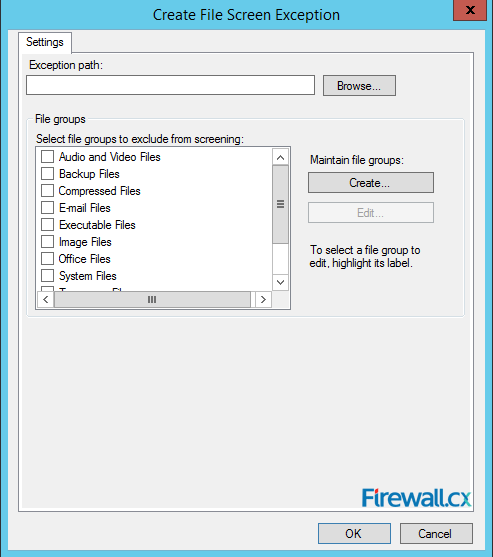
Figure 20. FSRM – File Screen Exception settings and options
Summary
This article showed how to we can use Windows Server File Server Resources Manager (FSRM) to block file types and extensions from being uploaded or saved to a directory or volume on a Windows 2012 R2 server. We explained how to perform installation of FSRM via GUI interface and Powershell, and covered the creation or editing of File Screen Templates used to block or permit access for specific files.
Your IP address:
18.191.236.98
Wi-Fi Key Generator
Follow Firewall.cx
Cisco Password Crack
Decrypt Cisco Type-7 Passwords on the fly!


