Cisco Nexus 7000 Series Module Shutdown and Removal Procedure
 This article explains the procedure that should be followed to correctly shutdown/powerdown a Cisco Nexus 7000 series module and remove it from the chassis. We also include important tips that will help ensure you avoid common problems and mistakes during the removal procedure.
The Nexus 7010 is one of the larger data center switches in the Nexus portfolio found in most enterprise-class data centers. Even though the Nexus 7000 series switches have been in the market since 2008 there are still a lot of data centers powering their core infrastructure using the well-known Cisco Catalyst series.
The Nexus 7000 series switches are designed for continuous operation, which means all parts are hot-swappable thereby eliminating downtime for upgrades or parts replacement.
The process covered in this installation guide can be used with all Nexus 7000 series modules including:
- 48-port 10/100/1000 Ethernet module (N7K-M148GT-11)
- 48-port 10/100/1000 Ethernet module with XL option (N7K-M148GT-11L)
- 48-port 1-Gigabit Ethernet I/O module (N7K-M148GS-11)
- 48-port 1-Gigabit Ethernet I/O module with XL option (N7K-M148GS-11L)
- 48-port 1-/10-Gigabit Ethernet I/O modules with XL (N7K-F248XP-25 and N7K-F248XP-25E)
- 32-port 10-Gigabit Ethernet I/O module (N7K-M132XP-12)
- 32-port 10-Gigabit Ethernet I/O module with XL option (N7K-M132XP-12L)
- 32-port 1- and 10-Gigabit Ethernet I/O module (N7K-F132XP-15)
- 8-port 10-Gigabit Ethernet I/O module with XL option (N7K-M108X2-12L)
Step 1. Nexus 7000 Module Shutdown - Poweroff
The Nexus 7000 series modules are hot swappable and support automatic shutdown when ejected, however, it is always advisable to poweroff the module before removing it. If the module is to be removed or swapped with a different module type it is advisable to also ensure all configuration associated with the old module’s ports is cleared and ports are shutdown before the module is removed.
Locate the slot number of the module to be uninstalled and remove all attached cables. It is very important no cables are attached to the module and there is enough space on both sides of the module. In our example we’ll be removing the module located in slot No.9:
Click on the images to enlarge
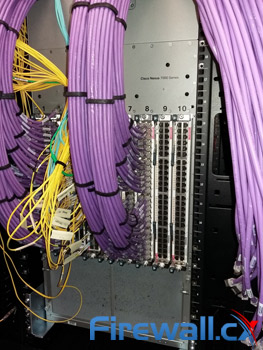 Figure 1. Nexus 7010 with module No.9 to be removed.
Issuing the show module 9 command will reveal the module’s model, status, capabilities, serial number and diagnostic status:
The output of the show module is also reflected on the module’s status LED. A green Status LED, as shown in the photo on the left, tells us that the module is currently online (powered on) and operating.
The orange interface LEDs confirm that the interfaces are in a shutdown state.
The specific card we are about to remove is a 48-port 10/100/1000 Ethernet card (N7K-M148GT-11L):
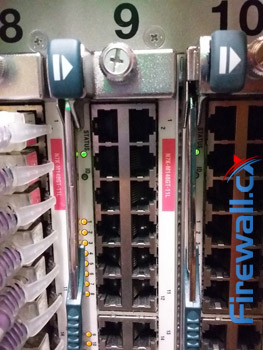 Figure 2. Nexus 7000 Module Status and Interface LEDs
Now proceed to power off the module using the poweroff module 9 command:
FCX_NEXUS_7010 (config)# poweroff module 9
Once the poweroff command has been executed the Nexus will begin powering off the module and removing all associated interfaces from the configuration:
Notice the final message confirms that module 9 is now powered down.
When looking at the module notice the change in its LEDs. The Status LED will be now flashing red, while all interface LEDs are off:
Figure 3. Nexus 7000 module powered down. Status LED flashing red
Using the show module 9 command we can verify the module’s powered-down status:
Step 2. Removing A Nexus 7000 Module
With the module powered down and the Status LED flashing red we are now able to remove the module from its slot.
Note: Ensure you’re using an antistatic wrist band that has been appropriately grounded.
It’s now time to leave the keyboard, grab a screw driver and get our hands dirty:)
First unscrew the two captive screws located at each end of the module as shown below. A Philips or straight head screw driver will be adequate for the job:
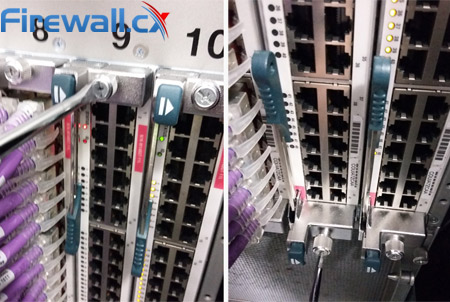 Figure 4. Unscrewing Nexus 7000 module captive screws
Next, using your fingers from both hands press simultaneously the ejector buttons located at each end of the module, right next to the captive screws, as shown below:
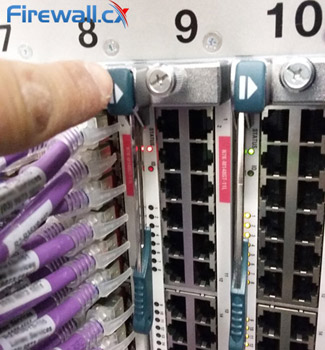 Figure 5. Pressing the ejector buttons on a Nexus 7000 module
When pressing the ejector buttons (No.1 below), two things will occur:
- The ejector levers will swing into the OPEN position (No.2 below)
- The Nexus 7000 switch will generate a message notifying that the ejectors are in the OPEN position
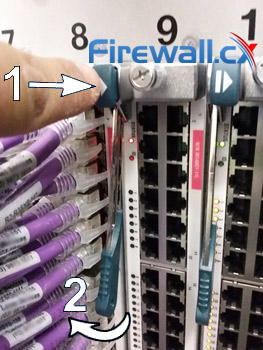 Figure 6. Nexus 7000 Module ejector lever in OPEN position after pressing the ejector button
Following is the message generated by the Nexus 7000 operating system after pressing the ejector buttons:
2016 Oct 15 11:48:39 FCX_NEXUS_7010 %PLATFORM-3-EJECTOR_STAT_CHANGED: Ejectors' status in slot 9 has changed, Top Ejector is OPEN, Bottom Ejector is OPEN
Now simultaneously swing open both ejector levers to unseat the module (No. 3 in the photo below) and with a hand on each ejector, pull the module part way out of its slot in the chassis (No.4 in the photo below):
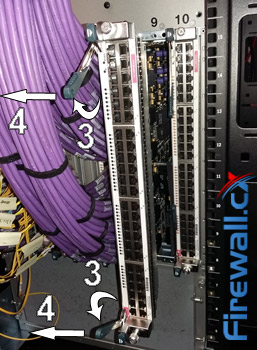 Figure 7. Nexus 7000 module – Swinging the ejector levers and pulling the module out
As soon as the module disconnects from the Nexus backplane the system will produce a notification message:
2016 Oct 15 11:50:07 FCX_NEXUS_7010 %PLATFORM-2-MOD_REMOVE: Module 9 removed (Serial number JAF1327BFHA)
When the module is almost out grasp the front edge with one hand and place your other hand under the module to support its weight without touching the module’s circuitry:
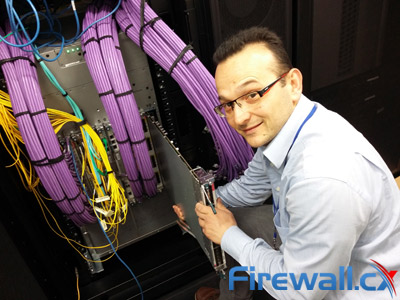 Figure 8. Proper handling during the removal of the Nexus 7000 module
Once the module has been removed from the slot place it inside an antistatic bag.
If using a disposable anti-static wrist strap take extra caution as the fans inside the Nexus 7000 series chassis create strong airflow capable of pulling in lightweight items as shown in the photo below.
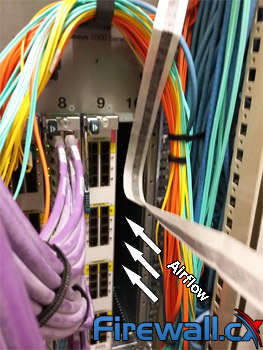 Figure 9. The Nexus 7000 airflow is strong enough to pull light items inside the empty slot
Cisco advises not to leave the slot open for a long as it can disrupt the system airflow causing the system to overheat and shut down. This, however, should not be a problem in a properly cooled data center.
Conclusion
Removing a module from a Nexus switch is a very delicate process. Special care must be taken to ensure the slot’s configuration is cleared, the module is powered down and safely removed using an anti-static wrist strap. Future articles will cover the installation of modules on Nexus 7000 data center switches.
Your IP address:
18.190.176.26
Wi-Fi Key Generator
Follow Firewall.cx
Cisco Password Crack
Decrypt Cisco Type-7 Passwords on the fly!


