OSPF - Part 3: OSPF Adjacency & Neighbor Forming Process. OSPF Hello Messages, OSPF Database Updates via Link State Requests (LSR & LSU)
 This is the thrid article of our 6-part OSPF series (see below) that describes how OSPF routers perform neighbor relationship and adjacency. We’ll examine how OSPF discovers neighbors by sending Hello packets through the router interfaces and how it shares Link State Advertisements (LSAs) to form adjacencies and build its topology table. We’ll also examine the contents of OSPF Hello packets (Router ID, Hello/Dead Intervals, Subnet Mask, Router Priority, Area ID, DB & BDR IP Address, Authentication information) and more.
Below is a complete list of articles covering our OSPF Series:
How OSPF Forms Neighbor Relations
Once OSPF is enabled on a router interface, a Link State Database (LSD) is established and all interfaces running OSPF are added to this table to be used in Link State Advertisements (LSAs), OSPF then the begins neighbor discovery and forming adjacency process.
We’ll now take a closer look at both, neighbor discover and adjacency forming process:

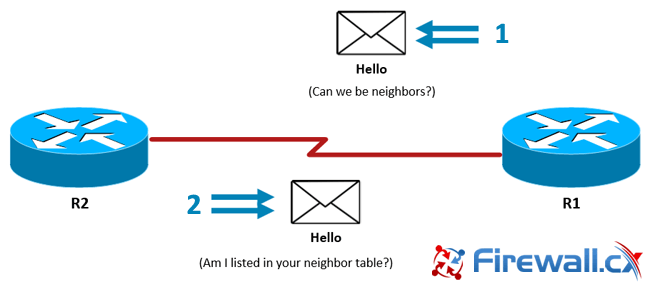
Figure 1. R1 sends an initial OSPF Hello packet. R2 responds with an OSPF Reply Hello packet.
Sending & Receiving OSPF Hello Messages
An OSPF router generates a Hello packet every poll interval -10 seconds for Peer-to-Peer (P2P) networks and 30 seconds for Non-Broadcast-Multiple-Access (NBMA) networks by default- and advertises it through multicast address 224.0.0.5 to all routers connected to its interfaces while it searches for potential OSPF neighbors. The Hello message contains a list of information needed to form an OSPF neighbor relation between two neighboring routers, the following a list of information contained the Hello messages:
- OSPF Router ID. The router’s ID which is configured or automatically selected by OSPF (analyzed below)
- Hello Interval Timer. Frequency upon which Hello packets are sent.
- Dead Interval Timer. Defines how long we should wait for hello packets before we declare the neighbor dead.
- Subnet Mask
- Router Priority. Used to help determine the Designated Router (DR). Higher priority takes precedence. A configured Priority of 0 means the router will not become a DR or BDR.
- List of reachable OSPF neighbors in the network.
- Area ID
- DR & BDR’s IP addresses (if exists)
- Authentication Password (if configured)
Once a neighbor router (R2) running OSPF receives the Hello message, it runs a check on the above list.
The following conditions must be met for two routers to become neighbors:
- They must have the same IP network/subnet
- The Hello and Dead Interval timers must be identical
- Router interfaces connecting two routers must have the same Area ID
- Type of area must be identical (normal or stub area)
- Authentication password (if used) must be identical
Hello Parameters Mismatch
If there’s a mismatch between some of the items (Hello/Dead interval, Subnetmask, Area ID etc), a Bouncing Relation case occurs as this potential neighbor (R2) keeps flapping on the router’s OSPF topology, indicating a mismatch with the Hello message information.
Note: Router ID can be a name, a number or an IP address. By default, OSPF will choose the highest active interface’s IP address as the Router ID. In case the interface does down (e.g Ethernet interface begin disconnected), it can create problems with the OSPF process. For this reason, it is always recommended to either configure a suitable IP address on a Loopback interface (virtual interface that is always ‘Up’) or manually configure the Router ID to something suitable for the OSPF network.
Hello Parameters Match - Replying Hello messages
When R2 receives the OSPF Hello message from R1 and all necessary Hello parameters match, R2 will send a Reply Hello packet back to R1.
The Reply Hello allows the R1 (who sent the original Hello message) to investigate if the neighboring router R2 is listed in its neighbor list or not.
- If the neighboring router R2 is listed as a neighbor already, then R1 resets its dead timer and the Reply Hello messages act as a Keep Alive mechanism.
- If the neighboring router R2 is not listed in R1’s neighbor database, it will add the newly discovered neighbor R2 router to its OSPF neighbor database. All further OSPF Hello and Hello Reply messages will act as a Keep Alive mechanism.
Establishing Master-Slave Relation
When a neighbor relation is formed between two routers running OSPF, a hierarchy order of exchanging information must be established, which determines which router sends DataBase Descriptor (DBD) updates first (Master) while the other router (Slave) listens. Once the Master sends the DBD packets, the Slave follows by sending its DataBase Descriptor (DBD) packets next.
OSPF elects master router based on highest priority -which can be configured manually-, however if priority is not configured, OSPF will use the router ID as a reference.
Note that the Designated Router (DR) is doesn’t have to be the master, it’s only a router priority based relation to arrange the exchanging data between neighbors but doesn’t affect the role of DR & BDR.
Exchanging DataBase Descriptor (DBD's) - DBD Acknowledgement & Review
OSPF neighbors follow a strict process of exchanging routing information and updates to prevent fault containment caused by updates flood, this process follows the order described below:

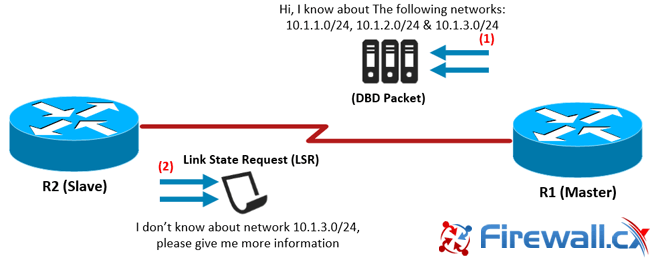
Figure 2. Steps 1 & 2: R1 sends a DBD Packet while R2 replies with a Link State Request (LSR)
1. Master sends DataBase Descriptor (DBD) update packet first.
2. Slave checks DataBase Descriptor (DBD) and finds new routes information, it then requests updates by sending a Link State Request (LSR) packet.

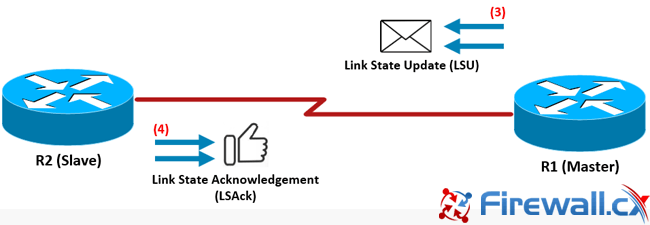
Figure 3. Steps 3 & 4. R1 replies with a Link State Update (LSU) and R2 Acknowledges with a LSAck
3. Master sends back updates through Link State Updates (LSU) packets.
4. Slave acknowledges the reception of updates by sending a Link State Acknowledge (LSAck) packet.
5. Slave sends DataBase Descriptor (DBD) update packet next.
6. Master requests updates by sending a Link State Request (LSR) packet.
7. Slave sends updates through the Link State Update (LSU) packets.
8. Master acknowledges receiving updates by sending a Link State Acknowledge (LSAck) packet.
There are no diagrams showing steps 5 to 8, however these are similar to the first 4 steps, but with the Master router requesting the Link State Request (LSR).
This article explained how OSPF routers build neighbor relationships and adjacencies. We saw the OSPF neighbor discovering process via OSPF Hello packets and the role of Link State Requests (LSR) and Link State Updates (LSU). We also examined the contents of OSPF Hello packets and which fields are necessary to ensure an OSPF adjacency is formed. Finally, we saw how OSPF routers exchange information and update their database via DataBase Descriptor (DBD) packets.
Your IP address:
3.137.183.239
Wi-Fi Key Generator
Follow Firewall.cx
Cisco Password Crack
Decrypt Cisco Type-7 Passwords on the fly!


