Network Address Translation (NAT) Overload - Part 1
NAT Overload is the most common NAT method used throughout all networks that connect to the Internet. This is because of the way it functions and the limitations it can overcome, and we'll explore all of these in the next two pages.
Whether you use a router, firewall appliance, Microsoft's Internet sharing ability or any 3rd party program that enables all your home computers to connect to the Internet via one connection, you're using NAT Overload.
This NAT mode is also know by other names, like NAPT (Network Address Port Translation), IP Masquerading and NAT with PAT (Port Address Translation). The different names logically come from the way NAT Overload works, and you'll understand this by the time we're finished with the topic.
NOTE: You should be familiar with TCP/IP & UDP communications, as well as how they use various Ports in order to identify the resources/applications they are trying to use. It's very important you understand them because NAT Overload is based on these Ports in order to identify sessions between hosts.
The Purpose of NAT Overload
NAT Overload is a mix of Static & Dynamic NAT with a few enhancements thrown in (PAT- Port Address Translation) to make it work the way we need. By now you understand how both Static & Dynamic NAT work so we won't get into the details again. NAT Overload takes a Static or Dynamic IP Address that is bound to the public interface of the gateway (this could be a PC, router or firewall appliance) and allows all PCs within the private network to access the Internet.
If you find yourself wondering how this is possible with one only IP Address, you will be happy to find that the answer lies within PAT.
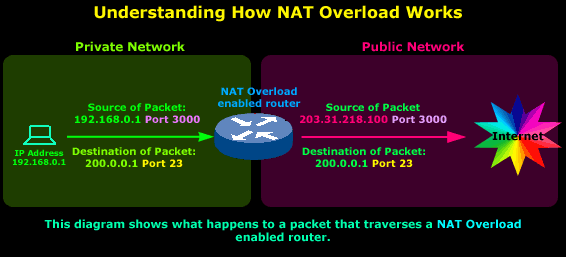
The diagram below shows you how a single session is handled by a NAT Overload enabled device:

So we have a host on a private network, its IP Address is 192.168.0.1 and it's sending a packet to the Internet, more specifically to IP Address 200.0.0.1, which we're assuming is a server. The Port, which is 23, tells us that it's trying to telnet to 200.0.0.1, since this is the default port telnet uses.
As the original packet passes through the router, the Source IP Address field is changed by the router from 192.168.0.1 to 203.31.218.100. However, notice that the ports are not changed.
The reason the Source IP Address is changed is obvious: The router's public IP Address must be placed in the Source IP Address field of the packet so the server we're trying to telnet to knows where the request is coming from so it can then send the reply.
That takes care of making sure the packet from the server we're telneting to finds its way back to the router's public interface. From there, the router needs to know which host on the private network it must send the reply to. For this, it uses the ports and we will be looking at that closer very soon.
Some might think that this example is pretty much the way a Static NAT router would behave, and if you're thinking just that you're totally right! In order to understand how a NAT Overload enabled router is different from Static NAT, we must add at least one more host in the private network, which we'll do right now.
With two or more hosts on the private network, in Static NAT mode we would require the equivalent number of public IP Addresses, right ? One for each private host, because Static NAT maps one public IP Address to each private host.
NAT Overload overcomes this limitation by using one public IP Address for all private hosts, but utilising the thousands of ports available in order to identify each private host's session.
Unleashing the True Power of NAT Overload
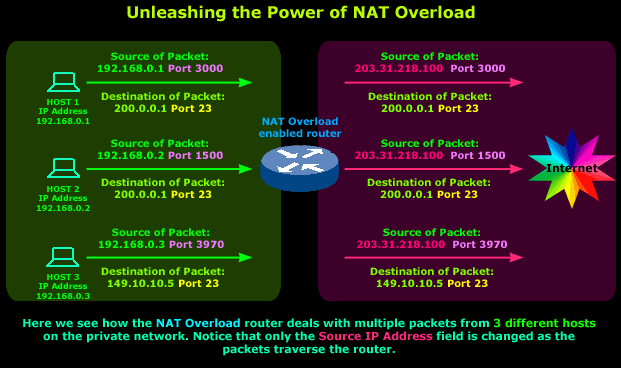
To help cover all possibilities and questions that might come up from these examples, we're going to add another two private hosts in our internal network. We'll assume that:
1) The 2nd host in our private network is trying to telnet to the same server as the 1st host
2) The 3rd host in our private network is trying to telnet to a different server on the Internet
So let's see how our example network looks:

Host 1 and 2 are telneting to the same server (203.31.218.100), the only difference between the two packets is their Source Port Numbers, the router uses these to keep track of which packet belongs to each host.
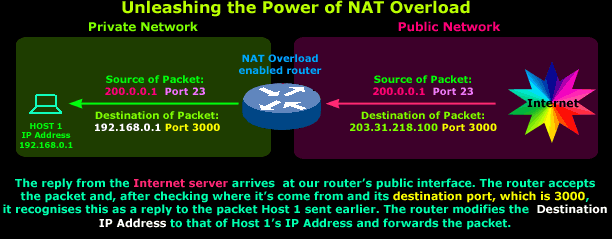
Let's examine what happens when Host 1's reply arrives:

A packet arrives on our router's public interface and is accepted. The packet's details are examined and show that it came from IP Address 200.0.0.1 Port 23 with a destination of 203.31.218.100 Port 3000. The router remembers that Host 1 and 2 just sent a packet to this IP Address and now, in order to determine to whom this response belongs, it carefully examines its Destination Port.
It focuses on the Destination Port because in any reply, the Destination Port takes the value of the initial packet's Source Port. This means that this packet is a reply to one sent previously to IP Address 200.0.0.1 with Source Port 3000. The router refers to its NAT table and finds a matching entry for the described initial packet. It recognises that the reply is intended for Host 1 and will forward it to the host.
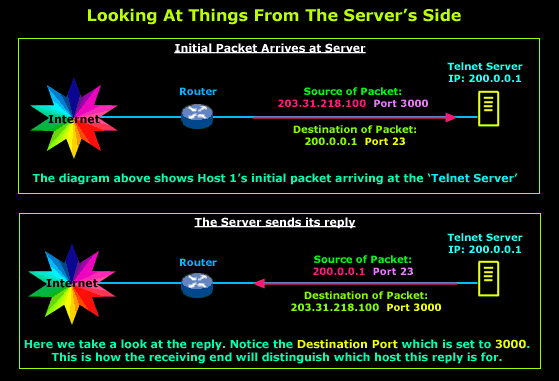
The server to which Host 1 and 2 of our example private network are telneting uses the same logic to distinguish between the two separate sessions.
Because this can also be a bit difficult to imagine, I've included a diagram which shows the server receiving Host 1's initial packet and then sending a reply:

The example on this page is intended to show you the idea behind NAT Overload and how it works. We saw our little NAT Overload enabled router doing wonders with one single public IP Address. If we wanted to use Static or Dynamic NAT in this same example, we would definitely require 3 public IP Addresses for our 3 private hosts but thanks to NAT Overload, we only need one IP Address.
NAT Overload Configuration for Cisco Router
Our Cisco Technical Knowledgebase contains detailed step-by-step instructions how to setup NAT Overload on a Cisco router. Please refer to our NAT Overload Configuration for Cisco Routers to read up more on its configuration.
The next page, NAT Overload - Part 2, will deal with a more detailed analysis of the packets as they traverse the router and take a look at a few more interesting parts of NAT Overload.
Wi-Fi Key Generator
Follow Firewall.cx
Cisco Password Crack
Decrypt Cisco Type-7 Passwords on the fly!


