How to Enable & Use Windows 8 Startup Settings Boot Menu (Workstations, Tablet & Touch Devices)
The Windows 8 Start Settings Boot Menu allows users to change the way Windows 8 starts up. This provides users with the ability to enable Safe Mode with or without Command Prompt, Enable Boot Logging, Enable Debugging and much more. Access to the Setup Settings Boot Menu is provided through the Advanced Startup Options Menu as described in detail below. Alternatively users can use the following command in the Run prompt to restart and boot directly into the Advanced Startup Options Menu:
While not enabled by default, users can use the F8 key to enter Safe Mode when booting into the operating system, just as all previous Windows versions. To learn more on this, read our How to Start Windows 8 and 8.1 in Safe Mode – Enabling F8 Safe Mode article.
Enabling the Windows 8 Startup Settings Boot Menu via GUI
Start with the Windows 8 Start screen. Type the world advanced directly, which will bring up the items you can search. You may also slide in from the right edge, tap/click on the Search Icon and type advanced into the resulting dialog box. Within the Search items listed, tap/click on Settings:
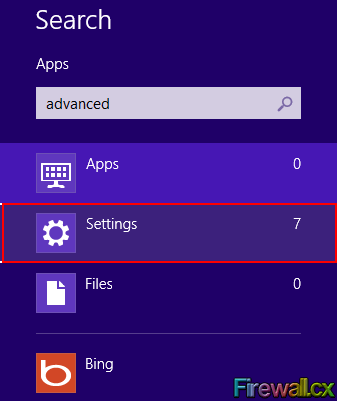 Figure 1. Search Settings
Windows will now show you the Advanced Startup Options within a dialog box as shown below:
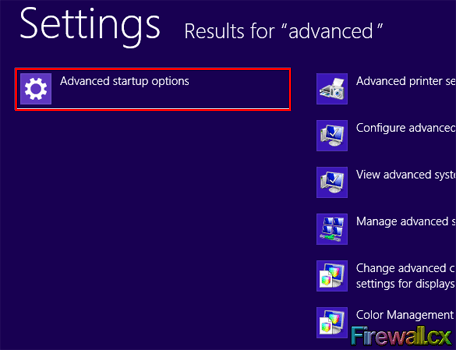 Figure 2. Advanced Settings Search Result
Tapping or clicking within the dialog box will take you to the PC Settings screen. Tap/click on the General Button and scroll down the menu on the right hand side until you come to Advanced Startup. Directly underneath is the Restart Now button:
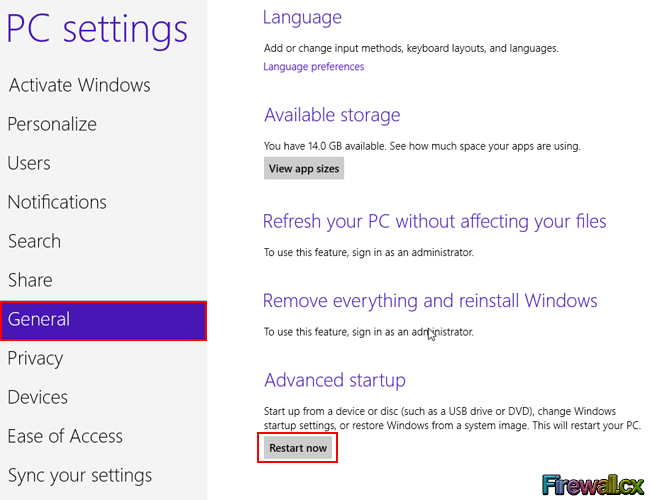 Figure 3. PC Settings
Tapping/clicking on the Restart Now button will let Windows offer its Options screen:
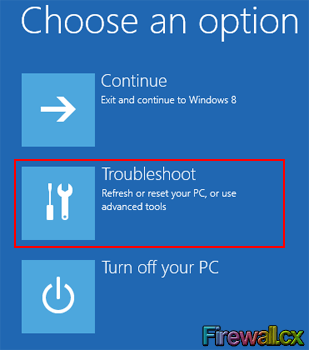 Figure 4. Choose Options
On the Options screen, tap/click on the Troubleshoot button to bring up the Troubleshoot menu:
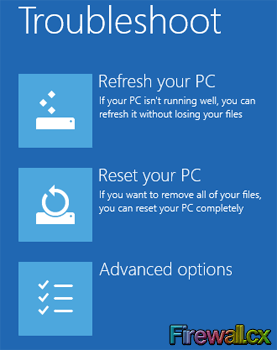 Figure 5. Troubleshoot Menu
From here tap/click on the Advanced Options button to get to the Advanced Options menu:
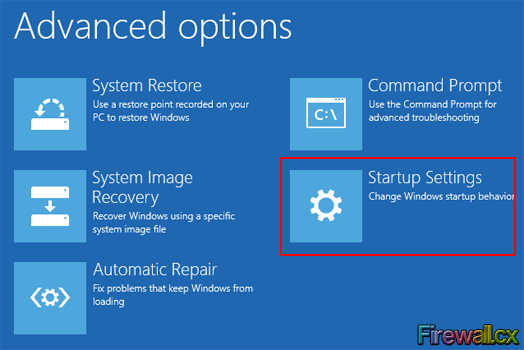 Figure 6. Advanced Options Menu
From the Advanced Options Menu, tap/click on the Startup Settings button. This brings you to the Startup Settings screen showing the various startup settings of Windows 8 that you will be able to change when you Restart. To move ahead, tap/click on the Restart button on the lower right corner of the screen:
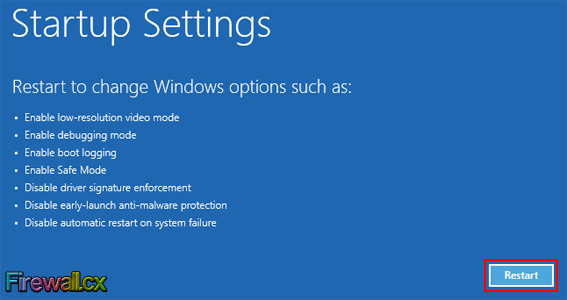 Figure 7. Startup Settings Screen
Windows 8 will now reboot, taking you directly into the Startup Settings Boot Menu. Your mouse pointer will not work here and you must type the number key (or the function key) corresponding to your selection. If you wish to see more options, you can do so by pressing the F10 key:
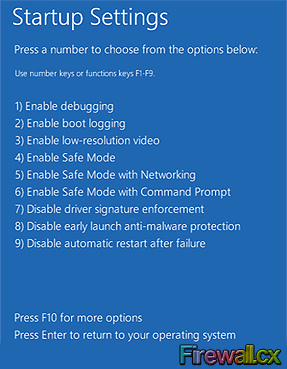 Figure 8. Startup Settings Boot Menu
To return without making any changes, hit the Enter key on your keyboard; you will need to login once again.
The menu options presented are analysed in detail below.
Windows 8 Startup Settings Boot Menu
The Windows 8 Startup Settings Boot Menu lists all the options from which you can select one to alter the way Windows will boot up next. You must be careful here, as there is no way you can go back on your selection and Windows will directly proceed to boot with the selected option. Each option results in a different functionality, as discussed below:
-
Enable Debugging – Useful only if you have a kernel debugger connected to your computer and you want it to control system execution. This option is usually used by advanced Windows users.
- Enable boot logging – Useful if you want to know what is happening during boot time. This option forces Windows to create a log file at the following path C:\Winodws\Ntbtlog.txt, where you will find detailed information about the boot process. For example, if there is a problem with the starting of a specific driver, you will find the relevant information in the log file. Used normally by intermittent to advanced users.
- Enable low-resolution video – Useful if you are facing trouble with your video graphics card and you are unable to see Windows properly. This option will let Windows start up in a low-resolution mode, from where you can specify the proper video resolution that Windows can use.
- Enable Safe Mode – Useful if you want Windows to bypass the normal video card driver and use the generic VGA.sys driver instead. With this option, Windows will start up in a bare-bones mode and will load only programs as are barely necessary for it to work. Network support is disabled in this mode, so do not expect to connect to the Internet or local network.
- Enable Safe Mode with Networking – This mode offers similar abilities as the previous Enable Safe Mode (Option 4) and provides additional network support, allowing connectivity to the local network or Internet.
- Enable Safe Mode with Command Prompt – Useful when you want Windows online but with only a command prompt to type in commands, rather than the usual Windows GUI desktop. In this mode, Windows will only load the bare necessary programs to allow it to run. In place of the normal video card driver, Windows will operate the VGA.sys driver. However, do not confuse this mode with the Windows 8 Recovery Environment Command Prompt, where Windows operates offline.
- Disable driver signature enforcement – Useful for loading unsigned drivers requiring kernel privileges. Typically, Windows does not allow drivers requiring kernel privileges to load unless it can verify the digital signature of the company that developed the driver. This option must be used very carefully, as you are setting aside the security reasons that normally would prevent malware drivers from sneaking in into your computer.
- Disable early launch anti-malware protection – Useful to prevent driver conflicts that are preventing Windows from starting. A new feature in Windows 8 allows a certified anti-virus to load its drivers before Windows can load any other third-party driver. Therefore, the anti-virus software is available to scan all drivers before they are loaded. If the anti-virus program detects any malware, it blocks that driver. Since this is a great security feature, disable it only when necessary and apply extreme caution.
- Disable automatic restart after failure – Useful when you want to see the crash information because Windows restarts too quickly after a crash making it impossible to read the information. Usually, after a crash, Windows displays an error message before automatically rebooting. You may not be able to read the information displayed if Windows reboots very quickly. This option prevents Windows from rebooting after a crash, allowing you to read the error message and take appropriate action.
- Launch Recovery Environment – Useful for accessing recovery and diagnostic tools. This option is available when you press F10 in the Startup Settings Boot Menu. These options are available under Advanced Options Menu - see Figure 6.
This article covered how enable and use the Startup Settings Boot Menu in Windows 8 and also explained in great detail the Windows 8 Startup Settings Boot Menu. Readers interested in learning how to enable F8 Safe Mode functionality can read the article by clicking here.
Your IP address:
3.144.28.82
Wi-Fi Key Generator
Follow Firewall.cx
Cisco Password Crack
Decrypt Cisco Type-7 Passwords on the fly!


