Configuring Windows Server Roaming Profiles
Windows roaming profiles allow the mobile users of a company to always work with their personal settings from any network computer in a domain. Roaming profiles are a collection of personal user settings of a user, saved at a central location on a network.
These settings and configurations are recovered on any network computer as soon as users log in with their credentials.
The roaming user profiles functionality is very useful because it allows mobile users to log on to a variety of computers located at different places and get the same look and feel of their own personalized desktops. However, roaming user profiles in Windows Server 2003 does not allow you to use encrypted files.
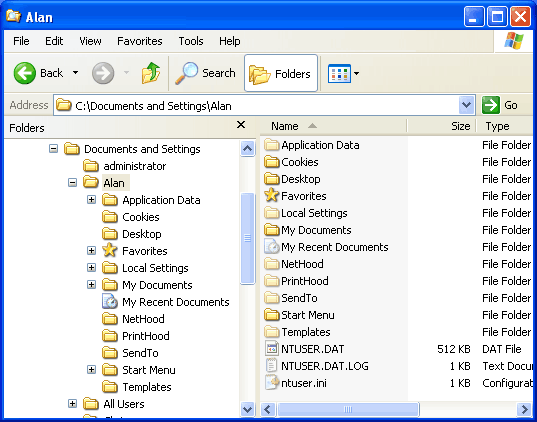
A roaming profile is made up of folders that appear under the <username> folder under Documents and Setting, as shown below:
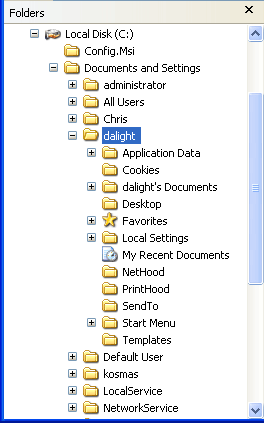
The detailed description of each folder is as follows:
- Desktop: This folder contains all the files, folders, and shortcuts data that is responsible for the appearance of your desktop screen.
- Favorites: This folder contains the shortcuts of the favorite and frequently visited websites of the user.
- Local Settings: This folder contains temporary files, history, and the application data.
- My Documents: This folder contains documents, music, pictures, and other items.
- The Recent: This folder contains the most recently accessed files and folders by the user.
- Start Menu: This folder contains the Start menu items.
- Cookies: This folder contains all cookies stored on the user's computer.
- NetHood: This folder contains shortcuts to sites in My Network Places .
- PrintHood: This folder contains the shortcuts of printers configured for the user's computer.
- Application Data: This folder contains the program-specific and the security settings of the applications that the user has used.
- Templates: This folder contains the templates for applications such as Microsoft Word and Excel.
- SendTo: This folder contains the popular Send To destination on right-clicking a menu.
Creating Roaming User Profiles
You can create roaming user profiles on Windows NT Server 4.0, Windows 2000 Server, or Windows Server 2003 based computers. In addition, you can use Windows NT Workstation 4.0, Windows XP Professional, or Windows 2000 Professional based computer that is running Windows NT Server Administration Tools to create roaming user profiles.
The three major steps involved in creating a roaming user profile include creating a temporary user profile on a local computer, copying that profile to a network server, and then defining the user's profile location through the group policy.
To create a roaming user profile, follow the steps given below:
1. Log on as Administrator, or as a user of local administrator group or Account Operators local group in the domain:
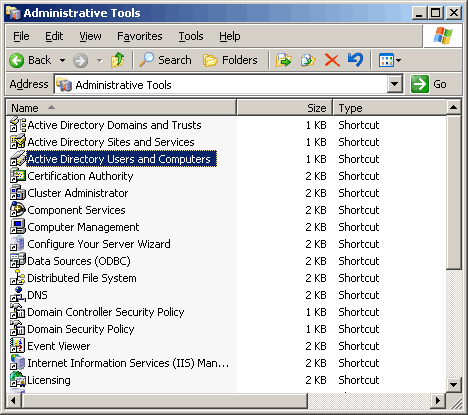
2. Open Administrative Tools in the Control Panel and then click Active Directory Users and Computers, as shown above.
3. Click Users folder under Local Users and Groups node, Right-click Users and then click New User in the menu that appears, as shown below:
Note: If you are using Active Directory then click Users folder under Active Directory Users and Computers node.
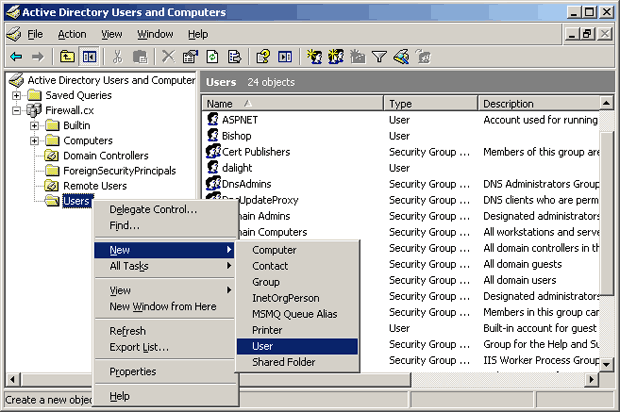
The New User dialog box appears as shown below.
4. Provide the User logon name and the Password for the user for whom the roaming profile is being created in their respective fields. Click on Next:
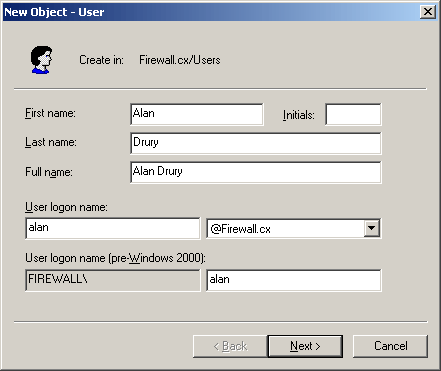
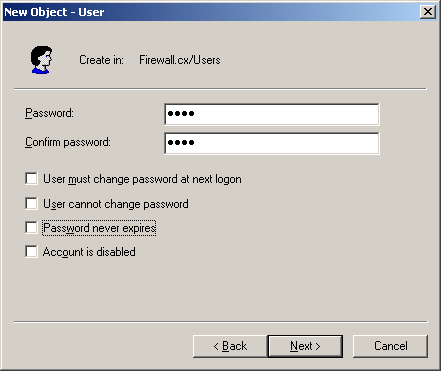
5. Enter the user password and clear the User must change password at next logon option as shown below:
6. Click Create , click Close, and then quit the Computer Management snap-in.
7. Log off the computer and then Log on to your workstation using the user account that you have just created on your server.
8. Verify that a folder with the user name is created under the Documents and Settings folder, as shown below:
9. Configure your desktop by adding shortcuts and modifying its appearance.
8. Configure the Start menu by adding desired options to it.
10. Log off.
Copying The Profile To Your Server
A temporary profile with all the required settings is configured on your local computer. You need to now copy this local profile to a network server which can be accessed centrally by all the computers.
Try not to user a domain controller for this purpose because domain controllers have many other tasks to do, so it is better to keep them away from this task. You can however, choose a member server for this purpose. Make sure that the member server you choose is regularly backed up otherwise you may loose all your roaming profiles.
To copy the profile to a network server, you need to:
1. Log on as Administrator and then create a Profile folder on a network server.
Windows uses Profile folder by default to store roaming user profiles. Although you can give a different name to this folder but this folder is traditionally named as Profile folder.
2. Share the Profile folder and give everyone the full control at share level.
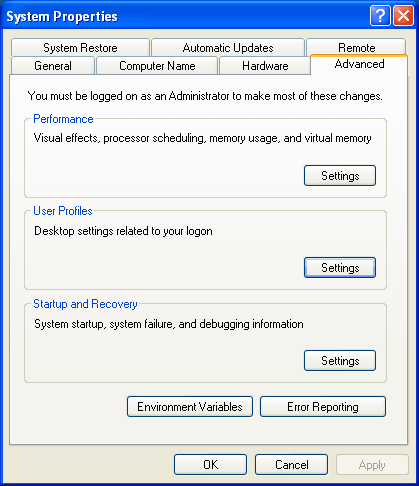
3. Open Control Panel , and then click System icon. The System Properties dialog box appears.
4. Click Advanced tab, and then click Settings under User Profiles section, as shown below:
The User Profiles dialog box appears.
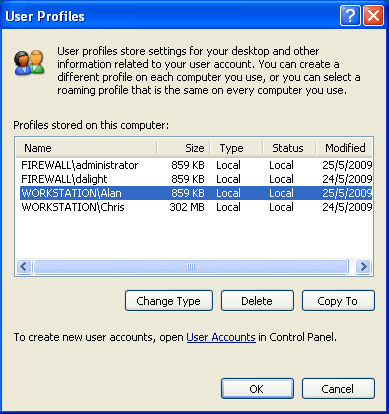
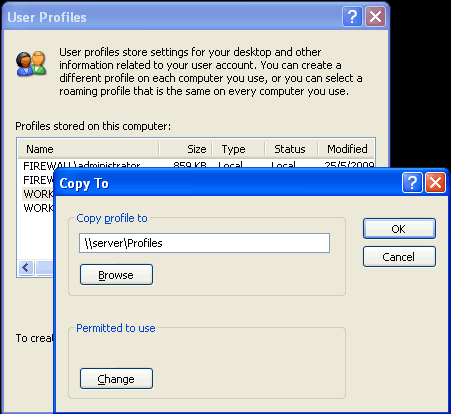
5. Click the temporary user profile that you had created and then click Copy To, as shown in the Figure below:
Next, The Copy To dialog box appears, a shown below.
6. Type the network path of the Profile folder in the Copy Profile To field.
A folder with the temporary user name will be created automatically under the Profiles folder.
7. Click Change.
8. The Select User or Group dialog box appears.
9. Enter the name of the temporary user that you have created.
10. Click OK four times on all the windows that you have opened recently.
11. Open Administrative Tools in the Control Panel and then click Computer Management, as shown in the second screenshot in this article.
12. Click Users folder under Local Users and Groups node, as shown below:
13. Double-click the temporary user account that you had created.
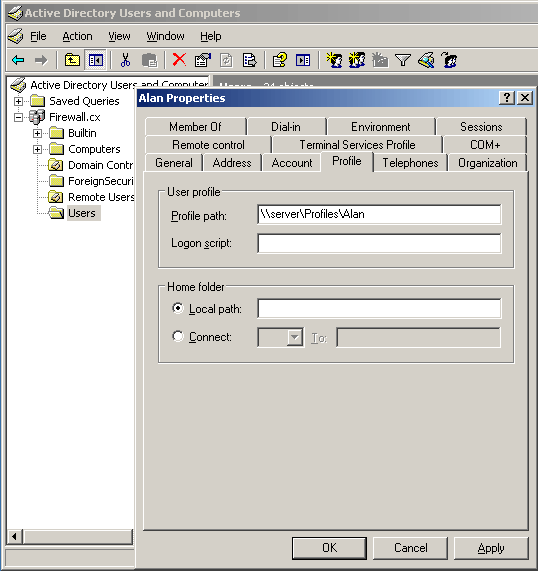
14. The Properties window for the user account appears as shown in the figure below.
15. Click the Profile tab and then type the path of Profile folder that you had created on a network server in the Profile path field:
16. Click OK and then quit the Computer Management snap-in.
This completes the process of creating a roaming user profile. Now when the user logs into any computer in the domain using his/her credentials, a copy of the user profile stored on the network will be copied to that computer with all the latest changes that the user might have made.
Usually when there are a few roaming profiles enabled in a domain then the login and log off become extremely slow. This happens mostly when roaming users save large files on their computers. Each time a logs off or logs on to a different computer the large files take long time to save on the network and recover from the network.
The solution to this problem is to use Folder Redirection along with roaming user profiles. The Folder redirection feature allows you to redirect folders such as Application Data, Desktop, My Documents, and Start Menu to a different network location. These folders are typically used to save the large files. When Folder Redirection is used then Windows understand that those particular folders need not be touched each time a roaming user logs in/off. These folders will only be touched by Windows when a user actually tries to open a file from them.
Another solution to control the growing size user profiles is to create Mandatory User Profiles for the users. However, you can use such profiles when you want to provide identical desktop configurations to all the roaming users. When mandatory user profiles are configured for the users, the users are not allowed to change their profile settings and thus the profiles size always remain manageable. To make a roaming user profile mandatory, you need to rename the Ntuser.dat file as Ntuser.man in the user's profile folder.
Article Summary
Roaming user profiles are simply collections of settings and configurations that are stored on a network location for each user. Once you perform some fairly simple configurations, every time a user logs on to a machine in your domain with his domain credentials, that user's settings will follow him and automatically be applied to his log-on session for that particular machine.
This article covered the creation of roaming user profiles in a Windows server active directory.
If you have found the article useful, we would really appreciate you sharing it with others by using the provided services on the top left corner of this article. Sharing our articles takes only a minute of your time and helps Firewall.cx reach more people through such services.
Your IP address:
3.129.211.190
Wi-Fi Key Generator
Follow Firewall.cx
Cisco Password Crack
Decrypt Cisco Type-7 Passwords on the fly!


