How To Configure DHCP Server On A Cisco Router
DHCP (Dynamic Host Configuration Protocol) is the protocol used by network devices (such as PCs, network printers, etc) to automatically obtain correct network parameters so they can access network and Internet resources such as IP Address, Default Gateway, Domain Name, DNS Servers and more.
A DHCP Server is considered necessary in today's networks. Devices usally found providing this service are Windows servers, routers and layer 3 switches.
This article describes how to configure basic DHCP parameters on a Cisco router, enabling it to act as a DHCP server for your network.
Cisco Router DHCP Configuration - Example Scenario
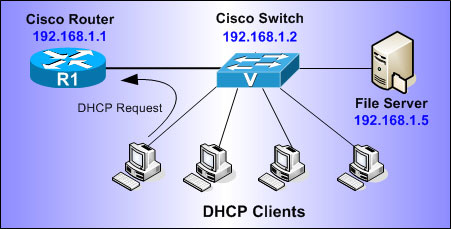
For the sake of this article, suppose we have the network shown in the following diagram, for which we would like to enable the DHCP service on our Cisco router.
The router will act as a DHCP server for the 192.168.1.0/24 network. IP Addresses already assigned to our switch (192.168.1.2) and File Server (192.168.1.5) will be excluded from the DHCP pool, to ensure they are not given out to other hosts and cause an IP address conflict.
First step is to enable the DHCP service on our router, which by default is enabled.

First step is to enable the DHCP service on our router, which by default is enabled:
R1(config)# service dhcp
Next step is to create the DHCP pool that defines the network of IP addresses that will be given out to the clients. Note that 'NET-POOL' is the name of the DHCP IP Pool we are creating:
R1(dhcp-config)# network 192.168.1.0 255.255.255.0
This tells the router to issue IP addresses for the network 192.168.1.0, which translates to the range 192.168.1.1 - 192.168.1.254. We will have to exclude the IP addresses we want later on.
We now define the DHCP parameters that will be given to each client. These include the default gateway (default-router), dns servers, domain and lease period (days):
R1(dhcp-config)# dns-server 192.168.1.5 195.170.0.1
R1(dhcp-config)# domain-name Firewall.cx
R1(dhcp-config)# lease 9
The domain-name and lease parameters are not mandatory. By default, the lease time for an IP address is one day, however we can specify any time range we need. For example, if we need to set the lease time for 4 hours and 30 minutes we would use the following command under our DHCP pool:
R1(dhcp-config)# lease 0 4 30
The above command is interpreted as follows: 0 (Zero) days, 4 hours and 30 minutes.
All we need now is to exclude the IP addresses we don't want our DHCP server giving out. Drop back to 'global configuration mode' and enter the following:
R1(config)# ip dhcp excluded-address 192.168.1.10
This excludes IP addresses 192.168.1.1 - 192.168.1.5 & 192.168.1.10. As you can see, there's an option to exclude a range of IP addresses or a specific address.
The above configuration is all you need to get the DHCP server running for your network. We'll provide a few more commands you can use to troubleshoot and ensure it's working correctly.
The following command will allow you to check which clients have been served by the DHCP:
Bindings from all pools not associated with VRF:
IP address Client-ID/ Lease expiration Type
Hardware address/
User name
192.168.1.6 0100.1e7a.c409 Jan 19 2009 03:06 PM Automatic
192.168.1.7 0100.1e7a.c3c1 Jan 19 2009 09:00 PM Automatic
192.168.1.8 0100.1ebe.923b Jan 19 2009 02:25 PM Automatic
192.168.1.9 0100.1b53.5ccc Jan 19 2009 02:03 PM Automatic
192.168.1.11 0100.1e7a.261d Jan 19 2009 07:52 PM Automatic
R1#
Notice that IP addresses 192.168.1.5 & 192.168.1.10 have not been assigned to the clients.
Summary
In this article we've covered how to configure a Cisco router to act as a DHCP server and configure available DHCP options. We also saw how you can obtain general information about the service. There are more options available with the DHCP service, however this basic article should cover most of your network needs.
Future DHCP articles will explore advanced options and debugging for more complex networks containing VLANs and IP Telephony.
Your IP address:
18.219.93.1
Wi-Fi Key Generator
Follow Firewall.cx
Cisco Password Crack
Decrypt Cisco Type-7 Passwords on the fly!


